Chapter 9: The Vegetable Garden
Chapter Contents
- Planning the Vegetable Garden
- Soil Preparation
- Selecting Gardening Equipment
- Seed for the Garden
- Transplants for the Garden
- Irrigating the Home Garden
- Fertilizing the Garden
- Weed Control in the Garden
- Vegetable Planting Guide
- Intensive Gardening Methods
- Container Gardening
- Vegetable Gardening in the Fall
- Season Extenders
- Organic Vegetable Gardening
- Additional Resources
Growing your own vegetables can be a rewarding experience. It allows you to engage directly with your food from garden plot to plate and can easily be done on a scale that matches the space that you have available for growing. However, vegetable gardening does not come without challenges. From environmental factors such as water, temperatures, and sunlight, to biotic factors such as insects and diseases, vegetable gardeners have their work cut out for them. With proper planning, regular observation, and careful maintenance, you can keep your garden bountiful for many months. The use of season extenders and careful planning can even allow you to grow throughout the year in Virginia.
Planning the Vegetable Garden
When planning your garden, it is important to ask a few basic questions:
- Who will be doing the gardening work?
- Will the home garden be a group project with family members who will work willingly through the season to a fall harvest, or will you be handling the hoe alone? Remember, a small, weed-free garden will produce more than a large, weedy mess.
- What fruits and vegetables do you and your family like to eat? There is no value in taking up gardening space with vegetables that no one eats. Make a list of your family favorites, ranked in order of preference. This will make a useful guide in deciding how much of each to plant. Successive plantings of certain crops, such as beans, will give a longer harvest period and increase your yield. List recommended varieties and planting dates.
- How do you plan to use the produce from your garden? If you plan to can, freeze, dry, or store it, this will be a factor in planning the size of the garden and in selecting the varieties to grow. Some varieties have much better keeping quality than others. Care should be used in choosing the kinds of plants to grow, making sure the varieties you select are adapted to your area and intended use. It is always advisable to use a crop calendar suited for your area (see VCE publication “Virginia’s Home Garden Recommended Planting and Harvest Dates” 426-331).
- How much space is available to be converted into usable garden space?
Vegetable versus Fruit
Vegetables are edible plant parts that do not contain seeds, for example kale, asparagus, carrots, broccoli, and onions. Fruits are the ripened ovaries of a female flower part that contains seeds, and in some cases may only be the seed itself, for example squash, tomatoes, cucumbers, peppers, peas, avocados and many other products of flowering plants. However, through common usage we have come to refer to many fruits as vegetables in our gardens and in the produce section of the grocery store. Classification is often ambiguous and it really depends on whether you are engaged in a botanical or culinary discussion.
Economic Value of Crops
It is difficult to evaluate the economic value of crops grown in the vegetable garden due to the different lengths of time they require for maturity and harvest, the availability of varieties and vegetable types not generally found in the marketplace, and the lack of comparison values for vegetables that are not acceptable by commercial standards (cracked tomatoes, crooked cucumbers, etc.), but which are perfectly usable by the gardener. Nevertheless, several studies have attempted to determine what crops bring the most value per square foot of garden space, partly to aid small-space gardeners in making decisions about what to plant. Of course, if no one in the family likes beets, there is no point in growing them just because they are economically valuable, but this list may help you determine what vegetables to plant and what to buy.
High value crops:
- Tomatoes
- Green bunching onions
- Carrots
- Leaf lettuce
- Cucumbers
- Turnip (greens and roots)
- Peppers
- Summer squash
- Broccoli
- Edible pod peas
- Head lettuce
- Onion storage bulbs
- Swiss chard
Low value crops (Not recommended for small spaces):
- Corn
- Winter squash
- Pumpkins
- Melons
Values above are based on pounds produced per square foot, retail value per pound at harvest time, and length of time in the garden. Miniature varieties or trellising may increase value per square foot.
Planting Guidelines
- Winter is the best time to plan next year’s garden and to order the seed.
Plan the garden on paper first. Draw a map showing the arrangement and spacing of crops. To keep the garden growing all season, make a spring, summer, and fall garden plan. - Plan the garden and order seeds at least three months earlier. Some plants may be started indoors as early as mid-February.
- In your plan, place tall and trellised crops on the north side of the garden so they won’t shade the shorter vegetables.
- Group plants by length of growing period. Plant spring crops together so later crops can be planted in these areas when the early crops mature. Consider length of harvest as well as time to maturity. Place perennial crops to the side of the garden where they will not be disturbed by any tillage that is needed.
Locating the Garden
- Vegetables grow best in a level area with loose, well-drained soil and at least six hours of sun (eight to ten hours is ideal).
- Use contour rows, terraces, or raised beds on sloped or hillside sites to avoid erosion. South-facing slopes are warmer and less subject to damaging frosts.
- Avoid placing the garden in low spots, at the base of a hill, or at the foot of a slope bordered by a solid fence. Such areas are slow to warm up in the spring, and frost settles in these places since cold air naturally drains into low areas.
- Avoid windy locations; if you must plant in a windy spot, build or grow a windbreak.
- Locate near a good and easily accessible supply of water.
Avoid planting near trees and shrubs; they compete for nutrients and water and may cause excessive shading. - Sites too near buildings may result in plants not receiving enough sunlight. Observe shading patterns through the growing season, if possible, before starting the garden. If you have a shaded area you wish to use anyway, plant shade-tolerant crops. If needed, increase effective light by providing reflective surfaces around plants.
- Try not to plant vegetables from the same family (peas and beans or squash and pumpkin) in exactly the same location in the garden more often than once in 3 years. Rotation prevents the buildup of insects and disease. Use previous year’s plans as guides for rotating crops.
- Avoid locating the garden on a site where buildings with lead paint have stood; lead may be present in toxic amounts. If you are unsure about your chosen location, have the soil tested for lead content, or have tissue analyses done on some leafy vegetables.
- Gardening where sod has long been established, whether converted pastures or lawns, requires a great deal of preparation to eliminate weeds.
Treated Wood in the Vegetable Garden
Some home gardeners have been concerned with the safety of pressure-treated landscape timbers in the garden, specifically when used to build raised bed vegetable gardens. On 12 February 2002, the Environmental Protection Agency (EPA) announced a voluntary decision by the wood preserving industry to phase out the use of wood preservatives that contain arsenic for any wood products destined for consumer use. The phaseout was completed by 31 December 2003. This transition affects virtually all residential uses of wood treated with chromated copper arsenate, also known as CCA, including wood used in play structures, decks, picnic tables, landscaping timbers, residential fencing, patios, and walkways/boardwalks. Since January 2004, the EPA has not allowed CCA products for any of these residential uses.
The EPA has not concluded that there is unreasonable risk to the public from CCA lumber, but believes that any reduction in exposure to arsenic is desirable. More information on CCA lumber can be found here.
CCA has been replaced with two other formulations in pressure-treated wood – ACQ and copper azole (CA-B). Information on ACQ can be found here.
Soil Preparation
The ideal vegetable garden soil is deep, well-drained, high in organic matter, and has good structure. Proper soil preparation provides the basis for good seed germination and subsequent growth of garden crops. The regular addition of manure, compost, cover crops, and other organic materials can raise the soil nutrient level to a point at which the need for the addition of synthetic fertilizers is greatly reduced.
Soil Testing
For a new garden, check initial soil fertility and pH by having your soil analyzed (a pH reading indicates acidity/alkalinity of soil, where 7 is neutral and lower pH values are more acidic, higher values more alkaline). Once the garden is established, check soil fertility and pH at least once every 3 years. Vegetables vary to some extent in their nutrient and pH requirements, but most garden crops will do well within a soil pH range of 6.2 to 6.8. This is a little below neutral, or slightly acid. If soil pH is too high or low, poor crop growth will result, largely due to the effects of pH on the availability of nutrients to plants. In addition to pH, a soil test will also give you an idea of the relative nutrient level of phosphorus (P) and potassium (K) in the soil.
Soil sample kits are available for checking your soil’s pH and may be obtained from your local VCE office. VCE will email results to you with recommendations for adjusting pH and correcting nutrient deficiencies, if any are present. Private companies also do soil testing; these give detailed reports and recommendations in many cases, but may be expensive (3 to 5 times the cost of VCE). For best results, carefully follow the instructions for taking the soil sample.
Adjust nutrient and pH by adding recommended fertilizers and/or lime for raising the pH (or acidifiers if the goal is to lower the soil pH). In new garden spots, remove sod with a spade before tilling. You can use the sod to patch your lawn or put it in a compost pile to decay. Next, plow, spade, or rotary till the soil when soil moisture conditions are right. To test, pick up a handful of soil and squeeze it. If it stays in a ball, it is too wet. If it crumbles freely, it should be about right. Excessively dry soil is powdery and clumpy and may be difficult to work. Take samples at the surface and at a 4- to 6-inch depth in several locations in the garden plot. If soil sticks to a shovel, or if when spading the turned surface is shiny and smooth, it is still too wet. Working soils when excessively wet can destroy soil structure, which may take years to rebuild. Plowing with a tractor when the soil is wet is especially damaging, causing the formation of a compaction layer that will inhibit root growth. Soils with adequate humus levels generally allow more leeway because of their improved structural qualities.
Just prior to planting, break up large clods of soil and rake the bed level. Small-seeded vegetables germinate best in smooth, fine-surfaced soil. Do not pulverize the seedbed soil. This destroys the structure and promotes crusting and erosion problems.
Tilling the Soil
Traditional tilling
The type of equipment used to prepare your garden will depend on the size of the garden, your physical ability, time, and budget. Options include hand-digging with a spade or shovel, tilling with a power rotary tiller, and using a small garden tractor or a full-sized farm tractor. Rotary tilling (rototilling) is sufficient for most home gardens, as long as plant debris accumulation is not out of hand. Rotary tilling mixes the upper layers of soil rather than completely turning the soil over. One possible harmful effect of rototilling is the formation of a compaction layer just beyond the reach of the tines. Use of deep-rooted cover crops or double digging can do much to prevent or alleviate this problem when it exists. Small gardens can be designed using raised beds which may be worked entirely by hand if the area is small enough.
Gardeners often wonder whether to plow/till in the spring or fall. Working the soil in fall has several advantages over the traditional, spring plowing. It allows earlier spring planting, since the basic soil preparation is already done when spring arrives. Turning under large amounts of organic matter is likely to result in better decomposition when done in the fall, since autumn temperatures are higher than those of early spring, and there is more time for the process to take place. Insects, disease organisms, and perennial weeds may be reduced by killing or inactivating them through burial or exposure to harsh winter weather. The physical condition of heavy clay soils may be improved by the alternate freezing and thawing, which breaks up tightly aggregated particles. Also, snow is trapped between the hills of roughly plowed soil, so more moisture is retained than on flat, bare ground. Incorporation of limestone in the fall gives it time to become integrated with the soil and influence spring plant growth.
Fall plowing alone is not recommended for hillside or steep garden plots, since soil is left exposed all winter, subject to erosion when spring rains come. If a winter cover crop is grown to improve soil and prevent erosion, the ground will have to be tilled in the fall to prepare the soil for seed and again in spring to turn under the green manure. Spring plowing is better for sandy soils and those where shallow tilling is practiced. Generally, most gardens must be disked or rotary tilled in the spring to smooth the soil for planting.
No-till or low-till methods
Tilling has become a staple of spring garden preparation for many gardeners. It can be used to prepare a clean seed bed, kill weeds, and warm up the soil for planting. However, in recent years many gardeners have started to focus on low or no-till gardening to help avoid some of the negative impacts regular tilling can cause.
It’s important to consider the three indicators of soil health when making decisions regarding tillage in your garden:
- Physical: The physical structure of the soil has an impact on drainage and retention of water, soil erosion, surface crusting and more.
- Biological: The biological properties of soil include all the organisms present in the soil food web, from bacteria and fungi to earworms and plants.
- Chemical: The chemical properties of the soil are the nutrients (both macronutrients and micronutrients), pH, and more.
Tillage of the soil, especially deep tilling practices, can negatively affect the physical and biological properties of the soil. Tilling causes a weakening of the microbial community within the soil. This impacts the soil’s ability to hold water, sequester and hold carbon, and hold other important nutrients. Tilling can also increase the potential for erosion and can increase the loss of organic matter in the soil. Untilled soil is rich in both fungi and bacteria, whereas tilled soil disrupts the important fungal community and may not have access to the benefits fungi provide to the garden.
Low and no-till gardening techniques
There are many techniques that can assist with low or no-till gardening. Here are a few steps that you can take in your garden to work toward a low or no-till garden:
Soil coverage: In low-till gardening, the soil should be covered throughout each season. This could be through cover crops, mulched crops, or a layer of mulch (for example straw, grass, chopped leaves) on top of the soil. Mulches from the fall can be left to protect the soil during the winter months.
Leave the roots: Rather than pulling out the entire plant at the end of the season, cut plants at the soil level so their roots remain. The roots remaining in the soil will slowly decompose and add organic matter to your soil.
Spring practices: A broad fork can be used in the spring to add soil amendments, lessen compaction, and prepare the garden for planting. Organic mulches left over from the winter can be pulled back and planted.
Cover crops: The root system of cover crops benefits the soil and the cover crop becomes manure when incorporated into the soil. Cover crops can be planted within plantings or when not growing crops. Learn more about cover crops, including recommendations for cover crops in Virginia, in Chapter 2 “Soils and Nutrient Management.”
Weed control
Tilling can kill weeds that have begun to grow. However, this risks bringing dormant weed seeds to the surface as they can remain viable in the soil for many years.
Rather than tilling for weed control, you can kill weeds with black plastic, cardboard, or tarps. This smothering layer should remain on the soil for several months to a year.
The aforementioned practice of soil coverage is also crucial for weed control. Covering the soil will make it more difficult for weed seeds to germinate and grow.
If weeds do germinate and take hold in the garden, pulling by hand or using a hoe or other garden tool will help to control. This should be done before weeds are able to go to seed.
Soil Amendments
Any addition to the soil that improves its physical or chemical condition is considered a soil amendment. Many types of amendments are valuable to the home gardener.
Amendments to change pH and nutrient levels and improve soil quality
Lime, sulfur, and gypsum are common amendments used to change soil pH. The correct soil pH is essential for optimum plant growth. Dolomitic limestone adds calcium and magnesium while also raising soil pH (lowering acidity). Gypsum adds calcium and some sulfur but does not enhance the structure of eastern U.S. clay soils as it does soils in western states. Agricultural sulfur is used to acidify alkaline soil. The amount to add depends on the current and desired pH, which is one good reason to have garden soil checked every 3 years.
Wood ashes can be used as a soil amendment to raise soil pH. They contain potash (potassium), phosphate, boron, and other elements. Apply twice as much ash as limestone to achieve the similar desired effect. Ashes should not come into contact with germinating seedlings or plant roots as they may cause root burn. Spread in a thin layer over the winter, and incorporate into the soil; check pH yearly if you use wood ashes. Never use coal ashes or large amounts of wood ash (no more than 20 lbs. per 1000 square feet), as toxicity problems may occur.
In special cases, perlite is sometimes added to clays to attempt to improve soil texture. Soil texture is defined as the percents sand, silt, and clay present in a soil. However, these inert materials can be expensive, and extremely large quantities are needed to do any good. Compost, manures, and other amendments usually serve the purpose better and are more economical at improving the structure or way the soil binds together.
Organic matter is a great soil improver for both clay and sandy soils. Good sources of organic matter include manures, leafmold, sawdust, and straw. These materials are decomposed in the soil by soil organisms. Various factors, such as moisture, temperature, and nitrogen availability, determine the rate of decomposition. Adequate water must be present, and warm temperatures will increase the rate at which the microbes work. Proper balance of carbon and nitrogen (C to N ratio) in the material is needed to ensure adequate nutrient availability both to growing plants and decomposition organisms. Adding nitrogen may be necessary if large amounts of undecomposed leaves, straw, sawdust, or other high-carbon substances are used. Nitrogen is used by the soil organisms to make proteins for their own bodies, and if it is not present in sufficient amounts, the microbes have no qualms about stealing the plant’s share. Generally, fresh green wastes, such as grass clippings, are higher in nitrogen than dry material.
The use of compost is one way to get around the decomposition problem. Compost is usually made by the gardener from plant and/or animal wastes. Correct composting is an art that can result in a valuable nutrient and humus source for any garden. The basis of the process is the microbial decomposition of mixed, raw, organic materials to a dark, fluffy product resembling rich soil, which is then spread and worked into the garden soil (refer to Chapter 2: “Soils and Nutrient Management” for more information).
Animal manures are commonly used as a garden soil amendment, though care should be taken to avoid food safety concerns related to pathogens like E. coli; see the VCE publication “Food Safety for School and Community Gardens” FST-60P for more information. The value of manure in terms of the nutrients it contains varies. Fresh horse, sheep, rabbit, and poultry manures are quite high in nitrogen and may even burn plants if applied directly to a growing garden. They are best applied in the fall and tilled under. Manure usually has fewer total nutrients than synthetic fertilizers in terms of N, P, and K, but is a valuable soil builder. Unfortunately, manures may be a source of weed seeds; if this is a problem, composting in a hot pile may help. In urban areas, manure may be hard to come by, but country dwellers usually find it plentiful. Be cautious of the source of your manure as manure can sometimes be contaminated by herbicides.
Another source of inexpensive soil improvement that should not be underestimated is the cover crop. Green manures, or cover crops, such as annual rye, ryegrass, and oats, are planted in the garden in the fall for incorporation in the spring. For best results, seed should be sown a month before the first killing frost. In a fall garden, plant cover crops between the rows and in any cleared areas. Cover cropping provides additional organic matter, holds nutrients that might have been lost over the winter, and helps reduce erosion and loss of topsoil. Legume cover crops can increase the amount of nitrogen in the soil and reduce fertilizer needs. A deep-rooted cover crop allowed to grow for a season in problem soil can help break up hardpan and greatly improve tilth. Even home gardeners can benefit from the use of cover crops! See the VCE publication “Virginia Cover Crops Fact Sheet Series No. 2” CSES-121NP for more information. Incorporate green manures at least two weeks before planting vegetables; they should not be allowed to go to seed before incorporation.
The regular addition of manure, compost, cover crops, and other organic materials can raise the soil nutrient level to a point at which addition of synthetic fertilizers is greatly reduced. This comes about not only through the intrinsic fertilizing value of the amendment, but also through the increased action of microorganisms on soil and humus particles; humic acid (and other acids) helps to release previously locked-up nutrients naturally present in the soil, and the extra surface area provided by humus serves as a reserve, holding nutrient elements until they are needed by plants. This highly desirable soil quality does not come about with a single or even several additions of organic material, but rather requires a serious, long-term, soil-building program. Information is widely available in books and magazine articles on this subject.
Remember, your soil is alive and constantly changing. By keeping it fertile and rich, many gardening problems may be diminished. Soil is the base for plant growth, and much attention should be paid to getting and keeping it in the best condition.
Selecting Gardening Equipment
Garden catalogs and stores are full of gardening tools, many highly specialized; some are very useful, others are nice but not necessary, and some are gimmicks. The gardening equipment you need depends on the size of your garden, your age and strength, and whether you want to get the job done in a hurry or prefer to take your time. The minimum equipment needed by most gardeners includes a shovel or spade, a hoe, a rake, and a trowel. A wide selection of styles is available in each of these tools, and the choice is really one of personal preference and price range. You can get the best value by knowing each tool’s uses and particular qualities to look for and buying at the end of the gardening season when prices are reduced.
Hand Tools for Cultivating
A gardenshovel with a pointed blade is lighter and smaller than most other shovels and is well suited for use in the garden. Shovels are earth movers with dish-shaped blades mounted to the handle at an angle. A spade has a flat blade and is designed for cutting rather than lifting or moving soil. Spades are excellent for shaping straight-sided trenches and for edging beds. For general-purpose digging, lifting, and moving, a long-handled shovel is ideal. Both shovels and spades come with long or short handles in standard or D-shaped styles. Choice of handle style will depend on personal preference; long handles offer greater leverage and are less tiring to use in many cases. Short handles are often thicker and stronger than long ones.
A spading fork is another useful digging tool. It is ideal for breaking and turning heavy soils and for loosening subsoil layers when double digging a bed. Turning coarse compost, spreading mulches, and digging root crops are other jobs suitable for a spading fork.
A hoe is essential in any garden for preparing the seed bed, removing weeds, and breaking up encrusted soil. Several different hoe styles are available. The pointed hoe with a heart-shaped blade is lightweight and useful for opening seed furrows and cultivating between plants. The hula, or action hoe, is a type of scuffle hoe which is very lightweight and maneuverable. Pushing and pulling it just under the soil surface eliminates newly emerging weeds and breaks up any crust on the soil surface. This type of hoe is most easily used on soil which is not compacted, since the blade is relatively thin and lacks the clod-breaking capabilities of a heavier hoe; it is also less effective in cases where weeds have gotten a good start. Other types of scuffle hoes are somewhat more sturdy and are used with a pushing motion rather than pushing and pulling. Probably the most commonly used hoe is the square-bladed hoe, which lends itself well to many garden tasks.
A sturdy rake is useful in clearing the garden of rocks and debris. It is also helpful in spreading mulches and smoothing seedbeds. The correct-sized rake for you depends on your size and strength and the uses you intend to put it to. As the number of tines increases, the rake weight also increases; avoid choosing a rake so heavy it will tire you after a short period of use. The length of the rake handle is important too; the tip of the handle should come up to your ear when standing upright. A handle that is too short will make your work harder, causing excess bending and back strain.
Especially in the spring, a trowel will be in constant use for those many digging jobs that need not be done with full-sized tools. The trowel is perfect for transplanting seedlings and bulbs or digging shallow-rooted weeds. Small hand cultivators, often sold in sets with trowels, are good for weeding in small areas and between closely spaced plants. Another useful, small digging tool is appropriately named a digger (or weeder, cultivator, or asparagus knife). This tool is available from most hardware or discount stores inexpensively. It is useful for digging up weeds with long taproots, such as dandelions or Queen Anne’s lace, or for prying out Johnson grass rhizomes. It consists of a long (10 to 14 inch), solid-metal rod with a two-pronged blade at one end and a handle at the other. This tool is practically indestructible and well worth the small investment of its price for people with strong hands and arms or extremely loose, friable soil.
Rotary Tiller
The power rotary tiller is probably the power tool most commonly purchased by gardeners. Whether or not a gardener needs a rotary tiller depends on the size of the garden, the gardener’s capabilities, and the intended uses of the tiller. Renting a tiller or hiring someone to till the garden meets the needs of most gardeners. If a tiller is to be purchased, tiller selection may be based on the nature of the work to be done, the quality of the machine and ease of repair, as well as personal preference. The tiller’s engine powers rotating blades, or tines, which can make garden soil loose and fluffy, ready for planting. It can also chop up plant debris and mix it into the soil. Incorporating organic matter and manures into the garden is easily accomplished with a tiller, reducing the tendency to procrastinate this necessary chore. The ability of the tiller to do these jobs effectively is a function of its weight, strength, design, and type of tines, as well as the type of soil. A heavy, powerful tiller is most effective on stony, clay soils, while in a small garden or one with light soil, a smaller tiller is more appropriate. Very lightweight tillers, known as soil blenders, are designed mainly for raised-bed gardening.
Rotary tillers are available with front-mounted or rear-mounted tines. Rear-tined tillers are generally better able to self-propel on all but the rockiest soils. They travel straight and can produce a footprint-free seedbed.
Front-tined tillers are usually light in weight, but may require considerable strength to guide them through the soil. The front-tined tiller may not make as straight a pass as the heavier, rear-tined type, but it is much easier to turn. Due to this increased maneuverability, the front-tined tiller is easy to use in small gardens and in corner areas.
The purchase of a tiller is a major investment. Features to look for include heavy cast-iron, steel plate and tubing, heavy bearings, strong welds used in construction, and easily operable controls. Ask to look at the operator’s manual and try to determine how simply a tune-up can be performed; you may save yourself a great deal of trouble and money if you can replace plugs and points yourself. Also consider the locations of service centers and parts dealers. Careful attention to your needs, abilities, and price range is important. Talk to people who have the types of tillers in which you are interested. If possible, borrow or rent various types of machines and send for information before buying. If you are considering the purchase of a rotary tiller, plan to do so well ahead of time so you will not be rushed into a purchase. A good tiller is a long-term investment, so plan carefully before you buy.
Carts/Wheelbarrows
A wheelbarrow or cart is very handy to have in and around the garden area. Select one that is easy to handle when full, with good maneuverability. Durable construction is well worth paying for to ensure a long, useful life. Be sure to choose the size appropriate for your physical abilities and garden needs. A wheelbarrow generally requires more strength and control than do most garden carts, but many of the small carts generally available are made of relatively flimsy metal and, though inexpensive, are not particularly long lasting or suitable for heavy items such as rocks. Again, consider your needs. If you plan to haul only light straw, leaves, sawdust, and such materials, then one of the small carts may be suitable. For heavier jobs, you may need a wheelbarrow; or investigate some of the newer garden carts, especially those with bicycle-size tires, which make easy work of hauling. They are made of heavy plywood and metal, but are well balanced and easy to maneuver. These carts do, however, involve a sizeable investment (up to several hundred dollars) and a large storage space. Therefore, only serious gardeners or those with other uses for such a cart find them economical.
Watering Equipment
Watering is an essential garden job for most gardeners. An adequate water supply makes a big difference in garden yields. Purchase of watering equipment depends on available facilities, water supply, climate, and garden practices. If there is no outdoor spigot near the garden, the expense of having one installed may be greater than the benefits gained except in very drought-prone areas or in the case of a gardener who is fully dependent on the season’s produce. Where rainfall is adequate except for a few periods in the summer, it is wise to keep watering equipment simple; a garden hose with a fan-type sprinkler will suffice. In areas where there are extended periods of hot weather without precipitation, the local water supply is likely to be short. Overhead sprinklers are wasteful of water, so in this case, a drip irrigation system may be in order. Drip irrigation puts water right at the roots and doesn’t wet plant leaves, helping to prevent disease. Timers are available that allow automatic watering with drip and some other systems. Cultural practices, such as mulching, close plant spacing, shading, cultivar selection, and wide bed planting, will significantly reduce water needs. See Chapter 17: “Water Quality and Conservation” for more information.
Monitoring Equipment
While soil testing products can be purchased for household use, your VCE office can provide reliable, affordable testing through Virginia Tech’s Soil Testing Lab. After initially testing the soil for a new garden, testing does not have to be done more frequently than once every 3 years for most gardening purposes. Some gardeners like to monitor the soil quality frequently, though, making a commercial soil test kit a worthwhile purchase. An electronic pH tester is on the market for those who like gadgets.
Soil temperature is critical for many vegetable and food crops. Soil thermometers measure soil temperature and the internal temperature of a compost pile. Seeds planted in soil that is too cold will often rot, and seedlings planted in cold soil will delay growth until the ground temperature gets warmer and will likely result in stunted plants. A soil thermometer will assist the gardener in determining the proper time to plant seeds and seedlings. Optimal soil temperatures for seeds of early vegetables are between 45 and 50ºF and 50 to 55ºF for seedlings. Soil temperatures for warm weather species should be at least 65ºF.
Serious gardeners often invest in various types of equipment that allow them to monitor the microclimate around the garden or indoors. A rain gauge is an inexpensive device that helps the gardener determine if enough rain has fallen for garden plants. A minimum-maximum thermometer is a costly, but often useful, device to measure nightly lows and daytime highs within an area; these are especially valuable in a greenhouse. Light and watering meters can be purchased for indoor plant monitoring.
Seeding and Planting Tools
Depending on the size of your garden and your physical abilities, you may want to consider a row seeder. Seeders with wheels make easy work of sowing long rows of corn or beans or other vegetables. Seeders are available which make a furrow, drop the seeds properly spaced, and close up the furrow behind the seed – all in one pass. They do not perform quite as well on small-seeded crops, and it is not really worth the effort of setting up a seeder for small areas. A hand-held seeder is probably a better choice for this type of work. Broadcast seeders are available for sowing cover crop seeds, such as rye or wheat, but are generally not necessary for the average home gardener since broadcasting is easily done by hand once the proper technique is learned.
Trellises/Cages
Trellises and cages for vining plants save space and keep fruits off the ground, reducing the amount of stooping required for harvest and damage to plants. Look for heavy-duty materials and sturdy design that will stand up to rain, wind, and drying. Wire should be of a heavy gauge, and wood should be treated with non-phytotoxic (i.e., not toxic to plants) materials. Metal parts should be rustproof or at least rust-resistant. If you build your own, you will probably save a considerable amount of money and get better quality for the price.
Harvesting and Processing Equipment
Harvesting equipment varies depending on the size and type of garden, whether or not food is to be stored, and the way in which it is to be processed. Baskets are useful to most gardeners. They may be purchased at garden or farm supply stores or sometimes may be scrounged from local grocery stores or fruit stands. Berry baskets for small fruits, baskets with handles for carrying vegetables, and peck or bushel baskets for storage are all useful. Fruit pickers are nice and easy to use for tall fruit trees. A sharp knife for cutting vegetables off plants is handy and helps prevent plant damage. See the VCE publication “Food Safety for School and Community Gardens” for more information.
Purchasing and Maintaining Tools
When purchasing tools, buy for quality rather than quantity. Your tools will be in frequent use throughout the garden season. Cheap tools tend to break or dull easily and may end up making a job unnecessarily difficult and frustrating. Quality tools will last and tend to increase in value with time if well kept. Tools should be lightweight for easy handling, but heavy enough to do the job properly. Metal parts should be of steel, which will stay sharp, keep its shape, and outlast softer metals. Wooden handles may split or splinter; fiberglass handles are more durable.
Keeping a tool clean and sharp will increase its usefulness and lengthen its life. Learn the techniques of sharpening each tool, and practice them frequently. Professional gardeners often carry sharpening stones or files while working and sharpen after every hour or so of use. Clean your tools after each use and oil the blades.
The last and perhaps most important step in tool care is to put tools in their proper places. Tools left in the garden will rust and break and can be a safety hazard. Some gardeners paint handles with a bright color to make their tools easy to spot. And, if each tool has its own place in the storage area, it is simple to determine if tools are missing before closing up for the day.
Before winter sets in, sharpen tools, then coat metal parts lightly with oil and rub wooden handles with boiled linseed oil. Drain power tools of gasoline, and obtain filters, mufflers, and tune-up parts so a fall or late-winter tune-up can get the machine ready for early spring jobs. Have maintenance done, if needed, in the winter, when demand is lowest and you can afford to let the repairer take his or her time.
In fall, any trellises or cages that have been outdoors should be cleaned and stored inside if possible. Traps and other pest control devices should also be stored if the pest season is over. Cold frames and other season extenders should be protected from damage by ice and snow or high winds, and once their job is done, should be repaired if necessary and stored. Tools with wheels, like cultivators, seeders, and carts, should be oiled and stored. With thoughtful selection and care your tools will give many years of service. This extra help in the garden will pay for itself in time.
Seed for the Garden
Choosing and purchasing vegetable seeds are some of the most enjoyable gardening pastimes. Thumbing through colorful catalogs and dreaming of the season’s harvest are ways to make winter seem a little warmer. Seed purchased from a dependable seed company will provide a good start toward realizing that vision of bounty. Keep notes about the seeds you purchase, such as their germination qualities, vigor of plants, tendencies toward insects and disease. From this information, you can determine whether one seed company is not meeting your needs, or whether the varieties you have chosen are unsuitable for your area or gardening style. For example, if powdery mildew is a big problem on squash family plants in your area, the next year you may want to look for mildew-resistant varieties.
Saving Seed
Saving your own vegetable seed is another pleasurable activity. It offers a sense of self-sufficiency and can save money. You can maintain a variety that is not available commercially, which helps to perpetuate a broad genetic base of plant materials. Breeders often search for old-time varieties when attempting to improve commercial plants, since the heirloom vegetables (as they are sometimes called) often have disease and pest resistance or cold hardiness. Participation in a seed exchange can be a rewarding experience. You may find unusual varieties available for trade in an exchange that are otherwise hard to find.
There are certain considerations to be kept in mind when saving seed. Seeds from hybrid varieties will not produce plants that are the same as the parent plants; therefore, only open-pollinated varieties should be used for home seed production. Some seed dealers have responded to the increasing interest in seed saving by clearly marking open-pollinated varieties in their catalogs. Another consideration in saving seed is the possibility of carrying seed-borne diseases into the next year’s crop. Many commercially grown seeds are grown in dry areas unsuitable to fungal, viral, and bacterial diseases that may be present in your region. Take care to control diseases that can be carried in seed. Another weather-related factor is the speed of drying of seeds, which can be adversely affected by frequent rains and/or humidity. Finally, if you’ve ever saved squash seed during a season in which you had more than one type of squash planted, you have probably seen the weird results that may be obtained from cross pollination! Saving seeds from cross-pollinated crops is not generally recommended for the novice because of problems with selection, requirements for hand pollination and isolation, biennial habits, and genetic variability. Failure to let the seed mature adequately on the plant also leads to nonviable seed. Common, self-pollinated annual plants from which seed may be saved include lettuce, beans, peas, herbs, and tomatoes.
Beans and peas: Allow seed pods to turn brown on the plant. Harvest pods, dry for one to two weeks, shell, then store in a cool (below 50ºF), dry environment in a paper bag.
Lettuce seed: Cut off seed stalks when fluffy in appearance, just before all the seeds are completely dried. Seeds will fall off the stalk and be lost if allowed to mature on the plant. Dry the harvested seed stalk further; shake seeds off; then store in a cool, dry environment in an envelope or small glass jar.
Herb seeds: Herbs vary in the way their seeds are produced. In general, allow herb seeds to stay on the plants until they are almost completely dry. Some seed heads, such as dill, will shatter and drop their seeds as soon as they are dry. Watch the early ripening seeds; if they tend to fall off, harvest the other seed heads before they get to that point, leaving several inches of stem attached. Hang several stems upside down, covered with a paper bag to catch falling seed, in a warm, dry place until the drying is complete. Remove seeds from the seed heads and store in envelopes or small glass jars. Some herb seeds (dill, celery, anise, cumin, coriander, and others) are used for flavoring and are ready to use once dry.
Tomato seeds: Pick fruit from desirable plants when ripe. Cut fruit and squeeze out pulp into a container. Add a little water, then let ferment two to four days at room temperature, stirring occasionally. When seeds settle out, pour off pulp and spread seeds thinly to dry thoroughly. Store in an envelope or glass jar in a cool, dry place.
Lost Crops of Africa for Virginia Farmers
Harbans Bhardwaj, Professor, Virginia State University
The need for crop diversification and the development of crop varieties for sustainable food production are important factors for production of adequate and nutritious food for a growing human population worldwide. This is especially true of US agriculture, which depends upon a limited number of crops. The National Research Council of The National Academy of Science has published three books related to the “lost crops of Africa” (grains, vegetables, and fruits) which provide extensive information about new potential crop plants.
There are about 374,000 plant species currently known to science, with about 308,000 being vascular plants and about 295,000 being flowering plants. Out of all known plant species, some 120 are cultivated for human food but just nine of these crops supply over 75 percent of global plant-derived energy intake and of these, only three – wheat, rice and corn – account for more than 50 percent.
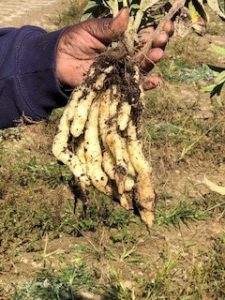
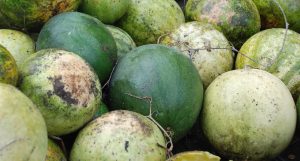
The New Crops Program of Virginia State University initiated a project in 2017 with five crops from West Africa: African eggplant, African potato, African rice, Egusi watermelon, and Marama bean. The aim of this project was to address the lack of local production/supply of exotic specialty crops to an increasing population of immigrants and Americans that appreciate different types of cuisine, enhancing income of small farmers via production of specialized crops to support tastes of immigrants, and crop diversification. Imports of exotic crops are currently supplying the market for immigrant needs and the local specialty crop industry is missing the potential improvement in economic, environmental and social sustainability.
All of these crops grew well in Virginia. Thirty-nine lines of African rice planted in May 2019 produced seed when planted without standing water indicating that African rice has potential for production in non-traditional areas. Marama bean grew but did not produce flower or seed. Being a perennial crop, it would need protection from cold in the winter in Virginia. Growth of African potato plants was impressive – both types (rotundifolius and esculentus) produced marketable tubers. Seventeen lines of African eggplant with different colored fruits, transplanted in the field from greenhouse grown seeds, grew well and produced marketable fruits. Twenty-two lines of Egusi watermelon produced several fruits each. These watermelons have bitter flesh but are grown for their seeds that are edible and very nutritious. During 2019 and 2021, several lines of finger millet and pearl millet (additional crops) were successfully produced – these crops were successful even without water in a tunnel. Further work to introduce several African crops to Virginia farmers is continuing.
Saving purchased seed
Properly stored seed remains viable for different lengths of time depending on the type of seed. Be aware that seed companies may store seeds up to the number of years of their viability prior to selling them. See table 9-1 “Viability of saved vegetable seeds.” To ensure maximum viability of purchased seed after its package has been opened, remaining seed should be sealed in airtight containers and stored in a cool, dark location. Glass jars with rubber seals, such as baby food jars or canning jars, or tightly sealed plastic bags stored inside jars are good choices. Be sure to label all stored seed with the species name and original package date.
Be sure to label remaining stored seed clearly with permanent (preferably waterproof) ink, indicating the variety and date saved. To test for germination, sprout seeds between moist paper towels; if germination is low, either discard the seed or plant enough extra to give the desired number of plants.
Table 9-1: Viability of vegetable seeds (average number of years seeds may be saved)
| Vegetable | Years | Vegetable | Years |
|---|---|---|---|
| Asparagus | 3 | Leek | 2 |
| Bean | 3 | Lettuce | 6 |
| Beet | 4 | Muskmelon | 5 |
| Broccoli | 3 | Mustard | 4 |
| Brussels sprouts | 4 | Okra | 2 |
| Cabbage | 4 | Onion | 1 |
| Carrot | 3 | Parsley | 1 |
| Cauliflower | 4 | Parsnip | 1 |
| Celery | 3 | Pea | 3 |
| Chinese cabbage | 3 | Pepper | 2 |
| Collard | 5 | Pumpkin | 4 |
| Corn, sweet | 2 | Radish | 5 |
| Cress, water | 5 | Rutabaga | 4 |
| Cucumber | 5 | Spinach | 3 |
| Eggplant | 4 | Squash | 4 |
| Endive | 5 | Tomato | 4 |
| Kale | 4 | Turnip | 4 |
| Kohlrabi | 3 | Watermelon | 4 |
Depth for Planting Vegetable Seeds
The depth to cover seeds when you plant them depends on a number of factors, such as the size of the seed, the type of soil you have, and the season of the year. As a general rule, vegetable and flower seeds should be covered about four to five times their lateral diameter or width (not their length). Most seeds should be planted from 1/4 to 1/2 inch deep. There are exceptions, however, so read the packet directions. Small seeds, such as celery, should be planted only 1/8 inch deep. Vine crops, sweet corn, and beans can be planted 1 inch or deeper. Some seeds require light for germination and should not be covered at all. These instructions apply to seeds planted both inside and out.
Starting Seeds Indoors
To start seeds indoors, it is important to have enough light. More homegrown seedlings are probably lost due to this one factor than to any other. Vegetable seedlings grown under low-light conditions are likely to be leggy and weak, and many will fall over under their own weight after they are 3 to 4 inches tall. If you do not have a sunny room or back porch with a southern exposure, you will probably need supplemental lights. A simple, fluorescent shop light with one warm-white and one cool-white bulb (or with grow lights) will suffice.
It is probably easiest to use a soilless or peat-lite mix to start seedlings, since garden soil contains disease organisms that can be highly destructive to small plants. Soil can be sterilized in the oven by baking it at 200ºF until the internal soil temperature is 180ºF. It should be held at that temperature for 30 minutes. This is a smelly process, but it works. Garden soil for use in containers should be conditioned with compost and perlite to prevent excess moisture retention and/or shrinkage. A homemade mix of 50% vermiculite and 50% fine sphagnum peat is excellent for starting seeds. Fertilizer at half the normal strength may be added to the mixture. Mix well before using.
Many types of containers can be used to start seeds. Flats or other large containers may be used; plant in rows, and grow seedlings until they have one or two sets of true leaves, then transplant into other containers for growing to the size to transplant outdoors. Seedlings may also be started in pots, old cans, cut-off milk cartons, margarine tubs, egg cartons, or other throwaways. The pop-out trays found at garden centers are easy to use and reusable after cleaning. Peat pots or organic cow pots are nice, especially for large seeds. Sow one or two large seeds directly in each pot.
Table 9-2: Plant production data chart
* indicates transplants not recommended
| Crop | Days to Emergence from Seeding | Optimum (degrees F) Germination Soil Temperature Range | Number of Weeks to Grow Transplants |
|---|---|---|---|
| Beans | 5-10 | 65-85 | * |
| Beets | 7-10 | 50-85 | * |
| Broccoli | 3-10 | 50-85 | 5-7 |
| Cabbage | 4-10 | 50-85 | 5-7 |
| Carrots | 12-18 | 50-85 | * |
| Cauliflower | 4-10 | 50-85 | 5-7 |
| Celery | 9-21 | 50-65 | 10-12 |
| Chard, Swiss | 7-10 | 65-85 | * |
| Corn, Sweet | 5-8 | 65-85 | * |
| Cucumber | 6-10 | 65-85 | 4 (peat pots) |
| Eggplant | 6-10 | 65-85 | 6-9 |
| Lettuce | 6-8 | 50-65 | 3-5 |
| Melons | 6-8 | 65-85 | 3-4 (peat pots) |
| Okra | 7-10 | 65-85 | * |
| Onion | 7-10 | 65-85 | 8 |
| Parsley | 15-21 | 50-85 | 8 |
| Peas | 6-10 | 50-65 | * |
| Pepper | 9-14 | 65-85 | 6-8 |
| Potatoes, Sweet | (slips) | 65-85 | 5-6 |
| Radish | 3-6 | 50-65 | * |
| Spinach | 7-12 | 50-65 | * |
| Squash | 4-6 | 65-85 | 3-4 (peat pots) |
| Tomato | 6-12 | 65-85 | 5-7 |
| Turnip | 4-8 | 50-65 | * |
Thin to one seedling per pot. Peat pots or organic cow pots may be planted directly in the garden; do not allow the edges of the pot to stick out above the soil since they will act as a wick and moisture will evaporate from this exposed surface. Many seed starting kits are now available and provide everything you will need, but remember that these are used as part of a hobby and not as a way to save money instead of buying plants at a nursery.
Regardless of the type of container chosen, fill it three quarters full with seed-starting mixture and sow the seeds. Cover to the specified depth, and water the mix. It may help to cover the containers with plastic wrap to maintain a steadier moisture level. Seeds and seedlings are extremely sensitive to drying out. They should not be kept soaking wet, however, since this condition is conducive to damping-off, a fungus disease deadly to seedlings. Damping-off can be prevented or diminished by sprinkling milled sphagnum moss, which contains a natural fungicide, on top of the soil.
Another option is to use peat pellets or cubes, which are preformed and require no additional soil mix. The pellets or cubes are soaked until thoroughly wet, then seeds are planted in the holes provided. The whole pellet or cube may then be planted without disturbing the roots. The only disadvantage to this method is the expense.
Starting Seed Outdoors
Many seeds may be sown directly in the garden. If garden soil is quite sandy or is mellow (with a high content of organic matter), seeds may be planted deeper. Young seedlings can emerge quite easily from a sandy or organic soil. If garden soil is heavy with a high silt and/or clay content, however, the seeds should be covered only two to three times their diameter. In such soils, it may be helpful to apply a band of sand, fine compost, or vermiculite, 4 inches wide and 1/4 inch thick, along the row after seeds are planted. This will help retain soil moisture and reduce crusting, making it easier for seedlings to push through the soil surface.
Soil temperature has an effect on the speed of seed germination. In the spring, soil is often cold, and seeds of some plants will rot before they have a chance to sprout. Table 9-2: Plant production data chart gives optimum soil temperatures.
When planting the fall garden in midsummer, the soil will be warm and dry; therefore, cover the seeds six to eight times their diameter. They may need to be watered each day with a sprinkler or a sprinkling can to promote germination. Moisture can also be retained with a shallow mulch or by covering the row with a board until the seeds have sprouted. Shading the area may be helpful to keep the soil cooler for seed germination, especially when planting cool-weather crops in summer. Seed that requires a lower germination temperature may benefit from being kept in the refrigerator for two weeks before planting or from pre-sprouting indoors. Pre-sprouting is a useful technique for planting in cold soils, as well. However, seed must be handled very carefully once sprouted to prevent damaging new root tissue.
Planting Layouts
Row planting
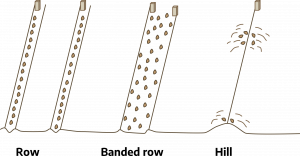
A string stretched between stakes will provide a guide for nice, straight rows, if desired. Use a hoe handle, a special furrow hoe, or a grub hoe to make a furrow of the appropriate depth for the seed being planted. Sow seed thinly; it may help to mix very small seed with coarse sand to distribute the seeds more evenly. Draw soil over the seed, removing stones and large clods. Firming soil so that it is in direct contact with seeds improves uptake of soil moisture by the seed, hastening germination. When plants have grown to 4 to 6 inches tall, thin according to seed packet instructions to provide adequate room for growth.
Wide row or banded planting
Many crops may be sown in wide rows or bands instead of in long, single rows. Crops of spinach, bean, pea, beet, lettuce, and carrot are especially suited to this type of culture. Sow seed evenly over the area, then rake it in, firming soil over the seeds. Thin young plants to allow room for growth.
Hill planting
Larger vegetables, such as melons, squash, sweet corn, and cucumbers, may be planted in hills or groups of seed. Soil is mounded to a foot or so in diameter, at the recommended spacing. Plant four to six seeds per hill, firming the soil well. Thin the seedlings to three to five plants per hill.
Transplants for the Garden
Most gardeners use transplants in the garden at some time or another to give long-season plants a chance to grow to maturity under their preferred weather conditions or just to lengthen the harvest season. Cool-season crops, such as head lettuce, broccoli, and celery, would not have a chance to reach their prime harvest stage in most places in Virginia in spring if not given those extra weeks indoors to get a head start. Tomatoes would certainly have a short harvest period in all but southeastern Virginia if started from seed in the ground, and peppers and eggplants might not produce at all if not grown from transplants.
Due to the amount of time, attention, and need for controlled growing conditions, many gardeners prefer to purchase plants for their gardens. However, for a larger choice in varieties and the control of plant production from seed to harvest, others choose to start their own transplants.
Annual Plant Transplants
Transplants of annual vegetables and flowers should be stocky, healthy, free from disease, and have good roots. They should not be too small or too mature (tomatoes will transplant all right with fruits already on them, but many other plants will drop flowers or fruit after transplanting). Be sure plants have been hardened off so that they will easily adapt to environmental change but not be so hardened that they are woody and yellow, otherwise they will not resume active vigorous growth. Successful transplanting is achieved by interrupting plant growth as little as possible. Younger plants that do not have dense roots growing out of the pot will usually become established fastest.
Have garden soil prepared before transplanting. All additives that require time to break down, such as manure, limestone (if called for in soil test), fertilizer, and green manure, should be incorporated the autumn before planting if at all possible. Well-decayed compost may be added just before planting.
Transplant on a shady day, in late afternoon, or in early evening to prevent wilting. It helps to water the plants several hours before transplanting. When using bare-root plant soak the roots thoroughly an hour or two before setting them out in the garden. They should not be allowed to dry out completely at any time. Handle plants carefully. Avoid disturbing the roots or bruising the stems. Dig a hole large enough to hold the roots of the plants. Set the plants slightly deeper than previously planted and at recommended intervals. Tomatoes are an exception to the rule of how deep to plant; they will develop roots all along the stems, and you can plant deep enough to leave only two or three sets of leaves exposed. Press soil firmly around the roots of transplants. Water the plants once or twice during the next week if there is insufficient rain.
Table 9-3: Ease of transplanting
| Easily Survive Transplanting | Require Care in the Operation | Not Successfully Transplanted by Usual Methods |
|---|---|---|
| Broccoli | Celery | Bean |
| Brussels sprouts | Eggplant | Carrot |
| Cabbage | Melon | Corn, Sweet |
| Cauliflower | Onion (tends to bolt) | Cucumber (tend to stop growth) |
| Chard | Pepper | Melon |
| Chinese cabbage | Okra | |
| Lettuce | Pea | |
| Sweet potato slips | Squash | |
| Tomato |
Perennial Plant Transplants
When buying small fruit plants and perennial crowns, such as asparagus, order early or buy from reliable local outlets. Occasionally stores allow plants to dry out, so watch for this, especially if you are buying sale plants. Select varieties that will do well in your growing conditions. For perennial plants, it will pay to do some research to find out what the major disease and insect pests are and buy resistant varieties. Dormant, bare-root plants, and 1- or 2-year-old crowns are preferred. Look for roots that are full, slightly moist, and have color. Roots that are dry brown or soggy black are indicative of poor storage and will probably not give good results. Check crowns for signs of viable buds. Inspect plants for signs of insects or disease. If you receive plants by mail that are not satisfactory, do not hesitate to send them back.
Once you have the plants, keep the roots moist (but not soaking wet) by misting occasionally, and do not allow them to freeze or be exposed to high temperatures. If it is necessary to keep the crowns for more than a few days, place in cold storage (not freezing) or else heel in a trench of moist soil in a shaded location. Pack soil firmly against roots to eliminate any air pockets.
Transplant crowns according to directions, digging holes large enough to give the roots plenty of room to spread. Remove any discolored or dried out roots. Perennial plants appreciate a dose of compost mixed into the bottom of the hole. Once transplanted, shade the plants if necessary and water when needed. Extra care at the beginning of their growth will result in productive, healthy plants.
Irrigating the Home Garden
Adequate soil moisture is essential for good crop growth. A healthy plant is composed of 75 to 90% water, which is used for the plant’s vital functions, including photosynthesis, support (rigidity), and transportation of nutrients and sugars to various parts of the plant. During the first two weeks of growth, plants are becoming established and must have water to build their root systems.
During the growing season of April through September, vegetable crops need enough water each week to wet the soil down 5 to 6 inches. In most soils, this means that about 1 inch of water needs to be applied each week in the form of rainwater, irrigation water, or a combination of both. Keep a rain gauge near the garden or check with the local weather bureau for rainfall amounts, then supplement rainfall with irrigation water, if needed. There are ways, however, to reduce the amount of water you have to add.
During dry periods, one thorough watering each week of 1-2 inches of moisture (65-130 gallons per 100 square feet, or approximately 2/3 gallon per square foot) at one time is usually enough for most soils and will add enough water to soak the soil to a depth of 5-6 inches (this varies with the nature of the soil). Do not water again until the top few inches of soil begin to dry. A trickle irrigation system will be much more efficient in use of water. It uses more frequent or continuous application of water in smaller amounts to prevent soil dryness. If there is any doubt, dig down 6 inches into the soil to check for moisture, but take care not to damage any roots.
Frequent, light watering will only encourage shallow rooting which will cause plants to suffer more quickly during drought periods, especially if mulches are not used. On the other hand, too much water, especially in poorly drained soils can be as damaging to plant growth as too little water. A good rule to remember is to water deeply and infrequently.
For some diseases of vegetable crops, wet foliage provides a favorable environment for disease development. Overhead watering (in which water is sprayed down on crops, directly wetting the crop surface) should be conducted so as not to prolong the time leaves are wet from dew (which is usually late evening through 9-10:00 am); therefore, late morning or early evening are the worst times for overhead watering. Watering in the early morning, which is usually the least windy time of day, also helps to decrease evaporation.
Reducing Water Demands
All of the water you apply may not be available to plants, particularly if the soil is a heavy clay. Clay particles hold soil moisture tightly. If, for example, there are 4 1/2 in of water per foot of this type of soil, there may be as little as 1 1/2 in available for plants. A relatively high level of humus in the soil, brought about by the addition and breakdown of organic matter, can improve this proportion to some extent. By causing clay particles to form aggregates or large clumps of groups of particles, humus also adds air spaces to tight clays, allowing moisture to drain to lower levels as a reserve, instead of puddling and running off the top of the soil.
The water-holding capacity of sandy soils is also improved by addition of organic matter. Though most soil water in sandy soil is available, it drains so quickly that plants are unable to reach water after even a few days following a rain. Humus in sandy soil gives the water something to cling to until it is needed by plants. Addition of organic matter is the first step in improving the moisture-holding capacity of the soil (see subsequent discussion of reducing water demands).
Mulching is a cultural practice that can significantly decrease the amount of water to be added to the soil. A 2- to 3-inch (6 to 8 inches of loose straw or leaves will compact to 2-3 inches of mulch) organic mulch can reduce water needs by as much as half by reducing evaporation of moisture directly from the soil. Organic mulches themselves hold some water and increase the humidity level around the plant. If they become dry it may be necessary to add an extra 1 or 2 inches of water when overhead watering to soak through the mulch. Plastic mulch also conserves moisture, but may increase soil temperatures dramatically during the summer (to the detriment of some plants and the benefit of others) if not covered by other mulch materials or foliage.
Shading and the use of windbreaks are other moisture-conserving techniques. Plants that wilt in very sunny areas can benefit from partial shade during the afternoon in summer. Small plants, in particular, should be protected. Air moving across a plant carries away the moisture on the leaf surfaces, causing the plant to need more water. In very windy areas, the roots often cannot keep up with leaf demands, and plants wilt. Temporary or permanent windbreaks can help tremendously.
During those times when cultural practices simply aren’t enough, when rainfall is sparse, and the sun is hot, watering can benefit the garden with higher yields or may save the garden altogether in severe drought years.
By knowing the critical watering periods for selected vegetables, you can reduce the amount of supplemental water you add. This can be important where water supplies are limited. In general, water is most needed during the first few weeks of development, immediately after transplant, and during development of fruits.
Specifically, the critical watering periods for selected vegetables are:
- Asparagus – Spear production, fern development
- Beans – Pod filling
- Broccoli – Head development
- Cabbage – Head development
- Carrot – Seed emergence, root development
- Cauliflower – Head development
- Corn, sweet – Silking, tasseling, ear development
- Cucumber – Flowering, fruit development
- Eggplant – Flowering, fruiting
- Lettuce – Head development; moisture should be constant
- Melons – Flowering, fruit development
- Peas – Pod filling
- Tomato – Flowering, fruiting
In areas prone to repeated drought, look for drought-resistant varieties when buying seed or plants.
Irrigation practices, when properly used, can benefit the garden in many ways:
- Aid in seed emergence
- Reduce soil crusting
- Improve germination
- Reduce wilting and checking of growth in transplants
- Increase fruit size of tomato, cucumber, and melon
- Prevent premature ripening of peas, beans, and sweet corn
- Maintain uniform growth
- Improve the quality and yields of most crops
Irrigation Methods
The home gardener has several options for applying water to plants. Most gardeners either use overhead watering (a watering sprinkler can, a garden hose with a fan nozzle or spray attachment, portable lawn sprinklers), or a drip application (a perforated plastic soaker hose, drip or trickle irrigation, or a semiautomatic drip system). When properly cared for, quality equipment will last for a number of years.
Some basic techniques and principles for overhead watering:
- Adjust the flow or rate of water application to about 1/2 inch per hour. A much faster flow than this will cause runoff, unless the soil has exceptionally good drainage. To determine the rate for a sprinkler, place small tin cans at various places within the sprinkler’s reach, and check the level of water in the cans at 15-minute intervals.
- When using the oscillating type of lawn sprinklers, place the sprinkler on a platform higher than the crop to prevent water from being diverted by plant leaves and try to keep the watering pattern even by frequently moving the sprinkler, overlapping about half of each pattern.
Several types of drip or trickle equipment are available. A soaker hose is a fibrous hose that allows water to seep out all along its length at a slow rate. Soaker hoses have a short lifespan and are more expensive than polyethylene drip tubing or drip tape. Drip tubing or drip tape allow water to drip out of small holes spaced along the tubing; a flow regulator usually has to be included with the system so water can reach the end of the hose (rather than spraying out at full force). Special, double-wall type of irrigation hoses help maintain an even flow. Drip tape or tubing should be placed with holes facing up (as recommended by manufacturers) along one side of the crop row or underneath mulch. Finally, there is the emitter-type system, best used for small, raised-bed or container gardens, in which short tubes, or emitters, come off a main water supply hose. Emitters put water right at the roots of the desired plants. This type of system is best used in combination with a coarse mulch or black plastic.
Fertilizing the Garden
The amount of fertilizer to apply to a garden depends on the natural fertility of the soil, the amount of organic matter present, the type of fertilizer used, and the crop being grown. The best way to determine fertilizer needs is to have the soil tested. Soil testing is available through your local VCE office.
Vegetables fall into three main categories according to their fertilizer requirements: heavy feeders, medium feeders, and light feeders. It may be advantageous to group crops in the garden according to their fertilizer requirements to make application easier. (For a complete discussion of fertilizers, refer to Chapter 2 “Soils and Nutrient Management”).
Weed Control in the Garden
Most gardeners are well aware that weeds readily grow wherever their seeds are dispersed. Weed seeds are able to remain viable in the soil for years until the environmental conditions become conducive for their growth. Many weeds that would otherwise not be growing in a lawn or natural areas appear to spring up as if by magic when the soil is cultivated. These weeds are competition for intentionally placed plants in our garden and can take up valuable water, nutrients, sunlight, and space if not properly managed.
Beneficial Weeds
Despite the competition they can create for our cultivated species, weeds can also have positive benefits for the garden. Some, such as morning glory and even thistles, have flowers that rival those intentionally planted in flower beds. Some weeds can also provide additional habitat and food sources to beneficial insects gardeners spend time and energy working to encourage.
Wild plants also have other virtues. Parts of some plants are used in natural dyes and other homemade products. Weeds can be a good source of nitrogenous materials for the compost pile if pulled before flowering. Certain soil problems (e.g., deficiencies, pH changes, soil compaction, etc.) can be brought to light by the presence of weed species that thrive under those specific conditions.
Control: Cultivation
Vegetable gardeners hoping to control weed populations and lessen their impact on vegetable development should strive to remove weeds while they are young. There are a number of methods to remove weeds from the garden, from hand pulling to using hand tools or motorized equipment. See the “Selecting Gardening Equipment” section of this chapter for more information on the common tools available for gardeners.
Turning under weeds can add beneficial organic matter to the soil, however, many plants with heavy roots or rhizomes may survive. Hand-pulled weeds, except for rhizomatous grasses, may be laid on top of the soil to dry out after shaking them free of soil and will eventually have the same effect of adding organic matter to the soil. However, if rain is predicted within a day or two, it’s better to collect the weeds and add them to the compost pile rather than turning under. Rain may wash soil around the roots allowing weeds to survive. Do not leave weeds that have begun to go to seed. In order to destroy weed seeds in compost, the pile must reach 140 degrees F. Failure to reach this temperature and destroy seeds means viable weed seeds may remain in compost. If not dried up completely, grasses that spread by rhizomes or stolons also present a problem. In these cases it’s best to either: let the trash collectors take the weeds, burn the weeds and spread the ashes in the garden (if local ordinances permit), or maintain a “pit” compost pile (where the organic material is actually buried in the soil) for these items, kitchen scraps, and other problematic materials. Gardeners can also work to reduce weed growth by mowing, especially before seed heads are fully formed.
Cultivation is best timed when soil is somewhat moist. Avoid pulling, hoeing, or otherwise cultivating when soil is wet so as not to impact soil structure. Dry soil can also make cultivation more difficult. Planning for this work a day or two after a rain or irrigation will increase the ease of removing weeds in the garden. If you have a choice, remember that the work will be much more pleasant in the cool temperatures of early morning or evening. On hot, summer afternoons, you are likely to fatigue more easily; get a sunburn; or suffer from sun poisoning, sunstroke, or worse. Wear protective clothing if you must work when it’s sunny, and stop frequently for rest and water.
Control: Mulching
Mulching is an optional alternative to weeding but requires a reliable source for these materials. Thick layers of organic mulch will not allow most annual weeds to grow. Black plastic can often control weeds with runners that organic mulch can’t control. For weed suppression in paths, newspaper or cardboard covered with organic mulch will offer good control. Sawdust, however, is not recommended for use right around plants because of its tendency to crust and because bacteria take nitrogen from the soil, thus from the vegetables, to break down the sawdust.
Control: Close Spacing
Once vegetable plants are established, if they have been planted close enough to each other, they will shade the soil and help to prevent the growth of many weeds. In order to achieve this effect, plants need to be spaced so that leaves of the adjacent plants touch and form a canopy at their mature growth stage.
Control: Cover Crops
Another method of long term weed control is the integration of cover crops into your garden beds. This method can reduce available gardening space, but can be beneficial both for weed control and soil health. Cover crops must be maintained throughout their lifecycle, including mowing, harvesting, or plowing them under at the right time in their growth cycle. These additional steps can be time-consuming and may require specialized tools. See Table 9-5 for more information on using cover crops.
Control: Herbicides
There are herbicides labeled for home vegetable garden use but they should be used sparingly and with caution. Always follow the instructions listed on the label, including what plants it can be used for, application rates, and more. The label is the law and you should not deviate from it. To learn more about pesticide use and safety, please see Chapter 7: “Integrated Pest Management.”
Vegetable Planting Guide
Use the VCE publication “Virginia’s Home Garden Vegetable Planting Guide” and your USDA zone to determine your last frost date and determine the earliest and latest planting dates for vegetable crops. This is particularly important in making maximum use of garden space by following one crop with another as soon as the first harvest is complete.
The Vegetable Planting Guide can be used to determine the approximate proper amount of crop to plant for the desired yield, the amount of seed or transplants required for that amount of crop, and proper spacing between plants in a row. In intensive, raised-bed gardens, use the in-row figures between all plants; i.e., use equidistant spacing between plants. Sow seeds to a depth three to five times the diameter of the seed. For midsummer plantings, sow up to twice this depth.
The planting date for vegetables depends on the hardiness of the particular crop. Most planting directions are based on the average frost date. Average frost date refers to the expected dates of the last frost in the spring and the first frost in the fall for a geographic location. The difference between the two average frost dates determines the average number of frost free days for crop production.

Intensive Gardening Methods
The purpose of an intensively grown garden is to harvest the most produce possible from a given space. More traditional gardens consist of long, single rows of vegetables spaced widely apart. Much of the garden area is taken by the space between the rows. An intensive garden reduces wasted space to a minimum. The practice of intensive gardening is not just for those with limited garden space; rather, an intensive garden concentrates work efforts to create an ideal plant environment, giving better yields with less labor.
Though its benefits are many, the intensive garden may not be for everyone. Some people enjoy the sight of long, straight rows in their gardens. Others prefer machine cultivation over hand weeding; though there is often less weeding to do in intensive plantings. Because of fewer pathways and closely spaced plants, the weeding that must be done is usually done by hand or with hand tools. Still other gardeners like to get their gardens planted in a very short period of time and have harvests come in all at once. The intensive ideal is to have something growing in every part of the garden at all times during the growing season.
A good intensive garden requires early, thorough planning to make the best use of time and space in the garden. Interrelationships of plants must be considered before planting, including nutrient needs, shade tolerance, above- and below-ground growth patterns, and preferred growing season. Using the techniques described below, anyone can develop a high-yielding intensive garden. For more information, see the VCE publication “Intensive Gardening Methods.”
Table 9-4: Vegetable planting guide
| Crop | Distance between plants in row | Distance between rows | Intensive spacing distances | Approximate amount of seed/ transplants for 10’ row | Approximate yield per 10’ row | Approximate number of plants per person per planting | Number of plantings spring/summer | Number of plantings fall |
|---|---|---|---|---|---|---|---|---|
| Asparagus | 12-18” | 36-48” | 15-18” | 10 crowns | 3-4 lbs | 5-10 | 1 | |
| Beans, bush | 1-3” | 24-36” | 4-6” | 1 oz seed | 3-5 lbs | 10 | 4 | |
| Beans, pole | 4-12” | 36-48” | 6-12” | 1 oz seed | 6-10 lbs | 3-5 | 2 | |
| Beans, lima | 3-6” | 24-36” | 4-6” | 1 oz seed | 4-6 lbs | 4-8 | 1 | |
| Beets | 2-3” | 12-18” | 2-4” | 1/8 oz seed | 8-10 lbs | 10-20 | 2 | 2 |
| Broccoli | 12-24” | 18-36” | 12-18” | 10 transplants | 4-6 lbs | 3-5 | 2 | 3 |
| Brussels Sprouts | 18-24” | 30-36” | 15-18” | 7 transplants | 3-5 lbs | 2-5 | 1 | |
| Cabbage | 12-18” | 18-36” | 15-18” | 10 transplants | 10-25 lbs | 4-8 | 1 | 2 |
| Chinese Cabbage | 4-30” | 18-36” | 10-12” | 10 transplants | 20-30 lbs | 6-8 | 1 | 2 |
| Carrots | thin to 1.5-2” | 6-12” | 2-3” | 1/20 oz seed | 7-10 lbs | 10-30 | 1 | 2 |
| Cauliflower | 12-24” | 24-36” | 15-18” | 10 transplants | 8-10 lbs | 3-5 | 1 | 2 |
| Chard, Swiss | 6-12” | 18-30” | 6-9” | 1/5 oz seed | 8-12 lbs | 3-5 | 1 | 2 |
| Collards, Kale | 12-24” | 18-36” | 12-15”, 15-18” | 10 transplants | 4-8 lbs | 3-7 | 1 | 2 |
| Cucumbers | 12-18” | 48-72” | 12-18” | 10 transplants | 8-10 lbs | 2-4 | 3-Feb | |
| Eggplant | 18-24” | 30-42” | 18-24” | 7 transplants | 10-12 lbs | 1-3 | 1 | |
| Kohlrabi | 4-6” | 12-36” | 6-9” | 30 transplants | 4-8 lbs | 3-6 | 1 | 2 |
| Leeks | 4-6” | 12-30” | 3-6” | 1/10 oz seed | 5-10 lbs | 10-12 | 1 | 1 |
| Lettuce, head | 6-10” | 10-18” | 10-12” | 20 transplants | 2-4 lbs | 5-10 | 3 | 3 |
| Lettuce, baby salad | 0.2-0.4” | 6-12” | 4-6” | 1/4 oz seed | 2-4 lbs | 10-15 feet of row | 2 | 3 |
| Muskmelons | 24-36” | 60-90” | 18-24” | 5 transplants | 15-25 lbs | 2-3 | 2 | |
| Mustard | 1-2” thin to 6” | 18-30” | 6-9” | 1/10 oz seed | 3-6 lbs | 5-10 | 1 | 2 |
| Okra | 12-18” | 36-48” | 12-18” | 15 transplants | 5-10 lbs | 3-5 | 2 | |
| Onions (bulbing) | 2-4” | 12-18” | 2-4” | 60 transplants | 7-10 lbs | 20-30 | 1 | |
| Peas, garden | 2-3” | 12-30” | 2-4” | 1/2 oz seed | 2-6 lbs | 20-30 | 2 | |
| Peppers | 12-24” | 30-36” | 12-15” | 10 transplants | 5-18 lbs | 3-5 | 2 | |
| Potatoes | 10-18” | 24-42” | 10-12” | 1 lb | 10-20 lbs | 10 | 1 | |
| Pumpkins | 2-4’ | 5-8’ | 24-36” | 1/20 oz seed | 10-20 lbs | 1 | 1 | |
| Radish | 3/4-1” | 6-12” | 2-3” | 1/8 oz seed | 3-5 lbs | 2 feet of row | 2 | 4 |
| Rutabaga | 3-6” | 12-30” | 4-6” | 1/8 oz seed | 8-12 lbs | 10-20 | 1 | |
| Southern Peas (Cowpeas) | 3-4” | 24-36” | 3-4” | 1 oz seed | 5-18 lbs | 20-30 | 1 | |
| Sweet Corn | 6-12” | 24-36” | 15-18” | 1/2 oz seed | 7-10 lbs | 15-20 | 5-Mar | |
| Spinach | 0.5-1” thin to 4” | 6-12” | 4-6” | 1/8 oz seed | 4-6 lbs | 15 | 2 | 2 |
| Squash, summer | 18-36” | 36-60” | 18-24” | 1/10 oz seed | 20-80 lbs | 1-2 | 3 | |
| Squash, winter | 2-4’ | 3-10’ | 24-36” | 1/10 oz seed | 10-80 lbs | 1-2 | 1 | |
| Sweet Potato | 9-12” | 30-48” | 15 slips | 8-12 lbs | 5 | 1 | ||
| Tomatoes | 18-36” | 36-50” | 18-24” | 7 transplants | 15-45 lbs | 2-4 | 2 | |
| Turnips | 2-3” | 12-24” | 4-6” | 1/8 oz seed | 8-12 lbs | 10-20 | 1 | 1 |
| Watermelons | 3-4’ | 5-10’ | 18-24” | 3 transplants | 8-40 lbs | 2 | 2 |
The Raised Bed
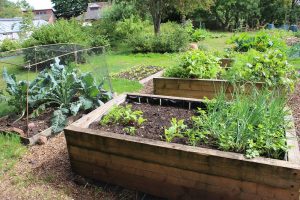
The raised bed or growing bed is the basic unit of an intensive garden. A system of beds allows the gardener to concentrate soil preparation in small areas, resulting in effective use of soil amendments and creating an ideal environment for vegetable growth. Some people like to use frames for their beds but it is not necessary and traditional cultures throughout the world do not.
Beds are generally 3 to 4 feet wide and as long as desired. The gardener works from either side of the bed, reducing the incidence of compaction between plants caused by walking on the soil.
Soil preparation is the key to successful intensive gardening. To grow so close together, plants must have adequate nutrients and water. Providing extra synthetic fertilizers and irrigation will help, but there is no substitute for deep, fertile soil high in organic matter. Humus-rich soil will hold extra nutrients, and existing elements that are “locked up” in the soil are released by the actions of earthworms, microorganisms, and acids present in a life-filled soil, making them available for plant use.
By their nature, raised beds are a form of wide-bed gardening, a technique by which seeds and transplants are planted in wide bands of several rows or broadcast in a wide strip. In general, the goal is to space plants at equal distances from each other on all sides, such that leaves will touch at maturity. This saves space, and the close plantings reduce moisture loss from surrounding soil.
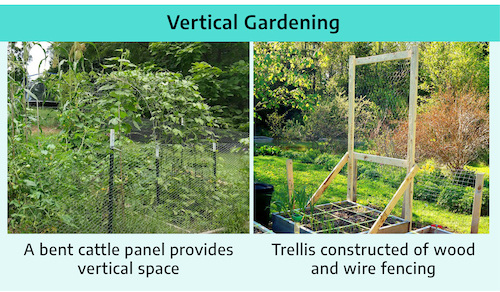
Vertical Gardening
The use of trellises, nets, strings, cages, or poles to support growing plants constitutes vertical gardening. This technique is especially suited, but not limited, to gardeners with a small garden space. Vining and sprawling plants, such as cucumbers, tomatoes, melons, and pole beans, are obvious candidates for this type of gardening. Some plants entwine themselves onto the support, while others may need to be tied. Remember that a vertical planting will cast a shadow, so beware of shading sun-loving crops, or take advantage of the shade by planting shade-tolerant crops near the vertical ones. Plants grown vertically take up much less space on the ground, and though the yield per plant may be (but is not always) less, the yield per square foot of garden space is much greater. Because vertically growing plants are more exposed, they dry out faster and may need to be watered more frequently than if they were allowed to spread over the ground. This fast drying is also an advantage to those plants susceptible to fungal diseases. A higher rate of fertilization may be needed, and soil should be deep and well-drained to allow roots to extend vertically rather than compete with others at a shallow level.
Interplanting
Growing two or more types of vegetables in the same place at the same time is known as interplanting. Proper planning is essential to obtain high production and increased quality of the crops planted. This technique has been practiced for thousands of years and is gaining widespread support in this country. To successfully plan an interplanted garden, the following factors must be taken into account for each plant: length of the plant’s growth period; its growth pattern (tall, short, below or above ground); possible negative effects on other plants (such as the allelopathic effects of sunflowers and Jerusalem artichokes on nearby plants); preferred season; and light, nutrient, and moisture requirements. Interplanting can be accomplished by alternating rows within a bed (plant a row of peppers next to a row of onions), by mixing plants within a row, or by distributing various species throughout the bed. For the beginner, alternating rows may be the easiest to manage at first.
Long-season (slow to mature) and short-season (quick to mature) plants like carrots and radishes, respectively, can be planted at the same time. The radishes are harvested before they begin to crowd the carrots. An example of combining growth patterns is planting smaller plants close to larger plants, radishes at the base of beans or broccoli. Shade tolerant species, like lettuce, spinach, and celery, may be planted in the shadow of taller crops. Heavy feeders, such as cabbage family crops, should be interplanted with less gluttonous plants.
Interplanting may reduce insect and disease problems. Pests are usually fairly crop-specific; that is, they prefer vegetables of one type or family. Mixing families of plants helps to break up large expanses of the pest-preferred crop, helping to contain early pest damage within a small area, thus giving the gardener a little more time to deal with the problem. One disadvantage is that when it does come time to spray for pests, it’s hard to be sure that all plants are protected.
Wide Row Planting
Plants are closely spaced in a raised bed or interplanted garden. Wide row planting refers to planting in such closely-spaced bands rather than in rows of individual plants. An equidistant spacing pattern calls for plants to be the same distance from each other within the bed; that is, plant so that the center of one plant is the same distance from plants on all sides of it. In beds of more than two rows, this means that the rows should be staggered so that plants in every other row are between the plants in adjacent rows. The distance recommended for plants within the row is the distance from the center of one plant to the center of the next. This results in an efficient use of space and leaves less area to weed and mulch. The close spacing tends to create a nearly solid leaf canopy, acting as a living mulch, decreasing water loss, and keeping down weed problems. However, plants should not be crowded to the point that disease problems arise or competition causes stunting.
Succession and Relay Planting
Succession planting is an excellent way to make the most of an intensive garden. To obtain a succession of crops, plant something new in spots vacated by spent plants. Planting corn after peas is a type of succession. This following of early crops with new ones provides for a gradual change from a spring garden to summer and fall gardens. Cool-season crops (broccoli, lettuce, pea) are followed by warm-season crops (bean, tomato, pepper), and where possible, these may be followed by more cool-season plants or even a winter cover crop. It is extremely important to avoid using members of the same family in succession cropping. For example, do not follow peas with beans. Insects and disease populations from the first crop will still be present, causing greater problems on the next.
Relaying is another common practice, consisting of overlapping plantings of one type of crop. The new planting is made before the old one is removed. For instance, sweet corn may be planted at two-week intervals for a continuous harvest. This requires some care, though; crops planted very early are likely to get a slower start because of low temperatures. In the case of sweet corn, it can be disastrous to have two varieties pollinating at the same time, as the quality of the kernels may be affected. Give early planted corn extra time to get started, for best results. Another way to achieve the same result is to plant, at once, various varieties of the same vegetable; for example, you can plant an early season, a mid-season, and a late-season corn at the same time and have a lengthy harvest.
Planning an Intensive Garden
Begin planning your garden early. In January or February, when the cold days of winter seem never-ending, pull out last year’s garden records and dig into the new seed catalogs. As with any garden, you must decide what crops you want to grow based on your own likes and dislikes, as well as how much of each you will need. An account of what cultivars were most successful or tasted best is helpful in making crop choices.
Good gardening practices, such as watering, fertilizing, crop rotation, composting, and sanitation, are especially important in an intensive garden. An intensive garden does require more-detailed planning, but the time saved in working the garden and the increased yields make it well worthwhile.
Starting seeds indoors for transplanting is an important aspect of intensive gardening. To get the most from the garden plot, a new crop should be ready to take the place of the crop being removed. Several weeks may be gained by having 6-inch transplants ready to go into vacated areas. Don’t forget to recondition the soil for the new plants.
Container Gardening
If you don’t have space for a vegetable garden or if your present site is too small, consider raising fresh, nutritious, homegrown vegetables in containers. A window sill, patio, balcony, or doorstep can provide sufficient space for a productive container garden. Problems with soil-borne diseases, nematodes, or poor soil can also be overcome by switching to container gardening.
Grow vegetables that take up little space, such as carrots, radishes and lettuce, or crops that bear fruits over a period of time, such as tomatoes and peppers, for best use of space and containers. Dwarf or miniature varieties often mature and bear fruit early, but most do not produce as well overall as standard varieties. With increasing interest in container gardening, plant breeders and seed companies are working on vegetables specifically bred for container culture. These varieties are not necessarily miniature or dwarf and may produce as well as standard types if properly maintained.
The amount of sunlight that your container garden spot receives may determine what crops can be grown. Generally, root crops and leaf crops can tolerate partial shade, but vegetables grown for their fruits generally need at least six hours of full, direct sunlight each day and perform better with eight to ten hours. Available light can be increased somewhat by providing reflective materials around the plants (e.g., aluminum foil, white-painted surfaces, marble chips).
Container gardening lends itself to attractive plantscaping. A dull patio area can be brightened by the addition of barrels of cherry tomatoes or a colorful herb mix. Planter boxes with trellises can be used to create a cool, shady place on an apartment balcony. Container gardening presents opportunities for many innovative ideas.
Choosing Containers
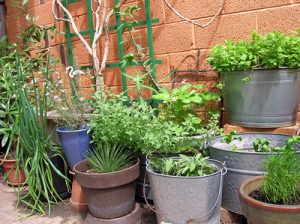
There are many possible containers for gardening. Clay, wood, plastic, and metal are some of the suitable materials. Containers for vegetable plants must (1) be big enough to support plants when they are fully grown, (2) hold soil without spilling, (3) have adequate drainage, and (4) never have held products that would be toxic to plants or people. Consider using barrels, cut-off milk and bleach jugs, window boxes, clothes baskets lined with plastic (with drainage holes punched in it), even pieces of drainage pipe or cement block. If you are building a planting box out of wood, you will find redwood and cedar to be the most rot-resistant, but bear in mind that cedar trees are much more plentiful than redwoods. Wood for use around plants should never be treated with creosote or pentachlorophenol (Penta) wood preservatives. Penta is a restricted-use chemical, not available to non-licensed individuals; however, you may still find it on some pretreated woods. Penta and creosote may be toxic to plants as well as harmful to people. The chemicals in pressure-treated wood should not leach out if handled properly.
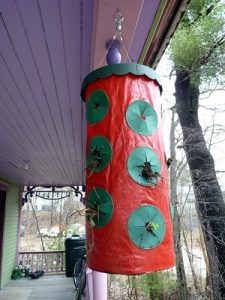
Some gardeners have built vertical planters out of wood lattice lined with black plastic, then filled with a light-weight medium; or out of welded wire, shaped into cylinders, lined with sphagnum moss, and filled with soil mix. Depending on the size of your vertical planter, 2-inch diameter perforated, plastic pipes may be needed inside to aid watering.
Whatever type of container you use, be sure that there are holes in the bottom for drainage so plant roots do not stand in water. Most plants need containers at least 6 to 8 inches deep for adequate root growth.
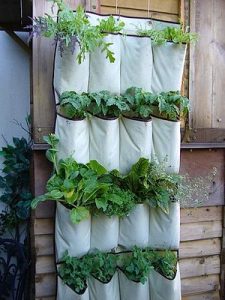
As long as the container meets the basic requirements described above it can be used. The imaginative use of discarded items or construction of attractive patio planters is a very enjoyable aspect of container gardening. For ease of care, dollies or platforms with wheels or casters can be used to move the containers from place to place. This is especially useful for apartment or balcony gardening so that plants can be moved to get maximum use of available space and sunlight and to avoid destruction from particularly nasty weather.
For information about growing vegetables in containers, including spacing and minimum container size, see the VCE publication “Vegetable Gardening in Containers.”
Media for Container Gardens
A fairly lightweight potting mix is needed for container vegetable gardening. Soil straight from the garden usually cannot be used in a container because it may contain too much clay. Clay soil consists of extremely small (microscopic) particles. In a container, the bad qualities of clay are exaggerated. It holds too much moisture when wet, resulting in too little air for the roots, and it pulls away from the sides of the pot when dry. It is also extremely heavy! Container medium must be porous to support plants, because roots require both air and water.
Packaged potting mix available at local garden centers is relatively lightweight and, if of high quality, may make a good container medium. Soilless mixes, such as peatlite mix, are generally too light for container vegetable gardening, not offering enough support to plant roots. If the container is also lightweight, a strong wind can blow plants over, resulting in major damage. Also, soilless mixes are sterile and contain few nutrients, so when fertilizers are added, trace elements must be included. If you wish to use a sterile mix you may add garden soil for weight and better water holding capacity but remember it will introduce insects, weeds, and diseases. For a large container garden, the expense of prepackaged or soilless mixes may be quite high. Try mixing your own with one part peat moss; one part garden loam; one part clean, coarse (builder’s) sand or perlite; and a slow-release fertilizer (14-14-14) according to container size. Lime may also be needed to bring the pH to around 6.5. In any case, a soil test is helpful in determining nutrient and pH needs, just as in a large garden.
Planting Container Gardens
Plant container crops at the same time you would if you were planting a regular garden. Fill a clean container to within 1 to 2 inches of the top (depending on the size of the container) with the slightly damp soil mixture. Peat moss in the mix will absorb water and mix much more readily if wetted before putting the mix in the container. Sow the seeds or set transplants according to instructions on the package. Put a label with the name, variety, and date of planting on or in each container. After planting, gently soak the soil with water, being careful not to wash out or displace seeds. Thin seedlings to obtain proper spacing when the plants have two or three true leaves. If cages, stakes, or other supports are needed, provide them when the plants are very small to avoid root damage later.
Watering Container Gardens
Pay particular attention to watering container plants. Because the volume of soil is relatively small, containers can dry out very quickly, especially on a concrete patio in full sun. Watering daily or even twice daily may be necessary. Apply water until it runs out the drainage holes. On an upstairs balcony, this may mean neighbor problems, so make provisions for drainage of water. Large trays filled with coarse marble chips work nicely. However, the pot should never be in direct contact with the drainage water as it will be absorbed and keep the soil too wet. The soil should never be soggy or have water standing on top of it. When the weather is cool, container plants may be subject to root rots if maintained too wet. Clay pots and other porous containers allow additional evaporation from the sides of the pots, and watering must be done more often. Small pots also tend to dry out more quickly than larger ones. If the soil appears to be getting excessively dry (plants wilting every day is one sign), group the containers together so the foliage creates a canopy to help shade the soil and keep it cooler. On a hot patio, you might consider putting containers on pallets or other structures that will allow air movement beneath the pots and prevent direct contact with the cement. Check containers at least once a day and twice on hot, dry, or windy days. Feel the soil to determine whether or not it is damp. Mulching and windbreaks can help reduce water requirements for containers. If you are away a lot, consider an automatic drip emitter irrigation system.
Fertilizing Container Gardens
If you use a soil mix with fertilizer added, then your plants will have enough nutrients for eight to ten weeks. If plants are grown longer than this, add a water-soluble fertilizer at the recommended rate. Repeat every two to three weeks. An occasional dose of fish emulsion or compost will add trace elements to the soil. Do not add more than the recommended rate of any fertilizer, since this may cause fertilizer burn and kill the plants. Container plants do not have the buffer of large volumes of soil and humus to protect them from over-fertilizing or over-liming. Just because a little is good for the plants does not guarantee that a lot will be better.
General Care of Container Gardens
Vegetables grown in containers can be attacked by the various types of insects and diseases that are common to any vegetable garden. Plants should be periodically inspected for the presence of foliage-feeding and fruit-feeding insects as well as the occurrence of diseases. Protect plants from very high heat caused by light reflected from pavement. Move them to a cool spot or shade them during the hottest part of the day. Plants should be moved to a sheltered location during severe rain, hail, or wind storms and for protection from early fall frosts.
Indoor Container Gardening
If you want fresh, homegrown vegetables over the winter, or if you don’t have an outdoor space in which you can place containers, it is worth trying some indoor container gardening. Of course, you cannot have a full garden in the house, but a bright, sunny window can be the site for growing fresh food all year. Some small-fruited tomatoes and peppers, several types of lettuce, radishes, and many herbs are among the plants you can include in the indoor garden.
Follow directions given above for preparing pots and for watering and fertilizing. However, note that plants will dry out less quickly indoors and will also grow more slowly, needing less fertilizer. To make watering easy it is wise to set the pots in large trays with 1-2 inches of decorative stones in them. Not only will this eliminate the need to move the plants in order to water them, which may discourage you from watering when you should, but it will also provide humidity, which is a major requirement, especially during winter when the house is warm and dry.
A sunny, south-facing window is a must for indoor vegetable growing. Fruiting vegetables, such as tomatoes and peppers, will also need supplemental light, such as a combination warm-white/cool-white fluorescent light during winter months. Insufficient light will result in tall, spindly plants and failure to flower and set fruit.
The small-fruited varieties of tomatoes, such as Tiny Tim, Small Fry, and Roma (a paste tomato), may be raised quite satisfactorily in the home. They will challenge your gardening ability and supply fruits that can be eaten whole, cooked, or served with salad. The Tiny Tim tomato grows to a height of about 12-15 inches. Small Fry, which is about 3 feet tall, and Roma will need more space and should be located on an enclosed porch or in a sun room. It may also be worth experimenting with varieties developed for hanging baskets. Some of the small-fruited peppers may be grown as indoor plants. Like tomatoes, they require warm, bright conditions to grow well indoors. Fruits will be ready to harvest from peppers and tomatoes about ten weeks after planting.
Whiteflies and aphids may present a problem on indoor tomato and pepper plants. Keep a close watch for these pests so they do not get a good start in your planting. Yellow sticky traps, either purchased or homemade, are effective in trapping whiteflies. Insecticidal soap or other pesticides approved for vegetable plants can be used to control aphids. Fortunately, you will be less likely to experience problems with outdoor pests, such as tomato hornworm, corn earworm (in peppers), and late blight, than you would if plants were outside.
For a quick-growing crop, try radishes. These must be grown very rapidly if they are to be crisp and succulent. Scatter radish seeds on moist soil in a 6-inch pot. Cover with 1/4 inch of soil, and place a piece of glass or plastic wrap over the pot to conserve moisture until the seeds germinate. Carrots are slower, but can be grown in the same way; use the small-rooted varieties, such as Little Finger, for best results indoors.
Experiment with various types of lettuce. Try leaf lettuce and the miniature Tom Thumb butterhead cultivar. Space them according to package directions. Keep lettuce moist and in a very sunny spot.
If light is limited, an old standby for fresh taste and high food value is sprouted seeds. Almost any seeds can be sprouted: corn, barley, alfalfa, lentil, soybean, rye, pea, radish, mung bean, sunflower, etc. Use seeds that have not been treated with pesticides. Use any wide-mouthed container, such as a Mason or mayonnaise jar. Soak seeds overnight, drain, and place in the container. Cover with a double cheesecloth layer held with rubber bands or a sprouting lid. Set the container in a consistently warm spot, and rinse and drain seeds two or three times daily. In three to five days, sprouts will be 1-3 inches long and ready for harvesting.
Herbs
Many herbs are less demanding than vegetable plants, and cooks find it pleasant to be able to snip off a few sprigs of fresh parsley or chop up some chives from the windowsill herb garden. Chives grow like small onions with leaves about 6 inches tall. These plants prefer cool conditions with good light, but will grow quite well on a windowsill in the kitchen. One or two pots of chives will provide leaves for seasoning salads and soups. Plant seeds in a 6-inch pot. The plants should be about 1 inch apart over the entire surface area. It will require about 12 weeks from the time seeds are planted until the first leaves can be cut. For variety, try garlic or Chinese chives, which grow in a similar fashion, but have a mild garlic flavor.
Parsley seeds can be planted directly into 6-inch pots, or young, healthy plants can be transplanted from the garden. One vigorous plant per pot is enough. Standard parsley develops attractive, green, curly leaves about 6 or 8 inches tall. Italian, or flat-leaved, parsley has a slightly stronger flavor and is a favorite for pasta dishes. Leaves can be clipped about 10 to 12 weeks after planting the seeds.
Cilantro, or the leaves of the young coriander plant, can be grown in the windowsill garden. Grow cilantro as you would parsley. Thyme and other herbs will also grow well indoors if given the right conditions.
Vegetable Gardening in the Fall
Planning for a Fall Harvest
By planning and planting a fall vegetable garden it is possible to have fresh vegetables up to and even past the first frosts. At the time when retail vegetable prices are on the rise, you can be reaping large and varied harvests from your still-productive garden site.
Many varieties of vegetables can be planted in midsummer to late summer for fall harvests. Succession plantings of warm-season crops, such as corn and bean, can be harvested until the first killing frost. Cool-season crops, such as kale, turnip, mustard, broccoli, and cabbage, grow well during the cool fall days and withstand light frosts. Timely planting is the key to a successful fall garden. Use the VCE publication “Virginia’s Home Garden Vegetable Planting Guide” to determine the appropriate date for planting (this publication has pre-calculated planting dates for fall harvest).
To calculate the time to plant a particular vegetable for the latest harvest in your area, you need to know the average date of the first killing frost and the number of days to maturity for the variety grown. Choose earliest maturing varieties for late plantings. The formula below for determining the number of days to count back from the first frost will help determine when to start your fall garden.
Number of days from seeding or transplanting outdoors to harvest
+
Number of days from seed to transplant if you grow your own
+
Average harvest period
+
Fall Factor (about two weeks)
±
Frost Tender Factor (if applicable); 2 weeks
=
Days to count back from first frost date
The frost tender factor is added only for those crops that are sensitive to frost (corn, beans, cucumber, tomato, squash), as these must mature two weeks before frost in order to produce a reasonable harvest. The fall factor takes into account the slower growth that results from cooler weather and shorter days in the fall and amounts to about two weeks. This time can be reduced two to five days by presprouting seeds. Almost any crop that isn’t grown for transplants can benefit from presprouting. Sprout seeds indoors, allowing them to reach a length of up to an inch. Sprouted seeds may be planted deeper than normal to help prevent drying out, and they should be watered well until they break the soil surface. Care should be taken not to break off the sprouts when planting them.
When planting fall crops, prepare the soil by restoring nutrients removed by spring and summer crops. A light layer of compost or aged manure or a small application of a complete fertilizer will boost soil nutrients in preparation for another crop.
Dry soil may make working the soil difficult and inhibit seed germination during the midsummer period. Plant fall vegetables when the soil is moist after a rain, or water the area thoroughly the day before planting. Seeds may be planted in a shallow trench to conserve moisture. Cover the seeds about twice as deeply as you do in the spring. An old-time trick for germinating seeds in midsummer is to plant the seeds, water them well, then place a board over the row until the sprouts just reach the soil surface; at that time, remove the board. An organic mulch on top will help keep the soil cool and moist but should not be deep enough to interfere with germination.
Mulching between rows can also help keep soil cool and decrease soil drying. In severe hot weather, a light, open type of mulch, such as loose straw or pine boughs, may be placed over the seeded row. This must be removed as soon as seedlings are up so they receive full sun. Starting transplants in a shaded cold frame or in a cool indoor area is another possibility.
The fall garden gives you a chance to try again any spring failures you might have encountered. Some crops, in fact, grow well only in the fall in certain areas. Cauliflower and long-season Chinese cabbage are two examples of crops that do not produce well in mountain areas in spring because they cannot reach maturity before the cool weather ends. Protection of vegetable plants during cold periods may extend your season even further. Although in the hot days of summer, the last thing you want to think about is planting more crops to take care of, look ahead to the fall garden. It offers its own satisfaction through prolonged harvest of fresh vegetables, savings in food costs, and the knowledge that you’re making full use of your gardening space and season.
Care of Fall Crops
The beginning of fall garden care comes when the weather and the radio station announce the first arrival of frost. Your main concern then should be to harvest all ripe, tender crops. Tomato, summer squash, melon, eggplant, cucumber, pepper, and okra are some of the crops that cannot withstand frost and should be picked immediately. Store the vegetables in a place where they can be held until needed for eating or processing. If the frost warning is mild, predicting no lower than 30ºF, try covering tender plants in your garden that still hold an abundance of immature fruit. Baskets, burlap, boxes, blankets, row covers, or buckets help protect them from the frost. Warm days after the frost will still mature some of the fruit as long as the plants have this nightly frost protection. Much will depend on the garden’s microclimate. If your spot is low and unsheltered, it is likely to be a frost pocket. Gardens sheltered from winds and on the upper side of a slope are less susceptible to early frost damage.
When using a cold frame to extend the harvest season, be sure to close the top on frosty nights to protect the plants from the cold. When the sun comes out the next morning and the air warms, open the cold frame again; leave it closed if daytime temperatures are low.
Cool-season crops, such as cabbage, cauliflower, broccoli, spinach, and Brussels sprouts, can withstand some cold. In fact, their flavor may be enhanced after a frost. They cannot stay in the garden all winter, but do not need to be picked immediately when frost comes. Kale, spinach, evergreen bunching onion, lettuce, parsley, parsnip, carrots, and salsify are some crops that may survive all winter in the garden. Mulch these overwintering vegetables with 8 inches of mulch to prevent heaving of the soil. Most of these vegetables can be dug or picked as needed throughout the winter or in early spring.
Care of Perennial Vegetables
Prepare perennial vegetables for winter around the time of first frost also. Most will benefit from a topdressing of manure or compost and a layer of mulch, which reduces damage from freezing and thawing of the soil. Dead leaf stalks of perennial vegetables, such as asparagus and rhubarb, should be cut to the ground after their tops are killed by frost, though some people prefer to leave asparagus stalks until late winter to hold snow over the bed. Don’t forget strawberry beds. Remove weeds that you let grow when you were too busy last summer. You can transplant some of the runner plants if you have had no disease problems and the plants are vigorous. Carefully dig a good-sized ball of soil with the roots. Mulch the bed well with a light material. Old raspberry canes can be cut back at this time or late in the winter see Chapter 10: “Fruits in the Home Garden.”
When tender crops have been harvested and overwintering crops cared for, pull up all stakes and trellises in the garden except those stakes that are clearly marking the sites of overwintering plants. Clean remnants of plant materials and soil from stakes and trellises. Hose them down and allow to dry. Tie stakes in bundles, and stack them so that they won’t get lost over the winter. If possible, roll up wire trellises and tie them securely. Store these items inside your attic, barn, or shed in an area where they are out of the way and where rodents and other animals cannot get to them to use as winter nests.
Preparing Soil for Winter
After caring for perennial vegetables, you are ready to prepare the soil for winter. Pull up all dead and unproductive plants, and place this residue on top of the soil to be tilled under or in the compost heap. Remove any diseased or insect infested plant material from the garden that may shelter overwintering stages of disease and insect pests. If this plant material is left in the garden, you are leaving an inoculum of diseases and insects that will begin to reproduce next spring and add to your pest problems.
Clean-up also gives you the chance to add compost to the garden. Compost contains highly nutritious, decomposed plant material and beneficial organisms and is an excellent soil builder. By spreading compost and other wastes on the soil and plowing them in, you are adding nutrients to the soil for next year’s crop. The beneficial insects and microorganisms in the compost will help integrate the compost with the soil, and the added humus will improve soil structure.
Don’t overlook other excellent sources of organic material available during the fall. Leaves are abundant, and neighbors will usually be glad to give their leaves away. Put some on the garden now, and store some for next year’s mulch. Leaves will mat if put on in too thick a layer and will not decompose quickly. You can help leaves break down more easily by running a lawn mower back and forth over the pile. Put the shredded leaves directly onto the garden or compost them.
If you wait until spring to add organic material to the garden, it may not have time to decompose and add its valuable nutrients to the soil by the time you are ready to plant, and you may have to delay planting to a later date. Hot (very fresh) manure can also burn young seedlings. By adding these materials in the fall, you give them plenty of time to decompose and blend into the soil before planting time. If you don’t have enough organic material for the entire garden, try to cover those areas that you want especially rich for next summer’s crop.
Check with your county recycling center for mulch or compost but keep in mind that it may contain weed seed or disease.
If possible, plow or rotary till in the fall. Turning under vegetation in the fall allows earlier planting in the spring and is especially good for heavy soils, since they are exposed to the freezing and thawing that takes place during the winter. This helps to improve soil structure. If you have a rainy fall or if the garden is steep and subject to erosion, you may decide you’d rather plant a cover crop for winter garden protection. A cover crop decreases erosion of the soil during the winter, adds organic material when it is incorporated in the spring, improves soil tilth and porosity, and adds valuable nutrients. Winter cover crops can be planted as early as August 1, but should not be planted any later than November 1. They should make some growth before hard frost. Where you have fall crops growing, you can sow cover crop seed between rows a month or less before expected harvest. This way, the cover crop gets a good start, but will not interfere with vegetable plant growth.
Prepare the soil for cover crop seed by tilling under plant wastes from the summer. Broadcast the seed, preferably before a rain, and rake it evenly into the soil. Spring planting may be delayed somewhat by the practice of cover cropping, since time must be allowed for the break down of the green manure. If you have crops that need to be planted very early, you may prefer to leave a section of the garden bare or with a stubble mulch (a stubble of crop residue left in place for winter).
When time or weather conditions prohibit either tilling or cover cropping, you may wish to let your garden lie under a mulch of compost, plant wastes, or leaves all winter to be plowed or tilled under in the spring. However, if you want to plant early the next spring, a mulch of heavy materials, such as whole leaves, may keep the soil cold long enough to delay planting. In this case, chop them fine enough so they will break down over the winter. The addition of fertilizer high in nitrogen will also help break down organic matter more quickly.
Table 9-5: Cover crops
| Type | Legume / Non-legume | Amount to Sow / 100ft (oz.) | When to Sow | When to Turn Under | Effects | Notes |
|---|---|---|---|---|---|---|
| Alfalfa | L | 1/2 | spring late summer |
fall spring |
Fixes 150-250lbs N/ac/yr; deep roots break up hard soil, trace elements to surface | Loam, fairly fertile soil; needs warm temps for germination. Lime if pH is low Hardy In mountains sow by Aug 10 Drought tolerant Inoculate |
| Barley | N | 4 | fall spring |
spring fall |
Adds organic matter, improves soil aggregation | Prefers medium-rich, loam soil Lime if pH is low Not as hardy as rye Tolerates drought |
| Buckwheat | N | 2 1/2 | spring summer |
summer fall |
Mellows soil; rich in potassium | Must leave part of garden in cover crop during season Grows quickly Not hardy |
| Crimson clover | L | 1/3 | spring fall |
fall spring |
Fixes 100-150lbs N/ac/yr | Not reliably hardy Sow before mid-Sept in Piedmont and mountains Not drought tolerant Lime is pH is low White clover is a bit hardier |
| Fava beans | L | plant 8" apart | early spring late summer |
early summer fall |
Some types fix 70-100lbs N/ac/yr in as little as 6 weeks Use small seeded rather than large seeded table types |
Will grow on many soil types Medium N/ac in drought tolerance Likes cool growing weather Good for mountain areas If planted in early spring can grow late vegetables Inoculate with same bacteria as hairy vetch |
| Oats | N | 4 | spring fall |
summer spring |
Adds organic matter; improves soil aggregation | Needs adequate manganese Not hardy; tolerates low pH |
| Rye, winter | N | 3 1/2 | fall | spring | Adds organic matter; improves soil aggregation | Very hardy Can plant until late October |
| Vetch, hairy | L | 2 1/2 | early fall | spring | Fixes 80-100lbs N/ac/yr | Inoculate; slow to establish Fairly hardy Till under before it seeds; can become a weed |
| Wheat, winter | N | 4 | fall | spring | Adds organic matter; improves soil aggregation | Prefers medium-rich loam soil Lime if pH is low Not as hardy as rye Tolerates drought |
Care of Garden Equipment in Fall Gardening
Clean-up of tools and equipment is another important practice related to the garden that should be completed in the fall. Proper clean-up of tools now will leave them in top shape and ready to use when spring comes. Clean, oil, and repair all hand tools. Repaint handles or identification marks that have faded over the summer. Sharpen all blades, and remove any rust. Power tools should be cleaned of all plant material and dirt. Replace worn spark plugs, oil all necessary parts, and sharpen blades. Store all tools in their proper place indoors, never outdoors where they will rust over the winter.
Unless you are lucky enough to live in a warm area where a cold frame will protect vegetables all winter, you will need to clean up the frame when all vegetables have been harvested. Remove all remaining plant material, and spread it on the cold frame soil. Spade the plant refuse and any other organic material into the soil in the cold frame as thoroughly as possible. Do not leave the top on the cold frame over the winter as the cold air or the weight of snow may crack or break the glass. Remove the top, wash it thoroughly, and store it on its side in a protected indoor area where it will not get broken.
Season Extenders
To get the most out of a garden, you can extend the growing season by sheltering plants from cold weather both in early spring and during the fall. Very ambitious gardeners harvest greens and other cool-weather crops all winter by providing the right conditions. There are many ways to lengthen the growing season, and your choice depends on the amount of time and money you want to invest.
Cold Frames and Hot Beds

Cold frames, sun boxes, and hot beds are relatively inexpensive, simple structures providing a favorable environment for growing cool-weather crops in the very early spring, the fall, and even into the winter months.
Hot beds are heated by soil-heating cables; steam-carrying pipes; or fresh, strawy manure buried beneath the rooting zones of the plants. Cold frames and sun boxes have no outside energy requirements, relying on the sun for their source of heat. Heat is collected by these frames when the sun’s rays penetrate the sash, made of clear plastic, glass, or fiberglass. The ideal location for a cold frame is a southern or southeastern exposure with a slight slope to ensure good drainage and maximum solar absorption. A sheltered spot with a wall or hedge to the north will provide protection against winter winds. Sinking the frame into the ground somewhat will also provide protection, using the earth for insulation. To simplify use of the frame, consider a walkway to the front, adequate space behind the frame to remove the sash, and perhaps weights to make raising and lowering of glass sashes easier. Some gardeners make their cold frames lightweight enough to be moved from one section of the garden to another.
Another possibility is the Dutch light, which is a large, but portable, greenhouse-like structure that is moved around the garden.
New designs in cold frames include passive solar energy storage. For example, barrels painted black and filled with water absorb heat during the day and release it at night. The solar pod, shown below, is one design that provides for this type of heat storage. Other new cold frames are built with a very high back and a steep glass slope and are well insulated. These may also include movable insulation that is folded up during the day and down at night or during extremely cold weather.
In early spring, a cold frame is useful for hardening-off seedlings that were started indoors or in a greenhouse. This hardening-off period is important as seedlings can suffer serious setbacks if they are moved directly from the warmth and protection of the house to the garden. The cold frame provides a transition period for gradual adjustment to the outdoor weather. It is also possible to start cool-weather crops in the cold frame and either transplant them to the garden or grow them to maturity in the frame.
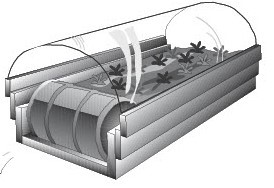
Spring and summer uses of the cold frame center around plant propagation. Young seedlings of hardy and half-hardy annuals can be started in a frame many weeks before they can be started in the open. The soil in a portion of the bed can be replaced with sand or peat moss or other medium suitable for rooting cuttings and for starting sweet potato slips. Fall is also a good time for sowing some cool-weather crops in frames. If provided with adequate moisture and fertilization, most cool-season crops will continue to grow through early winter in the protected environment of the cold frame. Depending on the harshness of the winter and whether or not additional heating is used, your frame may continue to provide fresh greens, herbs, and root crops throughout the cold winter months.
Growing frames can be built from a variety of materials; wood and cement block are the most common. If you use wood, choose wood that will resist decay, such as a good grade of cypress or cedar. Wood frames are not difficult to build. Kits may also be purchased and easily assembled; some kits even contain automatic ventilation equipment.
There is no standard-sized cold frame. The dimensions of the frame will depend on amount of available space, desired crops, size of available window sash, and permanency of the structure. Do not make the structure too wide for weeding and harvesting; 3-4 feet is about as wide as is convenient to reach across. The sash of the frame should be sloped to the south to allow maximum exposure to the sun’s rays.
Insulation may be necessary when a sudden cold snap is expected. A simple method is to throw burlap sacks filled with leaves over the sash on the frame at night to protect against freezing, or bales of straw or hay may be stacked against the frame. Ventilation is most critical in the late winter, early spring, and early fall on clear, sunny days when temperatures rise above 45ºF. The sash should be raised partially to prevent the buildup of extreme temperatures inside the frame. Lower or replace the sash each day early enough to conserve some heat for the evening. In summer, extreme heat and intensive sunlight can damage plants. This can be avoided by shading with lath or old bamboo window blinds. Watering should be done early so that plants dry before dark, to help reduce disease problems.
You may convert your cold frame to a hot bed. For a manure-heated bed: dig out to 2 feet deep (deeper to add gravel for increased drainage), add an 18-inch layer of strawy horse manure, and cover with 6 inches of good soil.
Cloches and Hotcaps
Cloches and hotcaps are covers placed over plants to provide a greenhouse-like atmosphere for seeds and small plants in order to get an early start on the season or to extend the fall garden as long as possible. Cloches are set out over individual plants or are made into tunnels for whole rows. They trap solar radiation and moisture evaporating from the soil and plants. The cloche (pronounced klosh) was originally a bell-shaped glass jar set over delicate plants to protect them from the elements. The definition has expanded, however, to include many types of portable structures that shelter plants from drying winds and cold air.
Hotcaps function as miniature greenhouses, trapping the heat from solar radiation. An effective hotcap transmits sufficient solar energy for photosynthesis and for warming the air inside, but not so much that the plant is damaged by overheating. Hotcaps also must retain sufficient heat throughout the night to protect plants against low temperature injury. Hotcap designs vary from wax paper cones to water-filled plastic insulators. All hotcap designs are most effective during sunny weather and have little effect on temperature during cloudy periods. The greatest temperature differences occur during sunny days and clear nights.
Elaborate designs include fiberglass tunnels, special plastic cloches, row covers with slits in them to allow some aeration, and panes of glass connected by specially designed hinges to form a tent. There are a variety of forms on the market now, some work, some don’t, and some are easily constructed from materials around the home. Cloches are generally lightweight, portable, and reusable. It is preferable to have a design that can be closed completely at night to prevent frost damage and opened or completely removed during the day for good air circulation. Cloches should be anchored or heavy enough that they don’t blow away.
Although expensive, water-filled plastic insulators have been shown to be more effective than other materials and can add several weeks’ growth to the early part of the season. Wax paper hotcaps are easy to install and disposable. Plastic jugs may be difficult to secure in the field and can only protect small plants; they do not retain sufficient heat to provide frost protection. They can delay fruit development unless ventilation is provided and can become hot enough to kill plants. For most gardens, simply cover plants overnight if there is a danger of frost. Be sure to remove the covering during the day.
Floating Row Covers
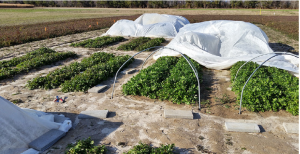
Row covers are a more recent development in extending vegetable production past frost dates. They are simple devices, pieces of material (in spunbonded polyesters) laid over transplants in the field. As the plants grow taller, the material is pushed up by the plants. Row covers retain heat and protect against frost so crops can be planted earlier in the spring and harvested later in the fall. They have demonstrated insect and vertebrate pest protection while also protecting plants from wind damage. Row covers generally provide 4 to 5 degrees of frost protection, so cool-season crops can be planted in air temperatures as low as 28ºF. Covers should be removed from the crops when air temperatures beneath the cover reach 80ºF. Problems associated with row covers are lower light transmission, as nonwoven materials allow 75 to 80% transmission of light to the crop. The fabric covers can be extended through two seasons if treated with care. If used in conjunction with other season-extending techniques, row covers can mean earlier harvests with greater yields in addition to extended harvests.
Greenhouses
There is an almost overwhelming selection of greenhouses on the market, and plans for building even more types are available. If you intend to purchase or build a greenhouse, it is wise to investigate the alternatives thoroughly, preferably visiting as many operating home greenhouses as possible. List your needs and wants ahead of time, and determine how you will use your greenhouse. Then compare on that basis. Many companies will send free specifications and descriptions of the greenhouses they offer; look in gardening magazines for their ads. The conservation-minded person may find a solar greenhouse desirable. The initial cost is generally higher for a solar greenhouse than for the simpler, free-standing, uninsulated types, but for maximum use with lower heating bills, one can insulate north and side walls, provide liberal glass area for winter sun catching, and make use of some type of solar radiation storage. When attached to a house, these greenhouses can be used for supplementary household heating, but there is a trade-off between heating the home and growing plants (especially heat-loving ones) in the greenhouse. Some researchers have concluded that a good compromise is to forget winter tomatoes and grow cool-weather crops during the winter in an attached greenhouse. In addition, they may retain excessive amounts of heat from late spring to fall and can make cooling the home more difficult.
Shading
It is not always easy to start seeds or young plants for fall crops in the hot and dry conditions of August. One simple way to provide shade in otherwise exposed conditions is to build a portable shade frame for placing over rows after seeds are sown or transplants are set out. This can be the same type of frame used for starting early seeds, using shade cloth, or lath strips or an old bamboo shade instead of plastic.
Culinary Herbs
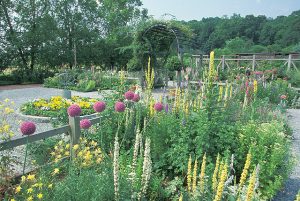
Herbs have been used for seasoning, medicine, fragrance, and sorcery for thousands of years. Among the legendary varieties are henbane and mandrake for witches’ spells, St. Johnswort for casting out evil, comfrey for healing, and Alchemilla sp. (lady’s mantle) for gold. Each leaf of the Alchemilla sp. gathers a drop of dew during the night; it was believed that if the drops were gathered and used properly, they would facilitate the process of alchemy – the making of gold from base metals. Tarragon, rosemary, and thyme are among the most ancient of seasonings, yet there are few culinary achievements that can top good poultry roasted with these three herbs.
Most herbs can be grown successfully with a minimum of effort. Several are drought-tolerant, some are perennials, and many are resistant to insects and diseases. They are versatile plants, providing flavors for seasoning food and fragrances for room-freshening potpourri. And with their enticing scents, diverse textures, attractive shapes, and countless shades of green and gray, herbs are often used to make a landscape that appeals to the senses of touch and smell as well as sight.
The classic use for herbs in the landscape is the formal garden. Many intricate designs have been drawn and planted using the beauty of herb plants to enhance the pattern of the garden; diamonds, compasses, and knots are among the most popular designs. The knot garden is especially intriguing; herbs with various textures and colors are planted carefully and trimmed neatly to create the appearance of ropes looping over and under each other. The effect is striking, especially when viewed from an upper-story window. Theme gardens are also popular. There are Biblical gardens, scent gardens, tea gardens, witch’s gardens, kitchen gardens, and apothecary gardens, to name a few.
Site: When selecting a site to plant your herbs, keep in mind that most culinary herbs are native to the Mediterranean region and therefore prefer full sun, good air circulation, and well-drained soil.
Start with a small herb garden that can be easily constructed and maintained, but leave space around it so that you can plan its expansion during the long, cold months of winter. Choose a soil that is fertile and loamy for best results; although many of the herbs will live in poor ground, for the healthiest plants and best harvest, they need good soil to thrive. Most herbs require a soil pH of 6.3 to 6.8 for optimum growth, but lavender prefers a pH of 6.5 to 7.0.
Prepare the soil to a depth of 8 inches. If it is heavy or has poor drainage, amend it with composted organic matter. Raised beds are an excellent solution to this problem. Fill them with a mixture of the heavy soil and the suggested amendments, or use a pre-mixed, soilless potting medium.
Plant perennial herbs in an area that will not be disturbed by tilling. Those that spread by runners, such as the mints, should be given a large, isolated area or must be contained in some fashion (to a depth of 10 to 12 inches) to prevent them from taking over the garden.
Some tender perennials need protection from winter winds. Plant on an eastern exposure, if possible. Evergreen trees and shrubs can be used to break the wind and create a “microclimate” for the herbs. Rocks are often incorporated into the design of herb gardens to provide focal points and windbreaks and to help keep roots cool and moist during the heat of summer.
Propagation: Annual herbs are best started from seed. When starting small seeds indoors, the easiest method is to sow them directly into peat pots filled with seed-starting mix, about six weeks before the last frost date. Cover seed with a thin layer of moist seed-starting mix or milled sphagnum moss. Later, thin the seedlings to four or five per pot. Larger seeds may also be started by this method, then thinned to one plant per pot. Keep the soil surface moist by misting with a spray bottle until the plants are established.
Although many perennial varieties may be started from seed, it is much easier to get plants from your local nursery or a reputable mail-order company. In addition, many culinary herbs, such as tarragon, can only be propagated asexually; seed-grown plants lack the oils that give them flavor. Propagate them from root divisions or cuttings taken in the summer, after new growth has hardened. Allow cuttings to root in a window box or some other suitable container, preferably covered with plastic to maintain high humidity. About 5 inches of clean, coarse sand is a good rooting medium. Keep the sand moist and out of direct sunlight when the plants are young. In 4-6 weeks, move the plants to pots or cold frames for the winter. Transplant all herb plants after danger of severe frost. Control weeds during the growing season to prevent competition for water and nutrients which are needed by your herbs. A light mulch (about 1 inch) will conserve soil moisture and help control weeds.
Most of the herbs that have a mature height under 12 inches may be grown in 6-inch pots as indoor plants. There are many dwarf varieties of the larger herbs that would be appropriate indoors, as well. Basil ‘Spicy Globe,’ dwarf sage, winter savory, parsley, chives, and varieties of oregano and thyme are some of the best for windowsill culture. When given proper care in a sunny window, they will supply sprigs for culinary use through all seasons. When cooking, use greater quantities of fresh herbs; although they often have better flavor than dried herbs, they are usually not as strong.
Culture: Although many herbs are considered drought-tolerant, some moisture is needed to maintain active growth. For a continual supply of fresh-cut herbs, periodic irrigation during dry periods is needed. As with all plants, a thorough watering with a period of drying is preferred over frequent sprinkling. Annual herbs require a higher level of available soil moisture than most perennial herbs.
Proper nutrient balance is very important. Weak, succulent growth can be caused by over-fertilization, making the plant susceptible to disease and insect pests. Rapid growth also dilutes the concentration of essential oils that impart the distinctive flavor to the culinary herb. Inadequate fertilizer can severely limit new growth, predisposes the plant to insect and disease problems, and increases the susceptibility of tender perennials to winter injury. A light application of fertilizer to perennials in early spring should promote new root and shoot growth and ensure vigor in the new growing season. Generally, adequate herb growth can be achieved with 1/4 to 1/2 the nitrogen recommended for vegetables in your area. Sequential harvests of annual herbs will be facilitated by light applications of fertilizer after each heavy harvest.
The high concentration of essential oils in healthy, actively growing herbs repels most insects. However, aphids and spider mites can be a problem. Aphids seem to be more prevalent in crowded conditions with rapidly growing, succulent plants. Spider mites thrive in dry conditions and can be controlled by spraying the plants with plain water at regular intervals, especially during periods of drought. Since there are very few labeled pesticides for use on herbs, the best defense against pests is preventative cultural management, such as good sanitation, removal of weak or infested growth, and regular pruning.
Periodic, judicious pruning promotes vigorous, sturdy plants that are less susceptible to disease and winter injury. If they are allowed to grow unchecked, some herbs will take on a gangly, unkempt appearance. If you are lavish in your use of herbs, regular harvesting for use in cooking, potpourri, and flower arrangements should keep your herbs sufficiently pruned.
Harvesting: It is best to harvest your herbs in the morning, just after the dew has dried, but before the sun gets hot. The concentration of essential oils is highest at this point. Harvest your herbs for fresh use all season, but for drying, cut just before the plants bloom. This will ensure the maximum concentration of essential oils. When harvesting, cut just above the first joint of tender growth – it takes the plant longer to send out new shoots from woody growth.
Stop making large harvests of the perennial herbs in late summer or fall. This will allow time for new growth to harden and gather carbohydrates in preparation for winter. However, small harvests can be made during most of the fall. Sage flavor may actually be improved by two or three frosts prior to harvest.
If you are interested in saving seed for the next season, choose one or two plants of each variety and allow them to bloom and go to seed. Harvest the seed heads when they change from green to brown or gray, and dry them thoroughly to ensure a good germination rate.
Drying: The best dried herbs are those that have been dried rapidly, but without excessive heat or exposure to sunlight.
When harvesting to dry, it is often necessary to spray the plants with a garden hose the day before cutting to clean dirt and dust off the leaves. The next morning, after the leaves have dried, make your harvest. Remove dead or damaged leaves and make small bunches of the herbs. Tie the stems together and hang them in a temperate, well-ventilated, darkened room that has little dust. Label each bunch, since several of the herbs look similar when dried.
Herbs may also be dried by removing the leaves and spreading them in a single layer on cookie sheets or foil, though it is preferable to use trays made of window screening for maximum air circulation. Again, remember to label the different varieties for accurate identification after drying.
Herb leaves are dry if they crumble into powder when rubbed between your hands. When the drying process seems to be complete, fill a small, glass container with the herb and seal. Put it into a hot oven for about 15 minutes or microwave it (don’t use a metal cover!) for about 5 minutes, then check for condensation on the inside of the jar. If there is moisture present, let the rest of the herbs dry some more; if your harvest is not completely dry when stored, it may succumb to molds. If necessary, herbs may be dried on cookie sheets in an oven set for 110ºF or less, though there is some loss of essential oils using this method.
When completely dry, store whole leaves in air-tight containers, preferably of dark glass or some material that will not let in light, in a cool to temperate place out of direct sunlight. This will ensure good flavor and color in your seasonings. To conserve essential oils, do not crush the herb until you add it to your cooking.
Table 9-6: Herb culture and use chart
| Common Name | Height | Plant Spacing | Cultural Hints | Uses |
|---|---|---|---|---|
| Basils | 20-24" | 12" | Grow from seed Sun |
Use in anything with tomatoes |
| Borage | 24" | 12" | Grow from seed, self-sowing Best in dry, sunny areas |
Young leaves used in salads for cucumber flavor |
| Chervil | 10" | 3-6" | Sow in early spring Partial shade |
Aromatic leaves used in soups and salads |
| Coriander | 24" | 18" | Grow from seed Sow in spring in sun or partial shade |
Seed and leaves used in food |
| Dill | 24-36" | 12" | Grow from seed sown in early spring Sun or partial shade |
Feathery foliage and seeds used in flavoring and pickling |
| Parsley | 6" | 6" | Grow from seed started in early spring Slow to germinate Sun Biennial |
Brings out flavors of other herbs High in vitamin C |
| Catnip | 3-4' | 18" | Hardy; sun or shade Grow from seed or by division |
Leaves for soothing tea |
| Chives, Garlic | 12" | 12" | Little care Divide when over-crowded Grow from seed or by division |
Good indoor plant Cut long strands at base; mild onion or garlic flavor |
| French Tarragon | 24" | 24" | Sun or semi-shade Grow from cuttings or division |
Aromatic seasoning; principal flavor in béarnaise sauce; great with fish or chicken |
| Lavender | 24" | 18" | Propagate from cuttings Grow in dry, rocky, sunny locations with plenty of lime in the soil Requires pH 6.5 to 7.2 |
Use for sachets, potpourri |
| Lemon Verbena | 36" | 36" | Tender perennial; propagate from cuttings Sun or partial shade |
Strongest lemon scent Used in teas or in potpourri |
| Lovage | 3-4' | 30" | Rich, moist soil Grow from seed planted in late summer Sun or partial shade |
Of the carrot family; strong celery flavor |
| Mints | 1-3' | 18" | Grow from cuttings or division Sun or partial shade |
Aromatic; used as flavoring Unusual varieties include orange, blue balsam, ginger, chocolate |
| Oregano | 24" | 9" | Grow from seed, cuttings, or division Sun |
Flavoring for tomato dishes, pasta |
| Rosemary | 3-6' | 12" | Grows in well-drained nonacid soil from cuttings Sun Marginally hardy; plant in protected site |
Leaves flavor sauces, poultry, meats, rice, and soups Good for topiary bonsai |
| Sage | 18" | 12" | From seed or cuttings Sun Renew every 3-4 years |
Seasoning for meats, especially pork; herb teas |
| Thyme | 8-12" | 12" | Light soil, well-drained Renew every 2-3 years Grow from cutting or division Sun |
Aromatic foliage for seasoning Varieties include lemon, orange, nutmeg, and wooly |
Organic Vegetable Gardening
The term “organic” is used frequently to describe various gardening and landscaping practices as well as numerous products available for sale. There are some misconceptions about just what the term means as well as much misinformation about what constitutes organic gardening. Most often the word “organic” is used to describe a no-pesticide gardening system or a no-chemical system. This is not always the case. The purpose of this section is to define what “organic” means and to describe the practices and principles used in effective organic gardening systems.
Organic Defined
Finding a reliable, consistent definition of organic gardening is a challenge in itself. There are so many perceptions of what is involved in an organic system that finding a general consensus is difficult.
The Merriam-Webster Dictionary defines organic as “Food grown or made without the use of artificial chemicals.”
The US Department of Agriculture defines organic products as food or other agricultural products that have been produced through approved methods that integrate cultural, biological, and mechanical practices that foster cycling of resources, promote ecological balance, and conserve biodiversity. Synthetic fertilizers, sewage sludge, irradiation, and genetic engineering are not to be used. (U.S. Department of Agriculture, National Organic Program). More specifics about the program can be found on the National Organic Program Website.
According to the USDA National Organic Standard Board, organic agriculture:
- Is an ecological production management system that promotes and enhances biodiversity, biological cycles, and soil biological activity;
- Is based on minimal use of off-farm inputs and on management practices that restore, maintain or enhance ecological harmony;
- Has a primary goal of optimizing the health and productivity of interdependent communities of soil life, plants, animals and people.
Certified Organic, USDA: The National Organic Program (NOP) is the federal regulatory framework governing commercial organic agriculture. In Virginia, it is administered by the Virginia Department of Agriculture and Consumer Services (VDACS). Under these regulations, any commercial producer who markets any products as “organic” must first obtain certification to make this claim. This is a long and difficult process that investigates every aspect of production to ensure that all organic guidelines are followed and involves copious recordkeeping and site visits.
Of course, home gardeners wishing to implement organic methods do not need to obtain such certification. Anyone can benefit from the ideas and practices of organic gardening!
Building the Organic Garden Soil
Starting from scratch to build an organic soil is a simple task but it can take time to complete. Depending on the present condition of the soil this task can take months or even years until a satisfactory soil has been developed.
The first step is to know what is there to start with. This means a soil test must be performed to measure fertility and pH levels to determine what adjustments, if any, will need to be made to the soil chemistry. In addition to the traditional soil test, a second level of testing will be needed. At the bottom of the VCE publication “Soil Sample Information Sheet” 452-126 just under the box marked “Routine” there is another box marked “Organic Matter.” Both the “Routine” and the “Organic Matter” boxes should be checked. This will provide a sample result that also measures the amount of organic material already in the soil, expressed as a percentage. Remember that the soils are tested based on what types of plants will be produced in that soil so this will need to be determined prior to taking the sample.
The next step is to learn what the plants will need for the soil in an organic gardening system. In most cases the basic needs for nutrients and pH levels will be the same. It is important to remember that the purpose of this sample is to build the soil to support the health and vigor of the plants, not to simply determine how much lime and fertilizer to use.
Next, start building the soil by incorporating organic materials such as compost, manure, crushed limestone, and other materials to bring the soil up to the level needed to support the plants. In many cases the materials can be spread on top of the soil and then worked in, down to a depth that will be slightly below the anticipated root depth for the desired plants. This practice of incorporating organic material into the soil never ends. Organic material improves the soil as it breaks down and therefore becomes depleted. It must be replaced often to continue to achieve the benefits for plant growth. The frequency of adding organic material depends on the soil type and the climate. A simple guideline to use at the beginning is to add it annually then adjust the schedule as needed.
Periodic retesting will be needed to track the progress toward the desired soil composition. Once that level has been achieved the soil will still need to be tested every 3 years to maintain everything at the correct level.
As an aside, it is important to note that under the rules of the USDA Certified Organic program, land must not have man-made fertilizers or synthetic pesticides applied to that property for at least 3 years before the crops and produce can be certified as organic. Organic farms maintain buffers between certified organic fields and conventional production fields. Local conditions and the individual doing the organic certification determine the width of buffers.
Soil Amendments
Compost
Compost is one of the primary soil amendments that organic gardeners rely upon. Some organic gardeners prefer to make their own compost to ensure that only organic materials go into the mix. This helps to avoid accidental introduction of pesticides, contaminants, and other synthetic materials that may come from unknown sources. Safe composting guidelines should always be followed. Vermicompost (compost made by worms as they digest plant material) may also used in organic systems.
Manure
Manure is another soil amendment used by organic gardeners but this too needs to be scrutinized. The NOP standard does not permit human sludge from waste treatment plants to be used in organic production. Sludge is composed of whatever people flush down their toilets and pour down their kitchen sinks. Since there is no certainty as to what is in the sludge it should not be used. Animal waste is often used in organic systems, though care should be taken to ensure any chemical residues from the animals’ diets are not introduced into your garden. The animal waste should be well composted before it is used. Compost should be applied no earlier than 90 days before harvest if the crop does not touch the ground, or no earlier than 120 days before harvest if the crop touches the ground. Manure must be incorporated into soil.
Compost and manure should not be the only component of an organic fertility program. Some crops will require additions of concentrated natural amendments such as blood meal, bone meal, or potassium sulphate.
A soil test will point to a need for additional fertilizer or other products to provide the correct soil chemistry for the type of plants being grown.
Organic Materials Review Institute
The Organic Materials Review Institute (OMRI) is an independent nonprofit that reviews materials and certifies them as meeting organic standards. Products with an OMRI label are sold in many stores. OMRI products may be used in Certified Organic production and processing of foods, feeds, and pesticides. In the example given earlier, the crushed limestone may have an OMRI label and the pelleted limestone may not. If the manufacturer of the pelleted limestone wanted to have an OMRI label on their product, they then could apply to OMRI to certify that their product is produced in a sustainable way that complies with OMRI and Certified Organic standards. OMRI may ask them to change a product or a process in order to be able to put the OMRI label on their product. The company producing the pelleted limestone would pay a fee to OMRI. Once the changes had been made, the pelleted limestone could then have an OMRI label, and a consumer would know it was produced in a sustainable way and a farmer or grower could use that product and keep their farm’s Organic Certification.
Organic Cultural Practices
Garden crop failures may be caused by poor soil, poor plant selection, poor plant placement, watering or feeding practices, or ecosystem-level problems. All of these can be corrected by using better cultural practices in the garden.
In an organic gardening system, there are no quick fixes to plant health problems. Traditional gardening methods can utilize synthetic fertilizers and pesticides to correct problems quickly, but these options may not be available to the organic gardener.
Many garden and landscape pests can be prevented by maintaining plant health, and the organic gardener takes a proactive approach to managing plant health. Healthy plants can use their own internal defenses to repel insects and to prevent disease pathogens from becoming established in the various plant tissues. Plants that are weak and/or unhealthy will attract pest problems; therefore it is important to follow an effective strategy in establishing healthy plants and monitoring plant health to keep the impact from plant pests to a minimum.
The cultural best management practices outlined below can prevent problems from occurring in the first place. Such practices are found in both conventional gardening, as well as organic gardening, and should not be viewed as exclusive to one or the other.
Plant selection: Select plants appropriate for your site and location. Plants should be known to thrive in the soil moisture and sunlight conditions for the planting site (for example, don’t plan to plant tomatoes in a shady vegetable bed). If you struggle with a particular disease problem, consider planting varieties resistant to that problem. Use a soil test to determine if the present soils are adequate for the plants desired or if soil amendments will be needed.
When selecting plants, inspect each one carefully. Look for any evidence of unwanted insects such as egg masses, cocoons, or the insects themselves. Also look for signs or symptoms of diseases such as dark spots on foliage, odd growths on the stems, open wounds, or evidence of rot. Reject any plants that seem to be “off-color,” wilted, or simply do not appear to be healthy.
Resistant cultivars: The horticulture community works to create new varieties and cultivars of favorite plants that are resistant to troublesome pest problems. These resistant varieties and cultivars are developed through traditional breeding programs where many plants with diverse genetics are crossbred and offspring that show resistance to disease or pests (or have other favorable qualities) are selected and marketed.
This process can produce hybrid varieties (labeled as F1). Seeds saved from hybrid plants will not produce “true” when planted the following year.
When selecting new plants for the garden, try to select from these new varieties as much as possible to avoid the use of pesticides.
Soil management: Healthy plants have healthy root systems. One key to a healthy root system is healthy soil. Manage the soil to optimize its benefits for the specific plants that will be grown. This is normally done with amendments such as compost and lime to improve structure, drainage, moisture holding ability, and pH. Use a soil test to determine what amendments are necessary! Cover crops such as grains and legumes are used to protect the soil when there is no crop present, and these can be incorporated into the soil to add nutrients and organic matter or can be mowed and left in place to serve as an organic stubble mulch.
Water Management: Many plant health issues arise from improper use of water. Too little or too much water can both lead to planting failures, plant diseases, and plant stress that will attract insect pests. Learn what the moisture requirements are for the plants being grown and then manage the water available to those plants. Remember that the soil structure influences the water available to the plants’ roots and incorporate this knowledge into the irrigation schedule.
Irrigation: Irrigating in the early morning will not only reduce evaporative moisture lost, it will also reduce the chances of foliar diseases in the garden. Watering in the morning will allow the leaves to dry more quickly as the weather warms up. Watering in the evening will allow the foliage to stay wet for a longer period of time, which may help in the development of disease pathogens.
Try to avoid wetting the foliage when irrigating. The water must go into the soil to be taken up by the plants’ roots. Keeping the foliage dry will help to prevent many diseases such as Septoria leaf spot and early blight on tomatoes.
Proper planting practices: Always be sure to plant at the right time of year and under the right conditions. Follow guidelines for correct planting such as depth and spacing. When planting seedlings, pay close attention to the roots as this is the only time they will receive much attention. Planting properly will help to get the plants off to a good start and will increase the chances of better plant health throughout the life of the plant.
Plant spacing: Proper spacing of new plants is critical to their health. Planting too close will reduce air circulation between plants and can lead to intense below ground competition for growing space among the roots. Both of these can place the plants under stress. Be certain to learn the proper spacing between plants. It is okay to plant wider than recommended, but it is not okay to plant closer together (unless an intensive gardening method, such as raised beds, is being used). For perennial plants the spacing should be based on the mature size of the plants.
Plant location: The garden needs to be planned to take full advantage of the growing conditions available. Rows and individual plants should be arranged to take advantage of prevailing winds, direction of sunlight, and movement of water both above and below ground. Tall plants should be sited so they do not interfere with the sunlight requirements of smaller plants.
Vegetable interplanting: Over centuries of gardening, humans have learned a lot about how plants interact with each other and their environments. For example, many people have observed that some plants will grow and produce better if in close proximity with certain other plants. Some plants can attract pollinators better if they work together, some plants will attract insect predators to aid in pest prevention, and some plants repel some types of insect pests. These plants are known as companion plants.
One example of this is the Diohe’ko or “three sisters” method developed by the Seneca Nation of western New York. This system involves grouping beans, squash, and corn in hills together so that the plants can provide mutual benefits to each other. A second example of this is the practice of planting marigolds near garden vegetables. The marigolds can help to attract pollinators and will also repel insect pests and soil nematodes.
Another aspect to this practice is that certain plants may be antagonistic to one another. Instead of helping each other to grow better, they will actually prevent each other from reaching optimal growth.
There are excellent intercropping charts available through Extension agencies at various universities (although you will find these charts have not been updated to reflect the intercropping term, and will instead call this practice “companion planting”). One outstanding example is the Washington State University publication “Cool Season Planting Chart for Companion, Interplanting, and Square Foot Gardening.”
Mulch in the organic garden: Research has proven the benefits to be gained from the use of mulch in a garden. For the organic gardener this just means that organic mulches should be used. Organic mulch can be pine needles, shredded bark, ground leaves, or other organically derived products that can be placed around the plants without harming them.
The benefits from mulch are simple. Mulch will trap moisture by blocking direct sunlight from the soil thereby keeping more moisture in the soil for plant roots. Mulch will also keep the soil it covers cooler on hot summer days reducing stress on the plants. During the winter, mulch can be used to insulate perennial vegetables like asparagus or rhubarb.
Organic mulch has one more advantage. It can be tilled into the soil at the end of the growing season to add to the organic composition of the soil.
Additional Resources
- Organic Materials Review Institute (OMRI)
- Baker, N. T. and Capel P. D. (2011). “Environmental Factors That Influence the Location of Crop Agriculture in the Conterminous United States.” USGS National Water-Quality Assessment Program. https://pubs.usgs.gov/sir/2011/5108/pdf/SIR2011_5108.pdf
References
- “No-Till or Low-Till Gardening Methods” section adapted from “Low and No Till Gardening,” by Nate Bernitz (2020) University of New Hampshire.
- “Weed Control in the Garden” section adapted from “Weed Control,” Dalhousie University.
- “Organic Gardening Practices” section adapted from “Cultural Practices,” ibiblio.
- Lomas, J. (1991). Sprinkler irrigation and plant disease under semi-arid climatic conditions. EPPO Bulletin, 21: 365-370. https://doi.org/10.1111/j.1365-2338.1991.tb01263.x
-
Ludy, R. L., M. L. Powelson, and D. D. Hemphill Jr. (1997). “Effect of Sprinkler Irrigation on Bacterial Soft Rot and Yield of Broccoli” Plant Disease 81:6, 614-618. https://doi.org/10.1094/PDIS.1997.81.6.614
-
Teeluck, M., and B. G. Sutton. “Discharge characteristics of a porous pipe microirrigation lateral.” Agricultural water management 38.2 (1998): 123-134.
Attributions
- Margaret Brown, Arlington Extension Master Gardener (2021 reviser)
- Jim Revell, Bedford Extension Master Gardener (2021 reviser)
- Stuart Sutphin, Extension Agent, Agriculture and Natural Resources (2015 reviser)
- Cathryn Kloetzli, Extension Agent, Agriculture and Natural Resources (2015 reviser)
- Leonard Githinji, Assistant Professor, Virginia State University & Extension Specialist, Sustainable & Urban Agriculture (2015 reviewer)
- Diane Relf, Extension Specialist, Consumer Horticulture (2009 reviser)
Image Attributions
- Figure 9-1: Egusi watermelon. Bhardwaj, Harbans. Virginia State University. 2021. CC BY-NC-SA 4.0.
- Figure 9-2: Potato esculentus. Bhardwaj, Harbans. Virginia State University. 2021. CC BY-NC-SA 4.0.
- Figure 9-3: Planting techniques. Grey, Kindred. 2022. CC BY-NC-SA 4.0.
- Figure 9-4: USDA plant hardiness zone map. USDA. 2012. Public domain. https://planthardiness.ars.usda.gov/.
- Figure 9-5: Raised beds. “High raised beds in organic vegetable garden.” Local Food Initiative. 2016. Flickr. CC BY 2.0
- Figure 9-6: Vertical gardens. Includes “Pea Trellis – Square Foot Garden” by Calder, Dale. 2010. Flickr. CC BY-NC-SA 2.0 and Cattle panel. Johnson, Devon. 2022. CC BY-NC-SA 4.0.
- Figure 9-7: Container garden. “Herb garden.” Dave Cooksey. 2008. Flickr. CC BY-NC-SA 2.0.
- Figure 9-8: Hanging strawberry planter. “Strawberries” Sheryl Westleigh. 2011. Flickr. CC BY-NC-ND 2.0
- Figure 9-9: Vertical planter. “vertical-garden.” wiccahwang. 2011. Flickr. CC BY 2.0.
- Figure 9-10: Cold frame. Virginia Cooperative Extension. From “Season Extenders” 2009. CC BY-NC-SA 4.0.
- Figure 9-11: Solar pod. Virginia Cooperative Extension. From “Season Extenders” 2009. CC BY-NC-SA 4.0.
- Figure 9-12: Row covers. Virginia Cooperative Extension. From “Low Tunnels in Vegetable Crops: Beyond Season Extension” 2018. CC BY-NC-SA 4.0.
- Figure 9-13: View of the National Herb Garden. USDA Agricultural Research Service Photo by Keith Weller. 2016. Public domain.
Tool used for digging and lifting loose soil or other materials
Digging tool with strong, flat tines that is ideal for breaking and turning heavy soils and for loosening subsoil layers when double digging a bed
Tool with a blade at a right angle to the handle. Examples may be pointed with a heart-shaped blade or have a narrow blade to slice through soil.
Tool with a long handle and crossbar with a toothed comb, helpful in spreading mulches and smoothing seedbeds
A small hand-tool for digging
Digging hand tool with tines
Hand tool with a narrow curved or straight blade on the end of a long stick, also called an asparagus knife
Power toll with a series of rotating tines used for working soil several inches deep
A genetic cross of two different plants, usually from two different varieties of the same species
Watering system in which water is sprayed down on crops, directly wetting the crop surface
The amount of water that a soil can hold for crop use
Plantings of trees and shrubs placed strategically to slow winds
Planting in such closely-spaced bands rather than in rows of individual plants
A stubble of crop residue left in place for winter
Compost made by worms as they digest plant material
