Chapter 16: Landscape Design
Chapter Contents:
Landscape design is the process of planning and organizing the natural and man-made parts of the landscape into an aesthetic, functional, and environmentally sustainable space. This can apply to the whole landscape or an area within the landscape.
Landscape design can help to balance people’s wants and needs with the environment and natural resource protection and preservation. Landscape design can affect site aesthetics, use and functionality, property value, water quality, wildlife, and long term management. Informed, thoughtful and creative planning and design can integrate the human and environmental factors for a positive impact at the individual residence level; which collectively impacts the larger community and watershed.
Why is it important? People’s wants and needs must be balanced with the environment and natural resource protection and preservation. Landscape design can affect site aesthetics, use and functionality, property value, water quality, wildlife, and long term management. Informed, thoughtful and creative planning and design can integrate the human and environmental factors for a positive impact at the individual residence level, which collectively impacts the larger community and watershed levels.
- What does a successful landscape design involve
- Gathering information and creating a plan to make the best use of the space
- The most of a site’s natural features and advantages
- Balancing human impact, the environment and long term sustainability of the design
- Utilizing materials and plants that best ft the site and the design
Plans and Maps
The planning process is the most important part of landscape design, but unfortunately it is often neglected. An overall plan should be developed so that when any landscape work is done, it will be part of the whole picture. Usually it takes several years to implement a landscape plan. Construction and plantings are completed as weather and finances and other resources allow. Many plantings also need time to mature to create the desired effect. The overall landscape plan should include goals, timeline, budget, a list of resources and contacts, and various site maps and information. The smaller the house, site, and budget, the greater the need for an overall plan, because every square foot of space and every dollar must produce maximum results.
Prepare a scale base map of the site using one of the following techniques.
- Use landscape design software or use graph paper and let one square equal so many feet
- Have a friend help hold and read a tape measure or use a measuring wheel
- Record all measurements clearly on the map
Draw the site to scale:
- Using a ruler, let 1 inch equal 8 feet for a small site, and 16 feet for a large site
- Using an engineer’s or architect’s scale, let 1 inch equal 10 feet for a small site, or 20 feet for a large site
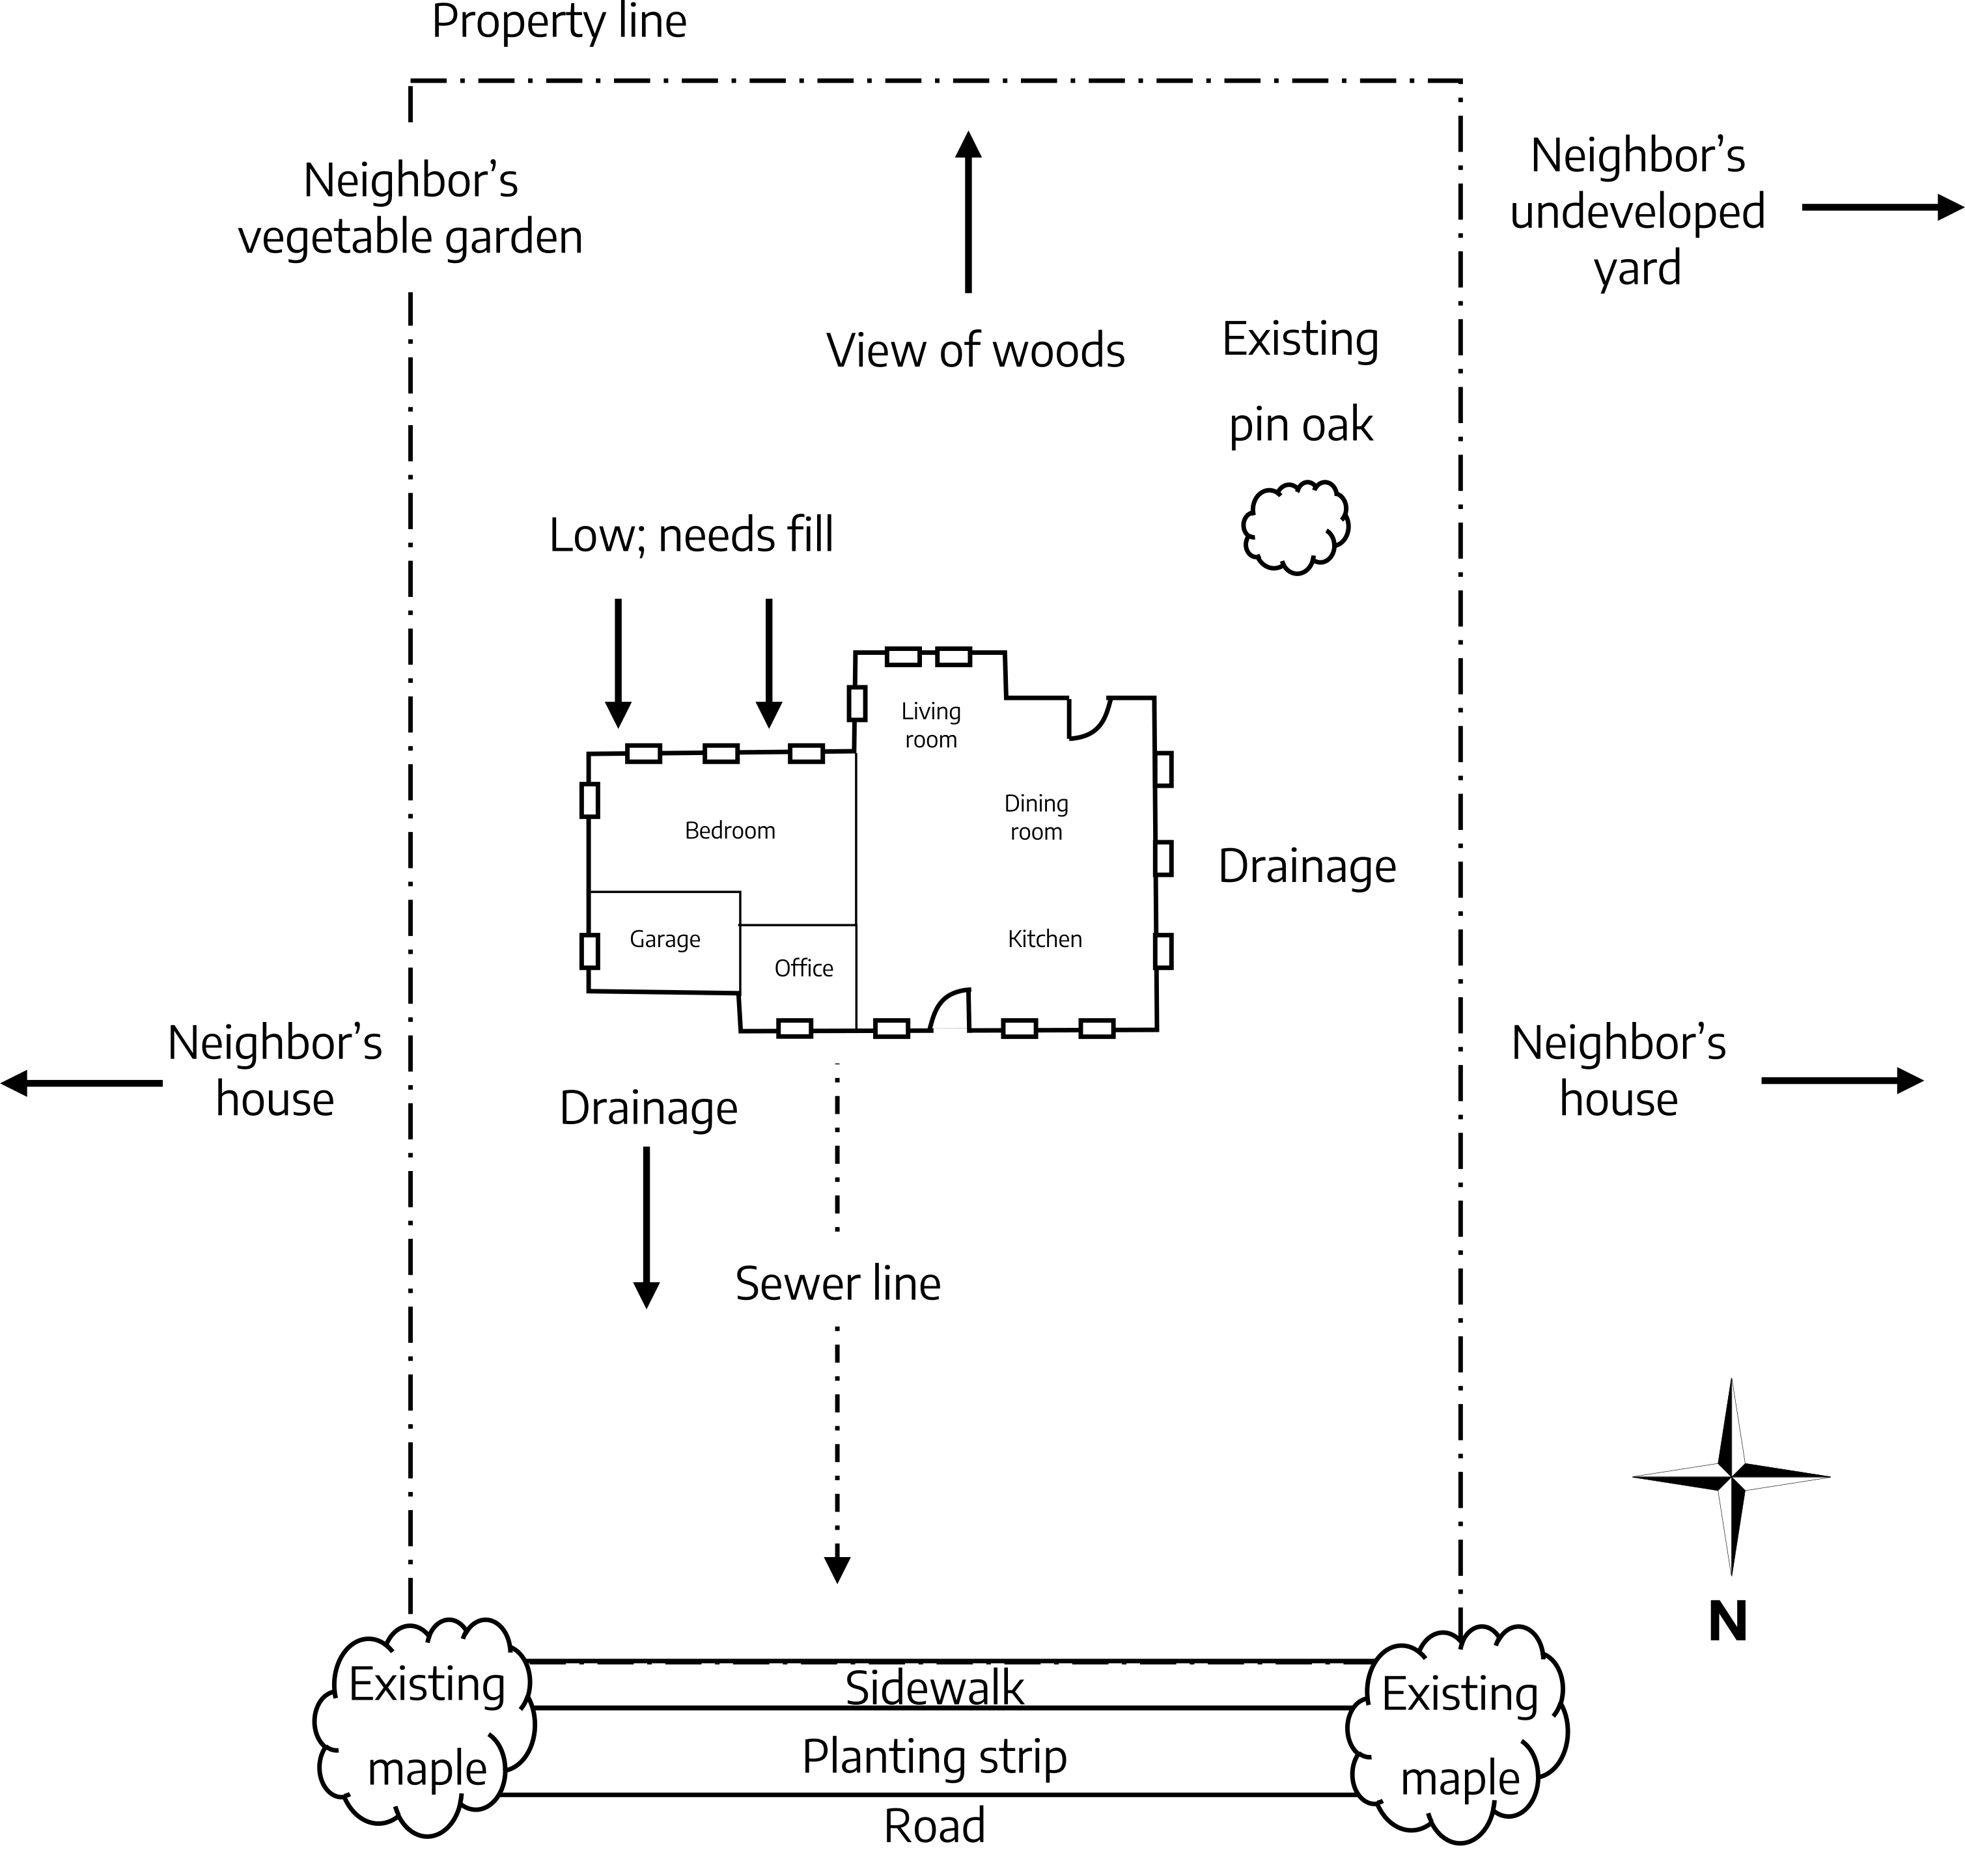
A base map should include the following: (make 5-6 copies of this map and don’t write on the original)
- Property lines, easements, or setbacks
- North point
- House, garage, other buildings or structures
- Scale used
- Location of septic tank or sewer lines
- Walks and driveways
- Doors, windows, porches, and location of specific rooms
- Fire hydrants, meters, utility lines, water spigots, HVAC unit, telephone poles, and lines

Site Analysis
This involves gathering additional information about the site that could impact the design. Spend time (10-15 minutes) in different parts of the site at different times of the day just observing. Use one copy of the base map to add items from the list below. These are reminders of unique site features to incorporate into the design or challenges that need to be addressed in the design.
- Rock outcroppings, slopes, erosion, compacted or poor soil areas
- Path of stormwater runoff. Use arrows to show the direction of surface water flow onto the site, across the site, off the site, and any low or constantly wet areas
- Setbacks, easements or streams (shorelines) that might have special restrictions/limitations
- Desirable and undesirable features of the site and adjoining property (noise, smells, traffic)
- Views – good and bad views from windows, porches, decks, and different parts of the site
- Prevailing wind direction
- Light coming from security lights, street lights, neighbors
- Areas that need privacy screening
- Access to equipment that may need maintenance (such as septic or propane tanks and well pumps)
On another copy of the base map add the plant information. Existing healthy plants are a valuable resource that can be incorporated into the design. Make extra copies of this map as the plant information will change as the design develops.
- The cold hardiness and heat tolerance zones for the site
- The location of existing trees, shrubs, turf and other plants
- Microclimates (dry shade, wet soils, tree root competition, etc.)
- Locations for specific plants (e.g., 8’ privacy hedge, small flowering tree, wildlife habitat, etc.)
- Create a companion list to this map identifying the plants on this map, noting their condition, and thoughts on keeping or removing them and any maintenance needed
- Create a list of favorite or desired plants that might be included in the design
- If you can’t identify the existing plants or need suggestions for new plants, create a list of resources to help like the Extension office, nearby botanical gardens or arboretums, and websites
An understanding of the water, soil, and climate conditions of a site is essential for plant selection and establishment and a successful design.
Water Factors
Water is critical to a successful landscape design. How much water is available will determine:
- The plants used in the design
- Whether an irrigation system is needed and what type to establish and maintain plants
- Whether to include natural or man-made water features in the design
- Whether there are drainage or erosion issues that need to be addressed in the design
During and after a rain, observe how water moves onto, across, and off the site. Look for soil splashed on windows or outside walls, water pathways, erosion, tree roots or rocks becoming exposed, small rills or gullies beginning to show, locations where water collects or where water stands. These areas may need to be addressed in the design through plantings or drainage techniques. See Chapter 17: “Water Quality and Conservation” for more information.
Soil Factors
See Chapter 2: “Soils and Nutrient Management” for more information.
Drainage
Drainage can vary a great deal from one area to another, even if the site is relatively flat. During and after a rain, note any locations where water collets, is slow to drain, or stands for more than 24 hours. These areas may need to be addressed in the design through plantings or drainage techniques. A percolation or “perk” test may be needed in any location where water stands to determine the infiltration or percolation rate. More information on perk tests can be found online.
Soil Texture
To determine texture, send a soil sample to a lab and request a textural analysis. Traditional soil survey maps can only be used on undisturbed sites. This disqualifies most urban and suburban sites, as they are significantly disturbed during development. Soil (sometimes called fill) is often hauled away from or onto a developed site and can be very different from the existing site soil. Soil texture can affect many site design and maintenance decisions including: plant selection, stormwater management, choice of irrigation method, and amount of irrigation, and stability for structures.
Soil pH and Fertility
Send soil samples to a lab for analysis. A soil sample should be collected from each different area (e.g., front lawn, back lawn, wooded area, flower bed, vegetable garden, or any problem area). Soil pH and fertility can vary over short distances and can be influenced by paved areas and foundations (these often raise pH), past gardening practices, fill hauled onto a site, and drainage issues. Soil tests provide a base line of information that could impact the design decisions like plant selection, plant location, and any site preparation including soil amendments like organic matter, lime, or fertilizer. Soil tests should be done every 3 years.
Topography
Changes in elevation can add interest and variety to a landscape. Natural variations should be considered an asset, and artificial ones should be minimized. For example, a hilly wooded site lends itself to an informal or natural design, with large areas left in a natural state. And, while grading of terraces or retaining walls might be necessary to facilitate construction or control water drainage, they should be kept to a minimum and designed to detract as little as possible from the natural terrain while accommodating vehicle and pedestrian traffic on the site. A particular challenge is creating topography for a water feature (i.e., a waterfall to a pond) in generally flat areas. If the feature isn’t integrated into the overall site design and topography, it looks like it landed from outer space!
Compaction
Areas with heavy foot traffic, where cars are or have been parked, or where there has been any construction activity, are likely to be compacted. Test soil compaction by forcing a shovel or other tool into the ground when soil is moderately moist. In healthy soil it should be fairly easy to push the tool into the ground, provided you do not hit any stones or large roots. Soil may be uniformly compacted, or there may be a hard layer, known as a hardpan, 6-18 inches under the topsoil that can restrict root growth and drainage. Because few plants will thrive in heavily compacted soil, aeration and/or amendments may be needed. Compacted areas should be noted on the site analysis map and addressed as part of the site preparation plan before implementing the design.
Climate and Microclimate
Climate includes sun, shade, all forms of precipitation, wind, and temperature. All these affect the way a house should be placed on a site, how the land is used, and what is planted. In planning the landscape, utilize the advantages of climate and microclimates. In protected microclimates, grow plants that might not normally survive or thrive in that growing zone, or use the microclimate to extend the growing season. Microclimates also create opportunities for diversity and adding unique plants to the landscape. In warm climates, enlarge the outdoor living area. In cold climates, plant so that the winter scene is enjoyed from the inside.
Cold Hardiness and Heat Tolerance
Cold hardiness and heat tolerance zone numbers help determine if a plant species will tolerate the temperature averages and extremes of a site. Refer to the USDA Hardiness Zone Map to determine the zones for a specific site. Other climate factors, such as rainfall, snow cover, soil types, winds, elevation and pollution should also be considered, as these may affect plant survival.
Sun and Shade Patterns
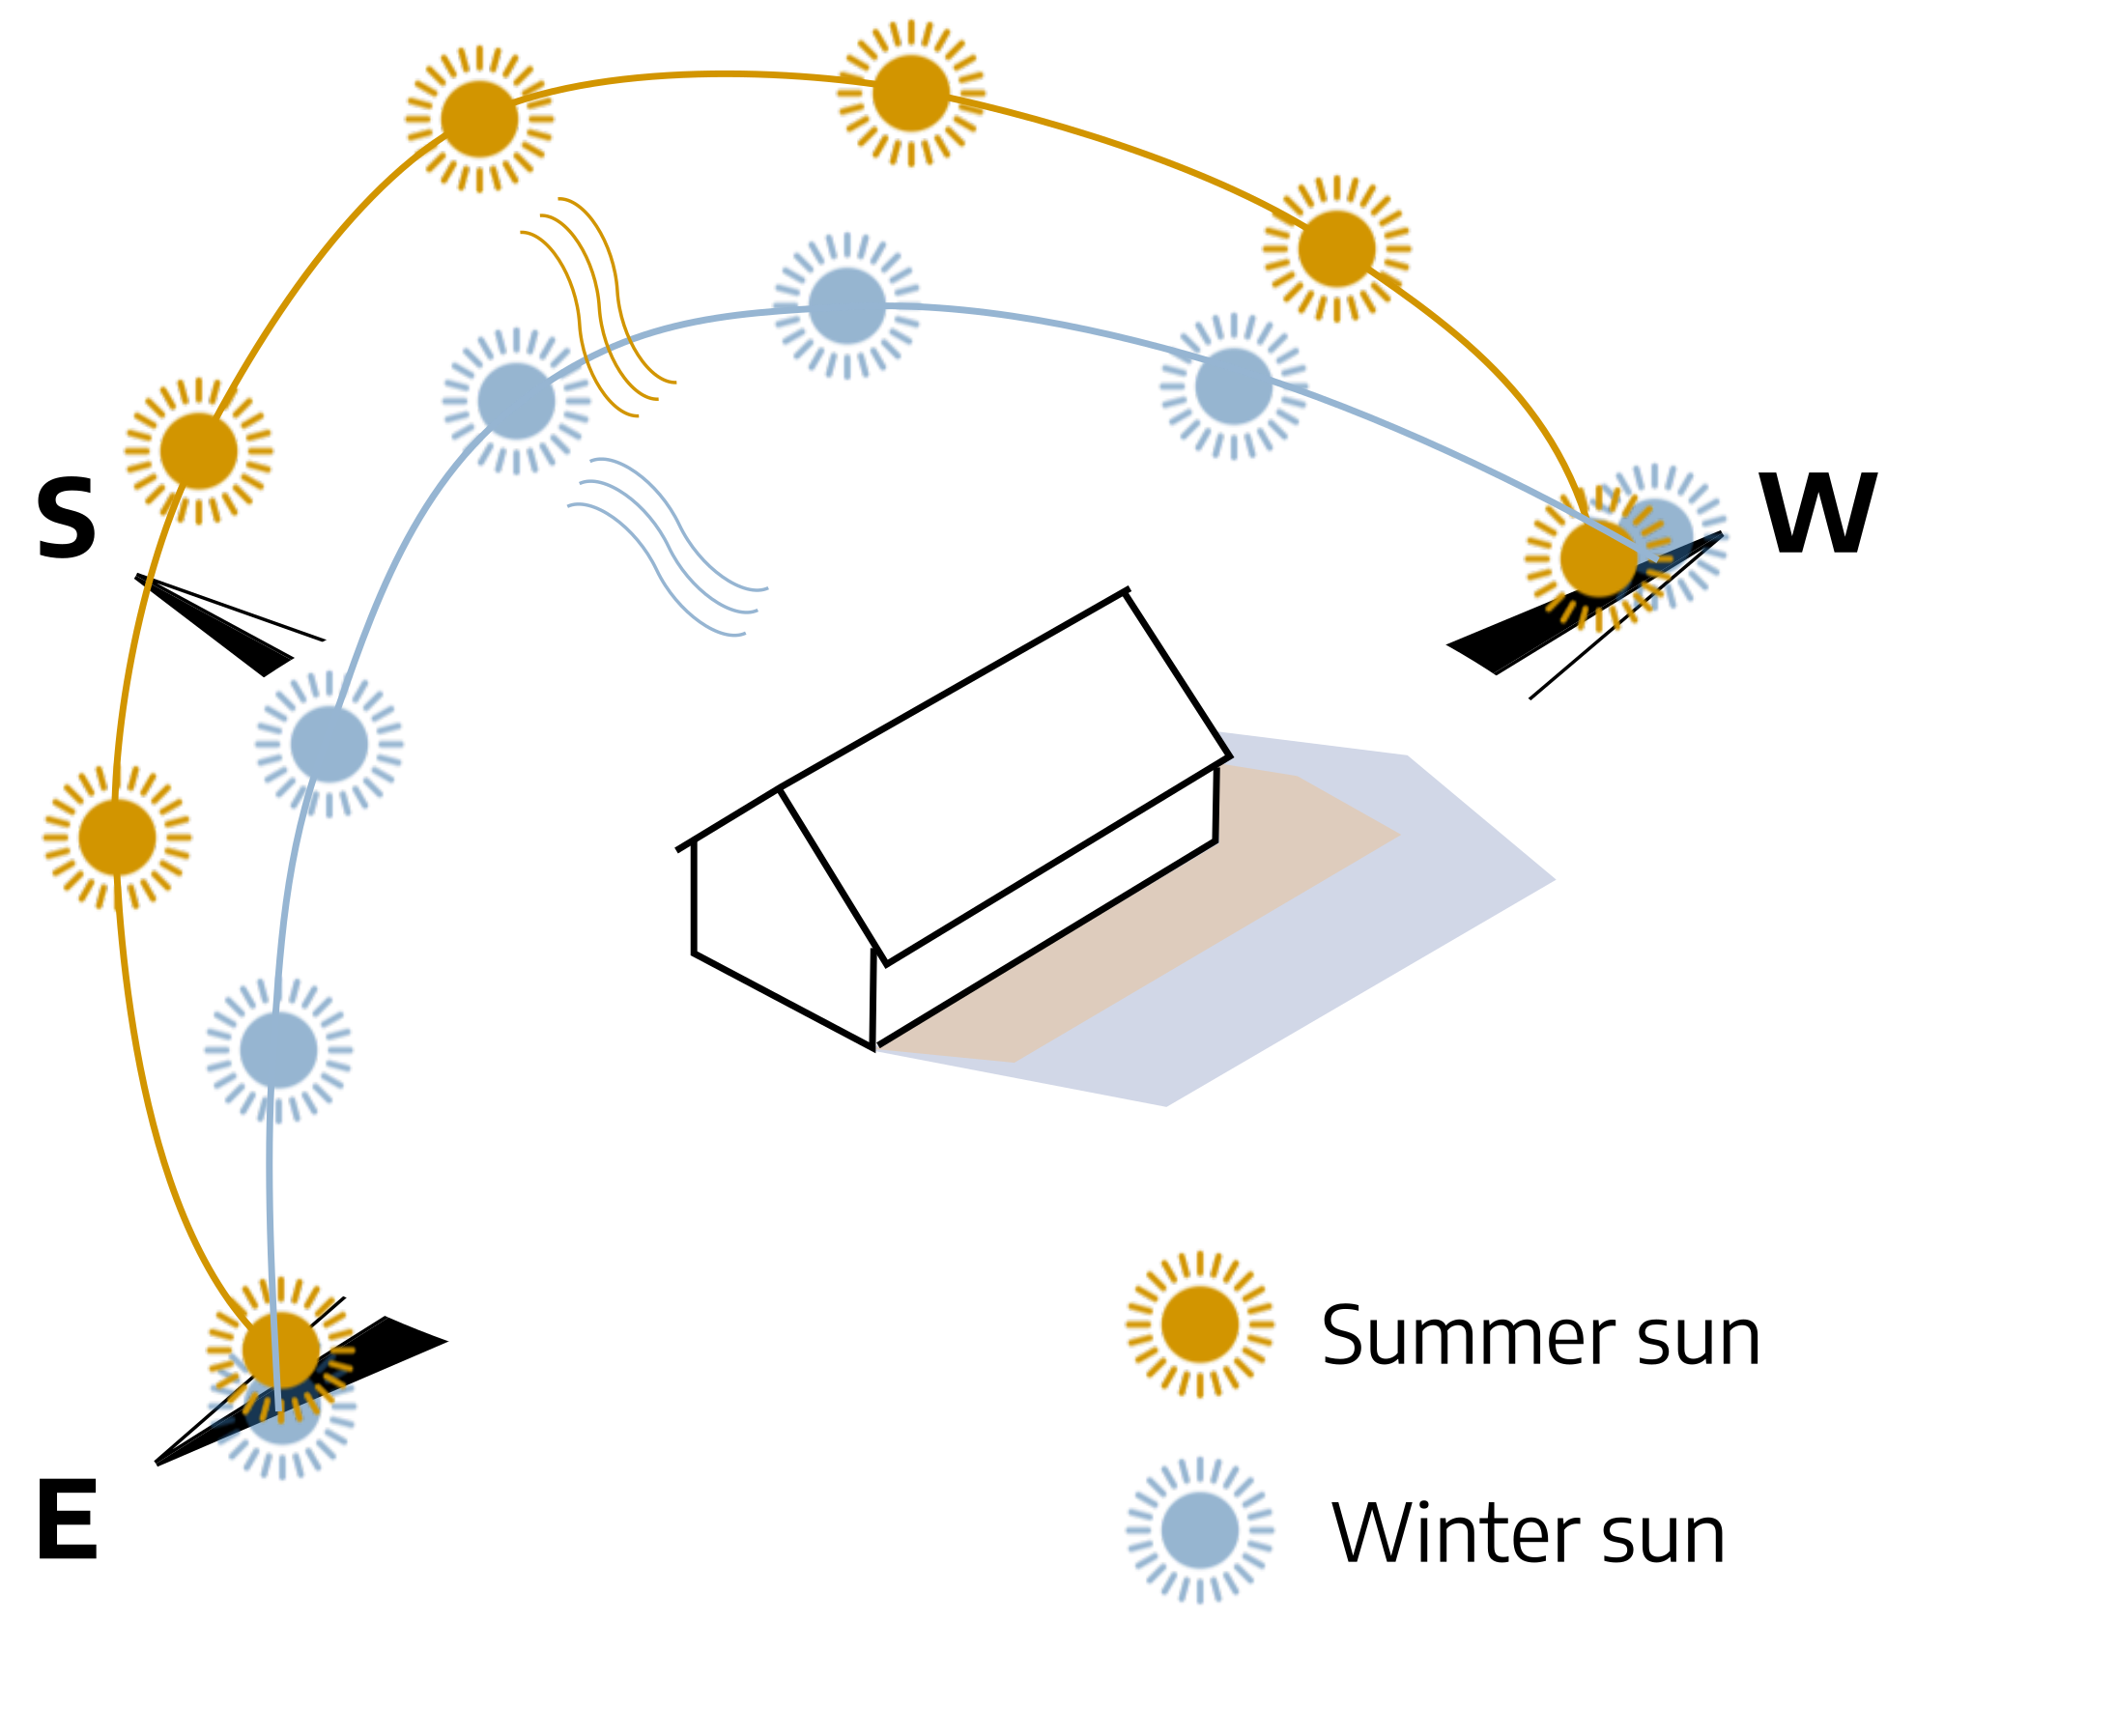
People respond differently to sun and shade, so it’s important to study the amount and location of each at a site. Note daily and seasonal patterns and those areas that are heavily shaded or are exposed to late afternoon sun. The sun is highest and shadows are shortest in the summer. Take into account planned and existing structures and plantings. Sun for a minimum of 6 hours a day during the growing season is generally adequate for vegetables and other plants requiring “full sun,” although 8 to 10 hours will result in significantly better growth and yield.

As the sun moves from east to west, it travels in the southern sky casting shadows to the north side of houses, structures, and trees.
Plan future shade from tree plantings carefully in order to keep sunny areas for lawns and gardens, and summer shade for the house and patio/deck. Place trees off the corners (rather than the sides) of the house where they will accent the house but not block views and air circulation. Remember to plan and plant for the mature size of the tree(s). Consider possible shade from trees and houses on neighbors’ property also.
A number of tools and apps are now available to help gardeners estimate the amount of sun a site receives. The iTree program can help you estimate the shade value of individual trees.
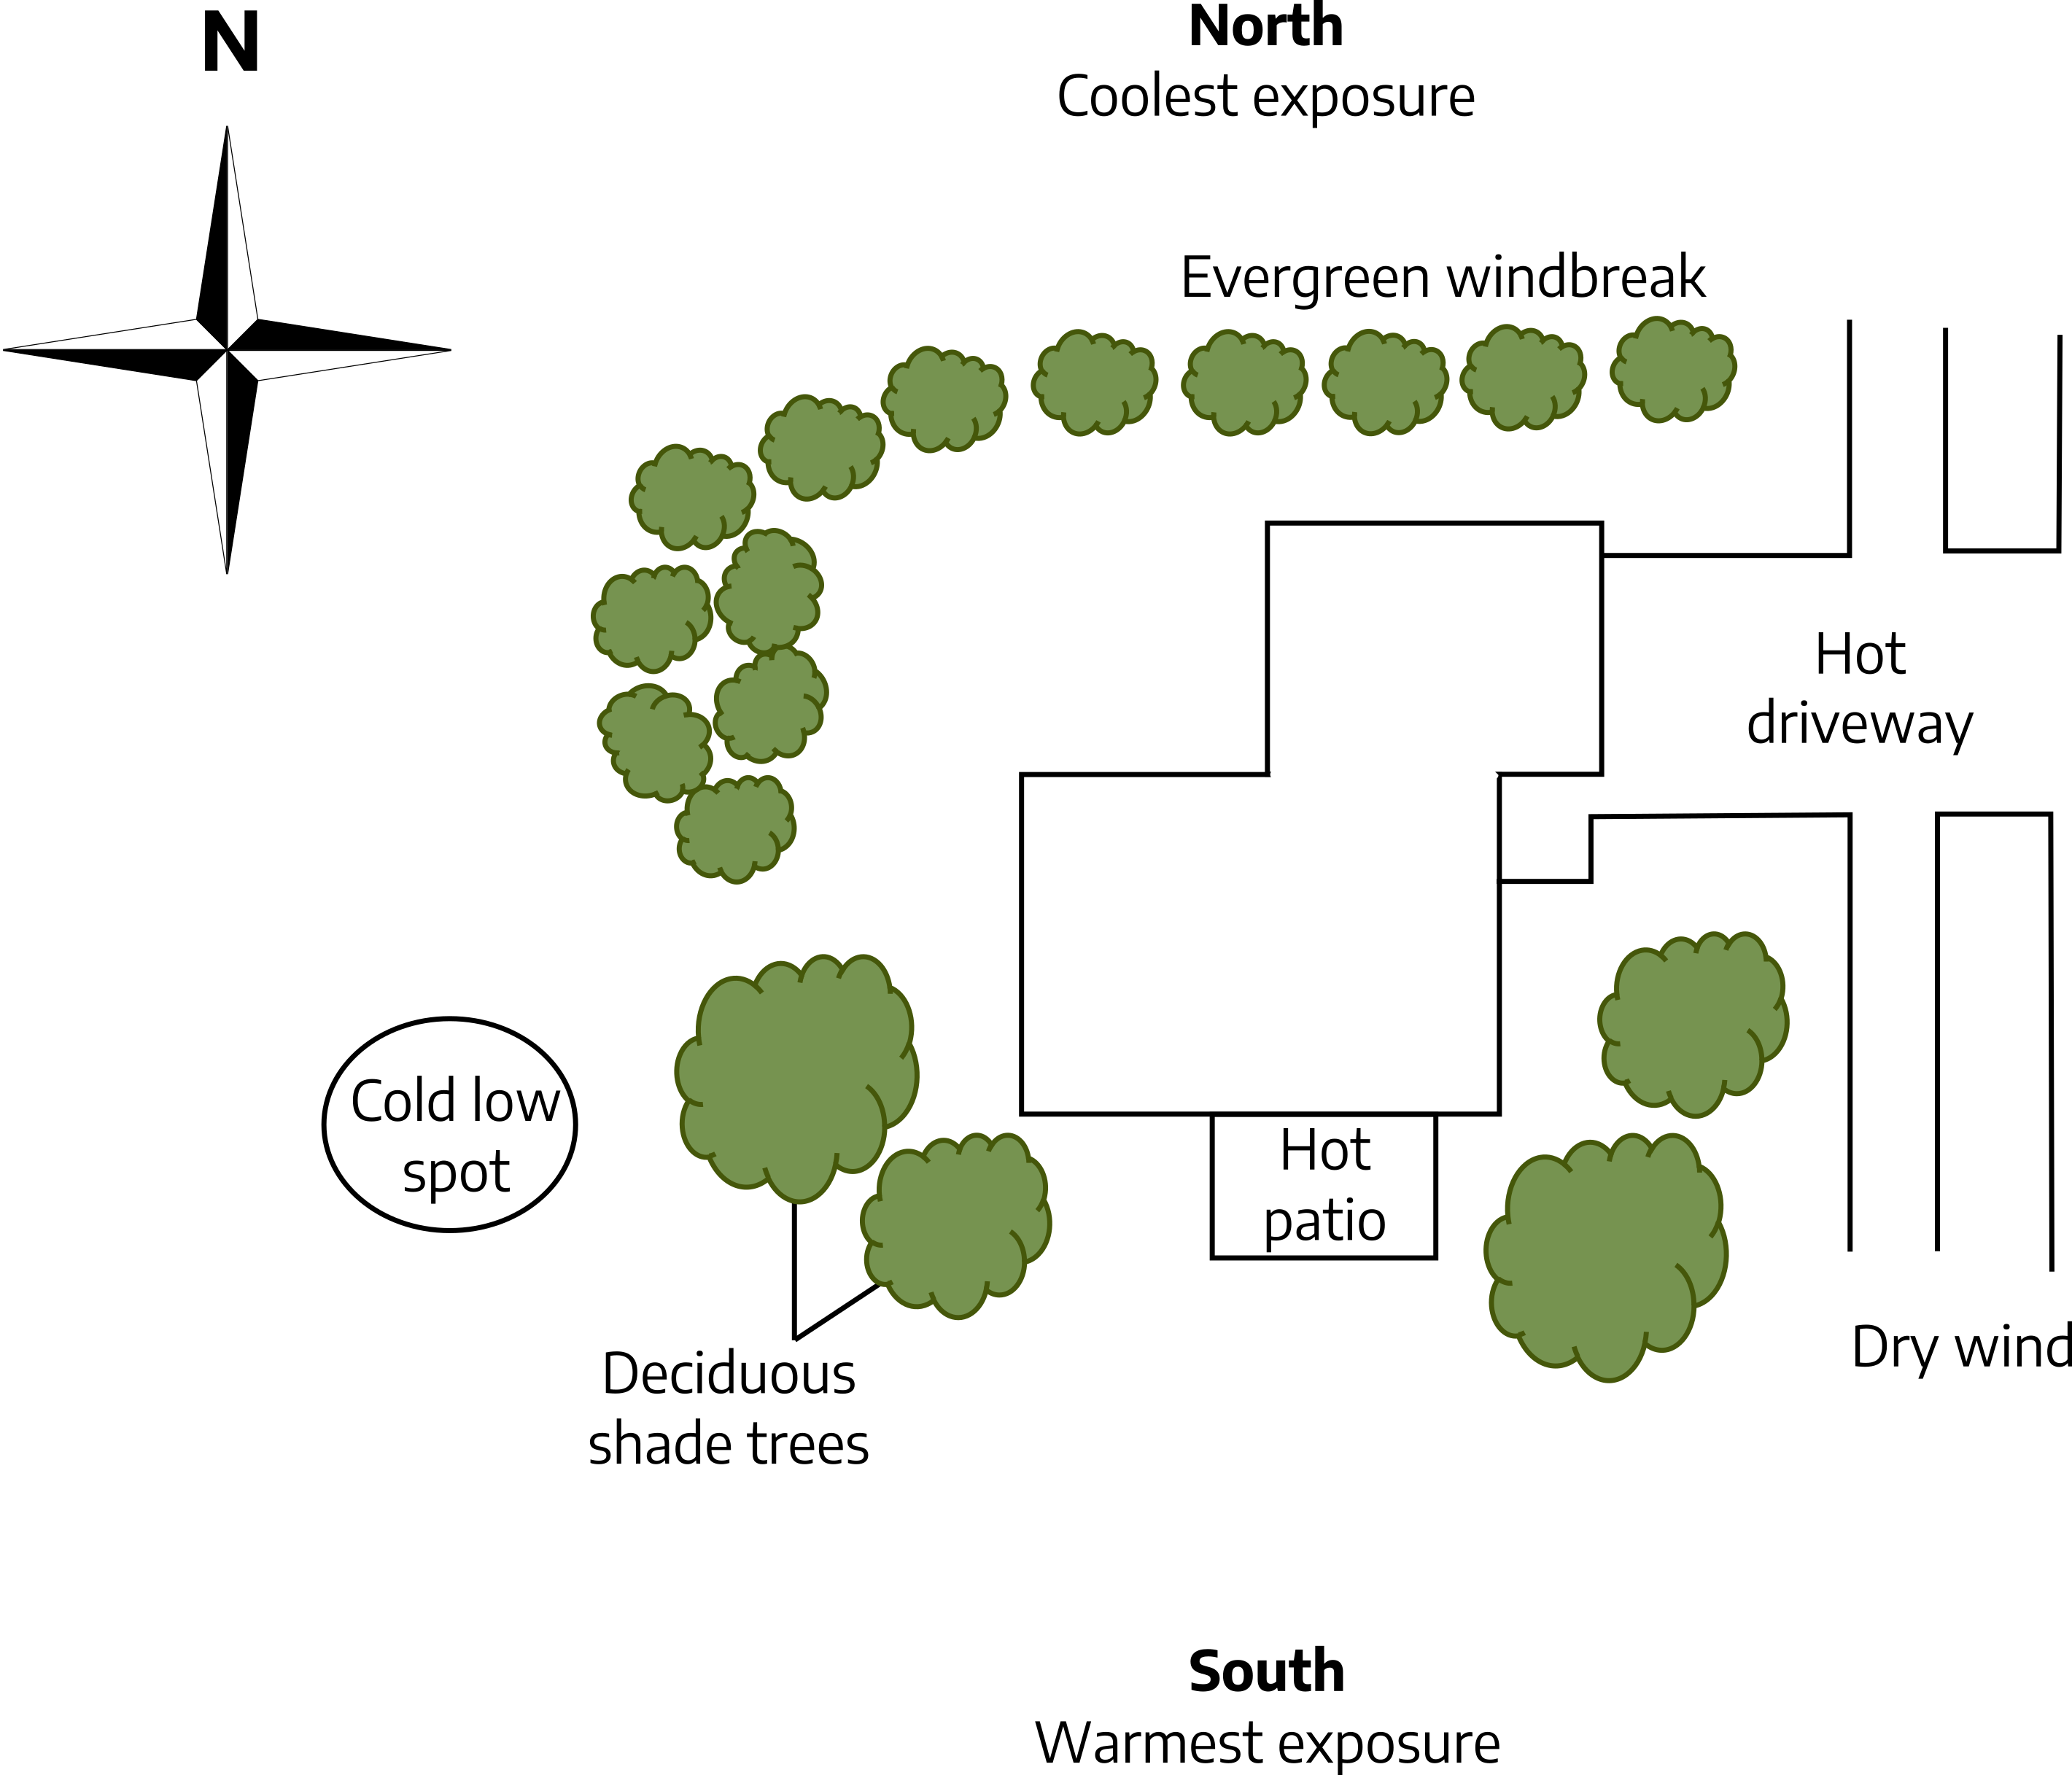
Site specific temperature
Note exposed surfaces that reflect or give off heat, such as patios and driveways. These can greatly increase air temperatures around them making the area hotter during the day and radiating back heat overnight. Identify wind patterns and areas protected from or exposed to cold winter winds or drying summer winds. Note any low areas where cold air might settle and injure marginally hardy plants. Northern exposures receive the least light, and therefore are the coolest. The east and west receive more light; western exposures are warmer than eastern because they receive afternoon light. The southern exposure receives the most light and tends to be the warmest. These factors can create microclimates that will affect plant selection and survival.
User Analysis
A landscape design should balance people’s wants and needs with the environment and natural resource protection and preservation. A user analysis is essential to creating a design that will keep the balance while changing over time as the user’s needs and lifestyle changes or as the users change. A user analysis should include: the people who will use it, their habits, actions, needs, desires, physical abilities, and economic abilities. A re-evaluation should occur when the user or situation changes. A successful landscape should change and mature with the user. For example: a plan for a young family would include inexpensive plantings and open areas in which children and pets can play. As a family reaches its middle years, more extensive and expensive plantings can be incorporated. The children’s play area can transition into other functions. For example, the sand box can become a water garden. With the approach of retirement years, the landscape should become lower maintenance. Mature trees and shrubs will carry the landscape theme, high-labor areas such as flower beds can be minimized. Ramps may replace steps.
Use Areas
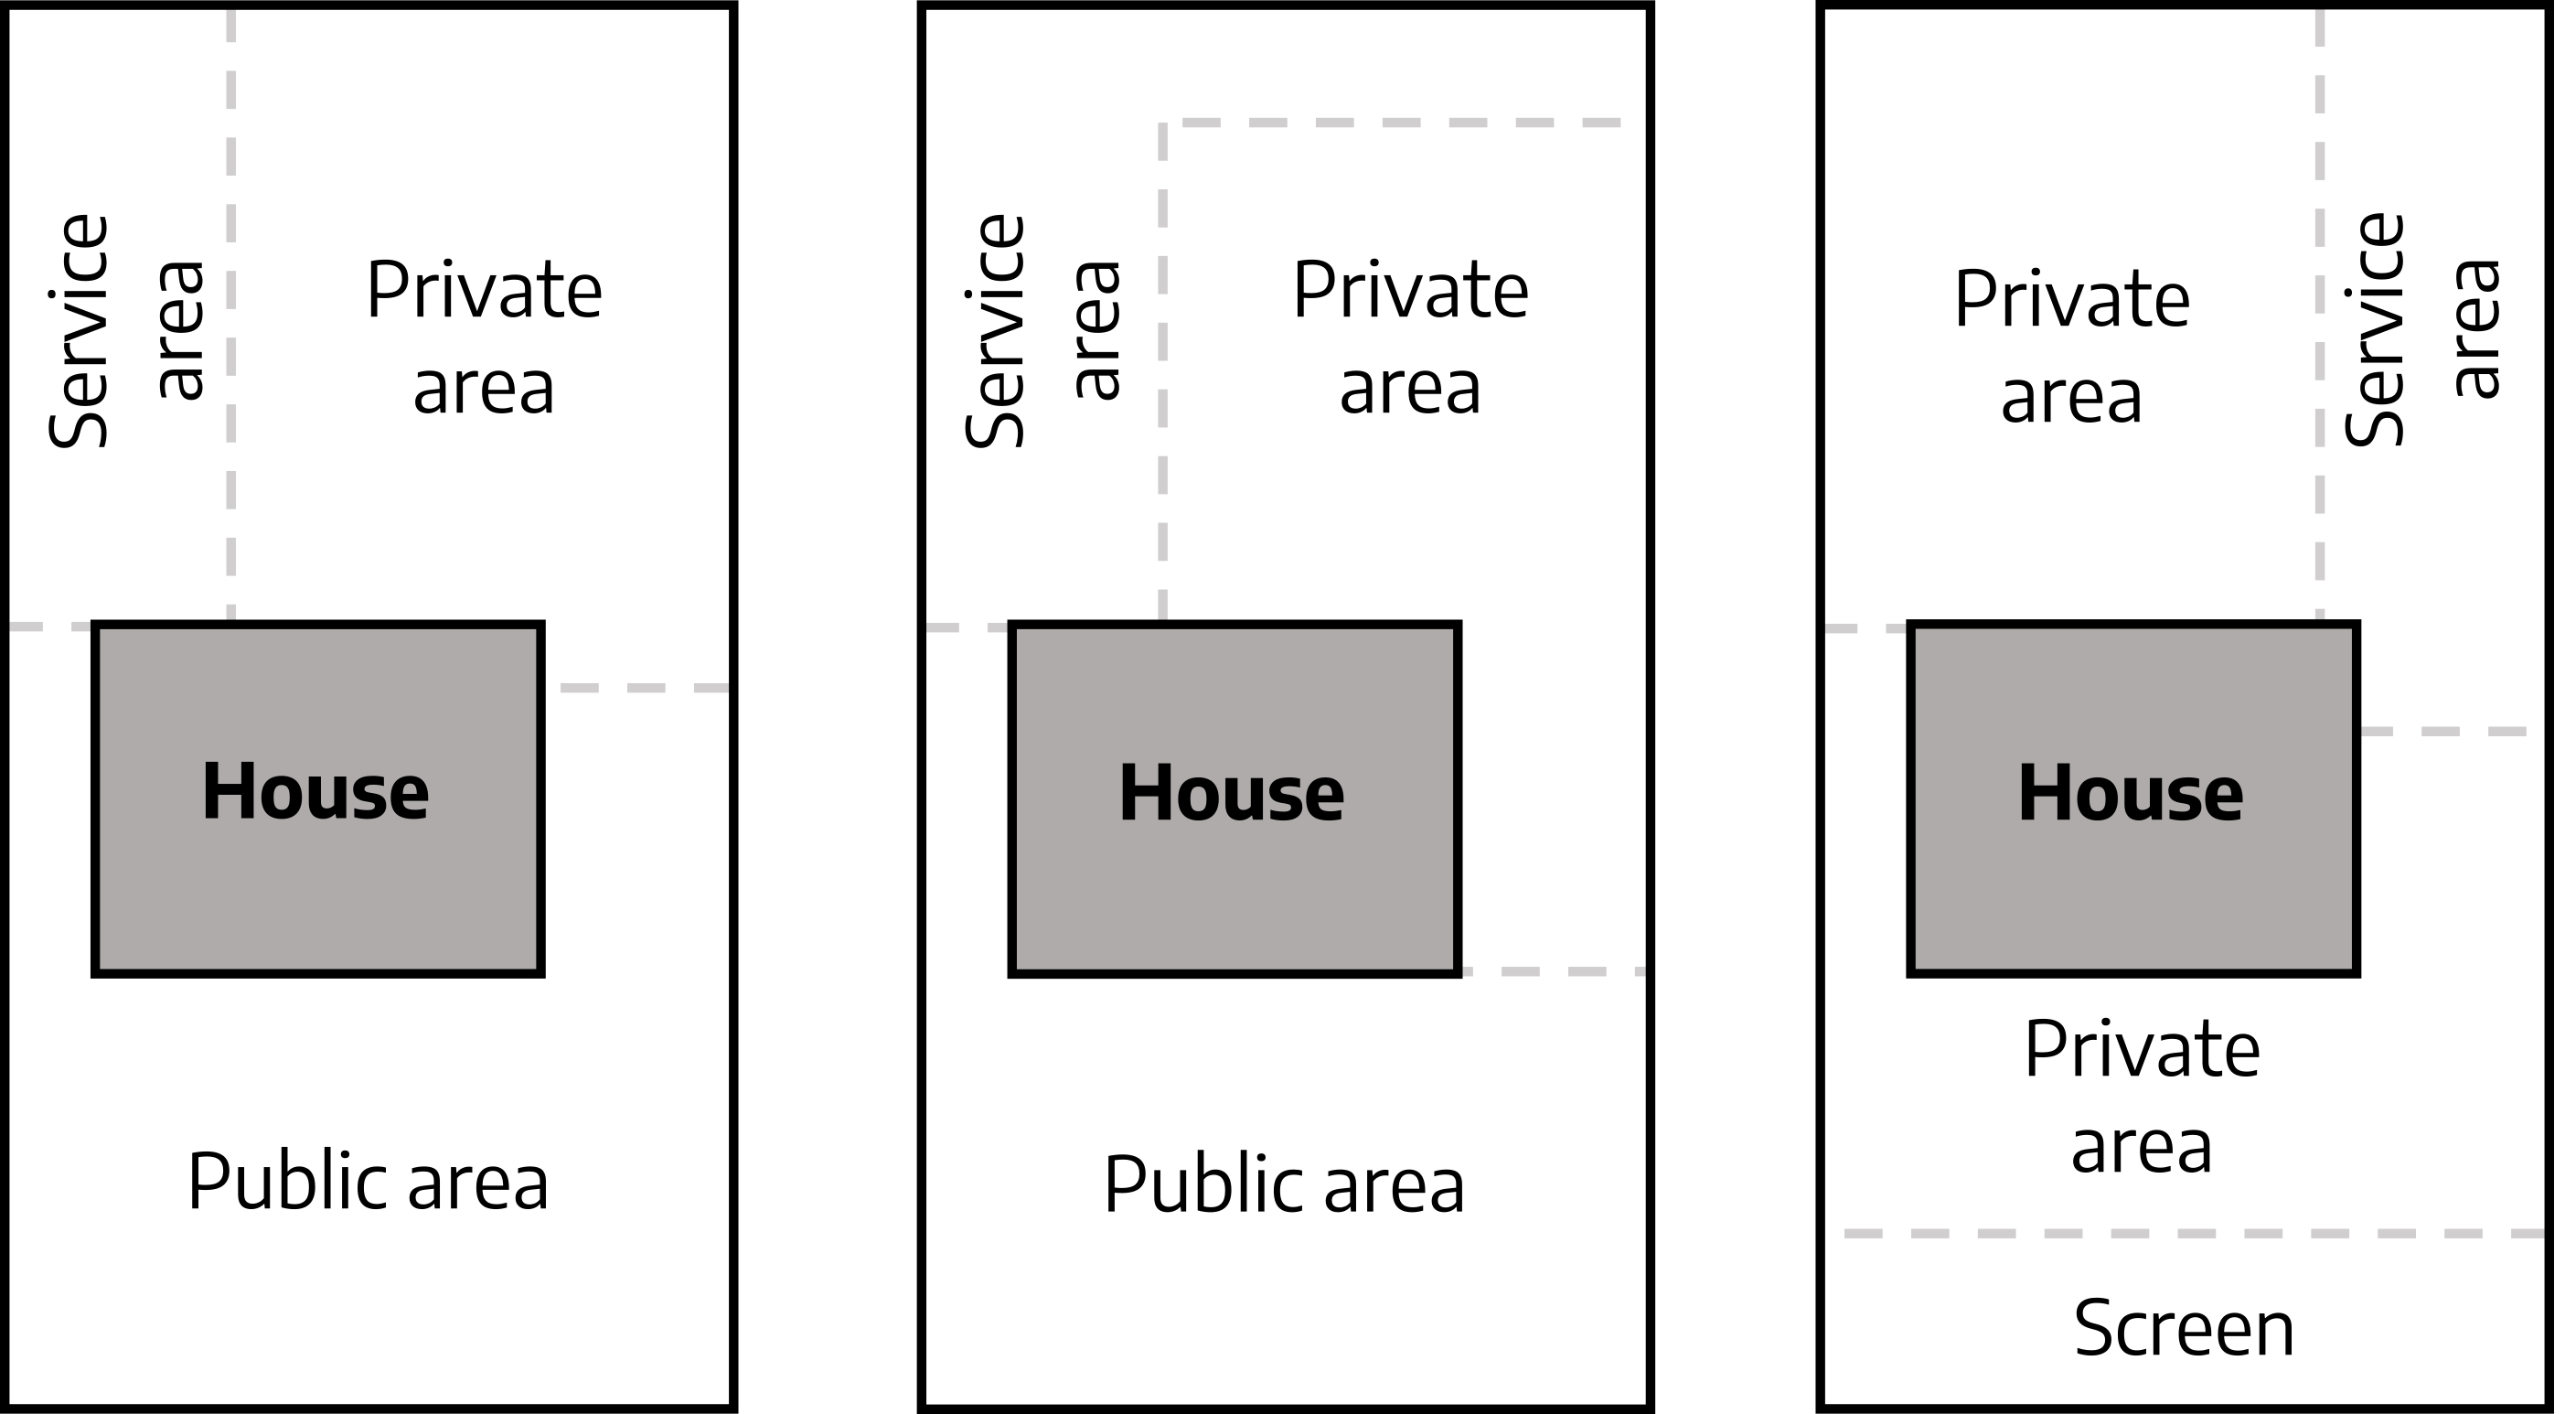
Public, private, and service areas can usually be easily defined in residential landscapes. The final design of these areas should reflect the user’s priorities, aesthetics and functional requirements.
Public – is the part of the site that passersby and visitors view and that the user sees every time they come or go from the site. It is generally in front of the house and is attractively maintained to compliment the house and give a welcoming appearance.
Private – is generally behind the house and is for the user’s activities such as entertaining, family activities, and pets. It is usually screened from public and/or neighbors views and has easy access from the house.
Service – is usually to the side of the house. It is the utility, work, or production area and it often connects the public and private areas. This area can be screened off and is for storage, work, garbage and recycling, oil tank, air conditioning unit, sheds, vehicle parking, wood storage, compost pile, etc.
Traffic Flow
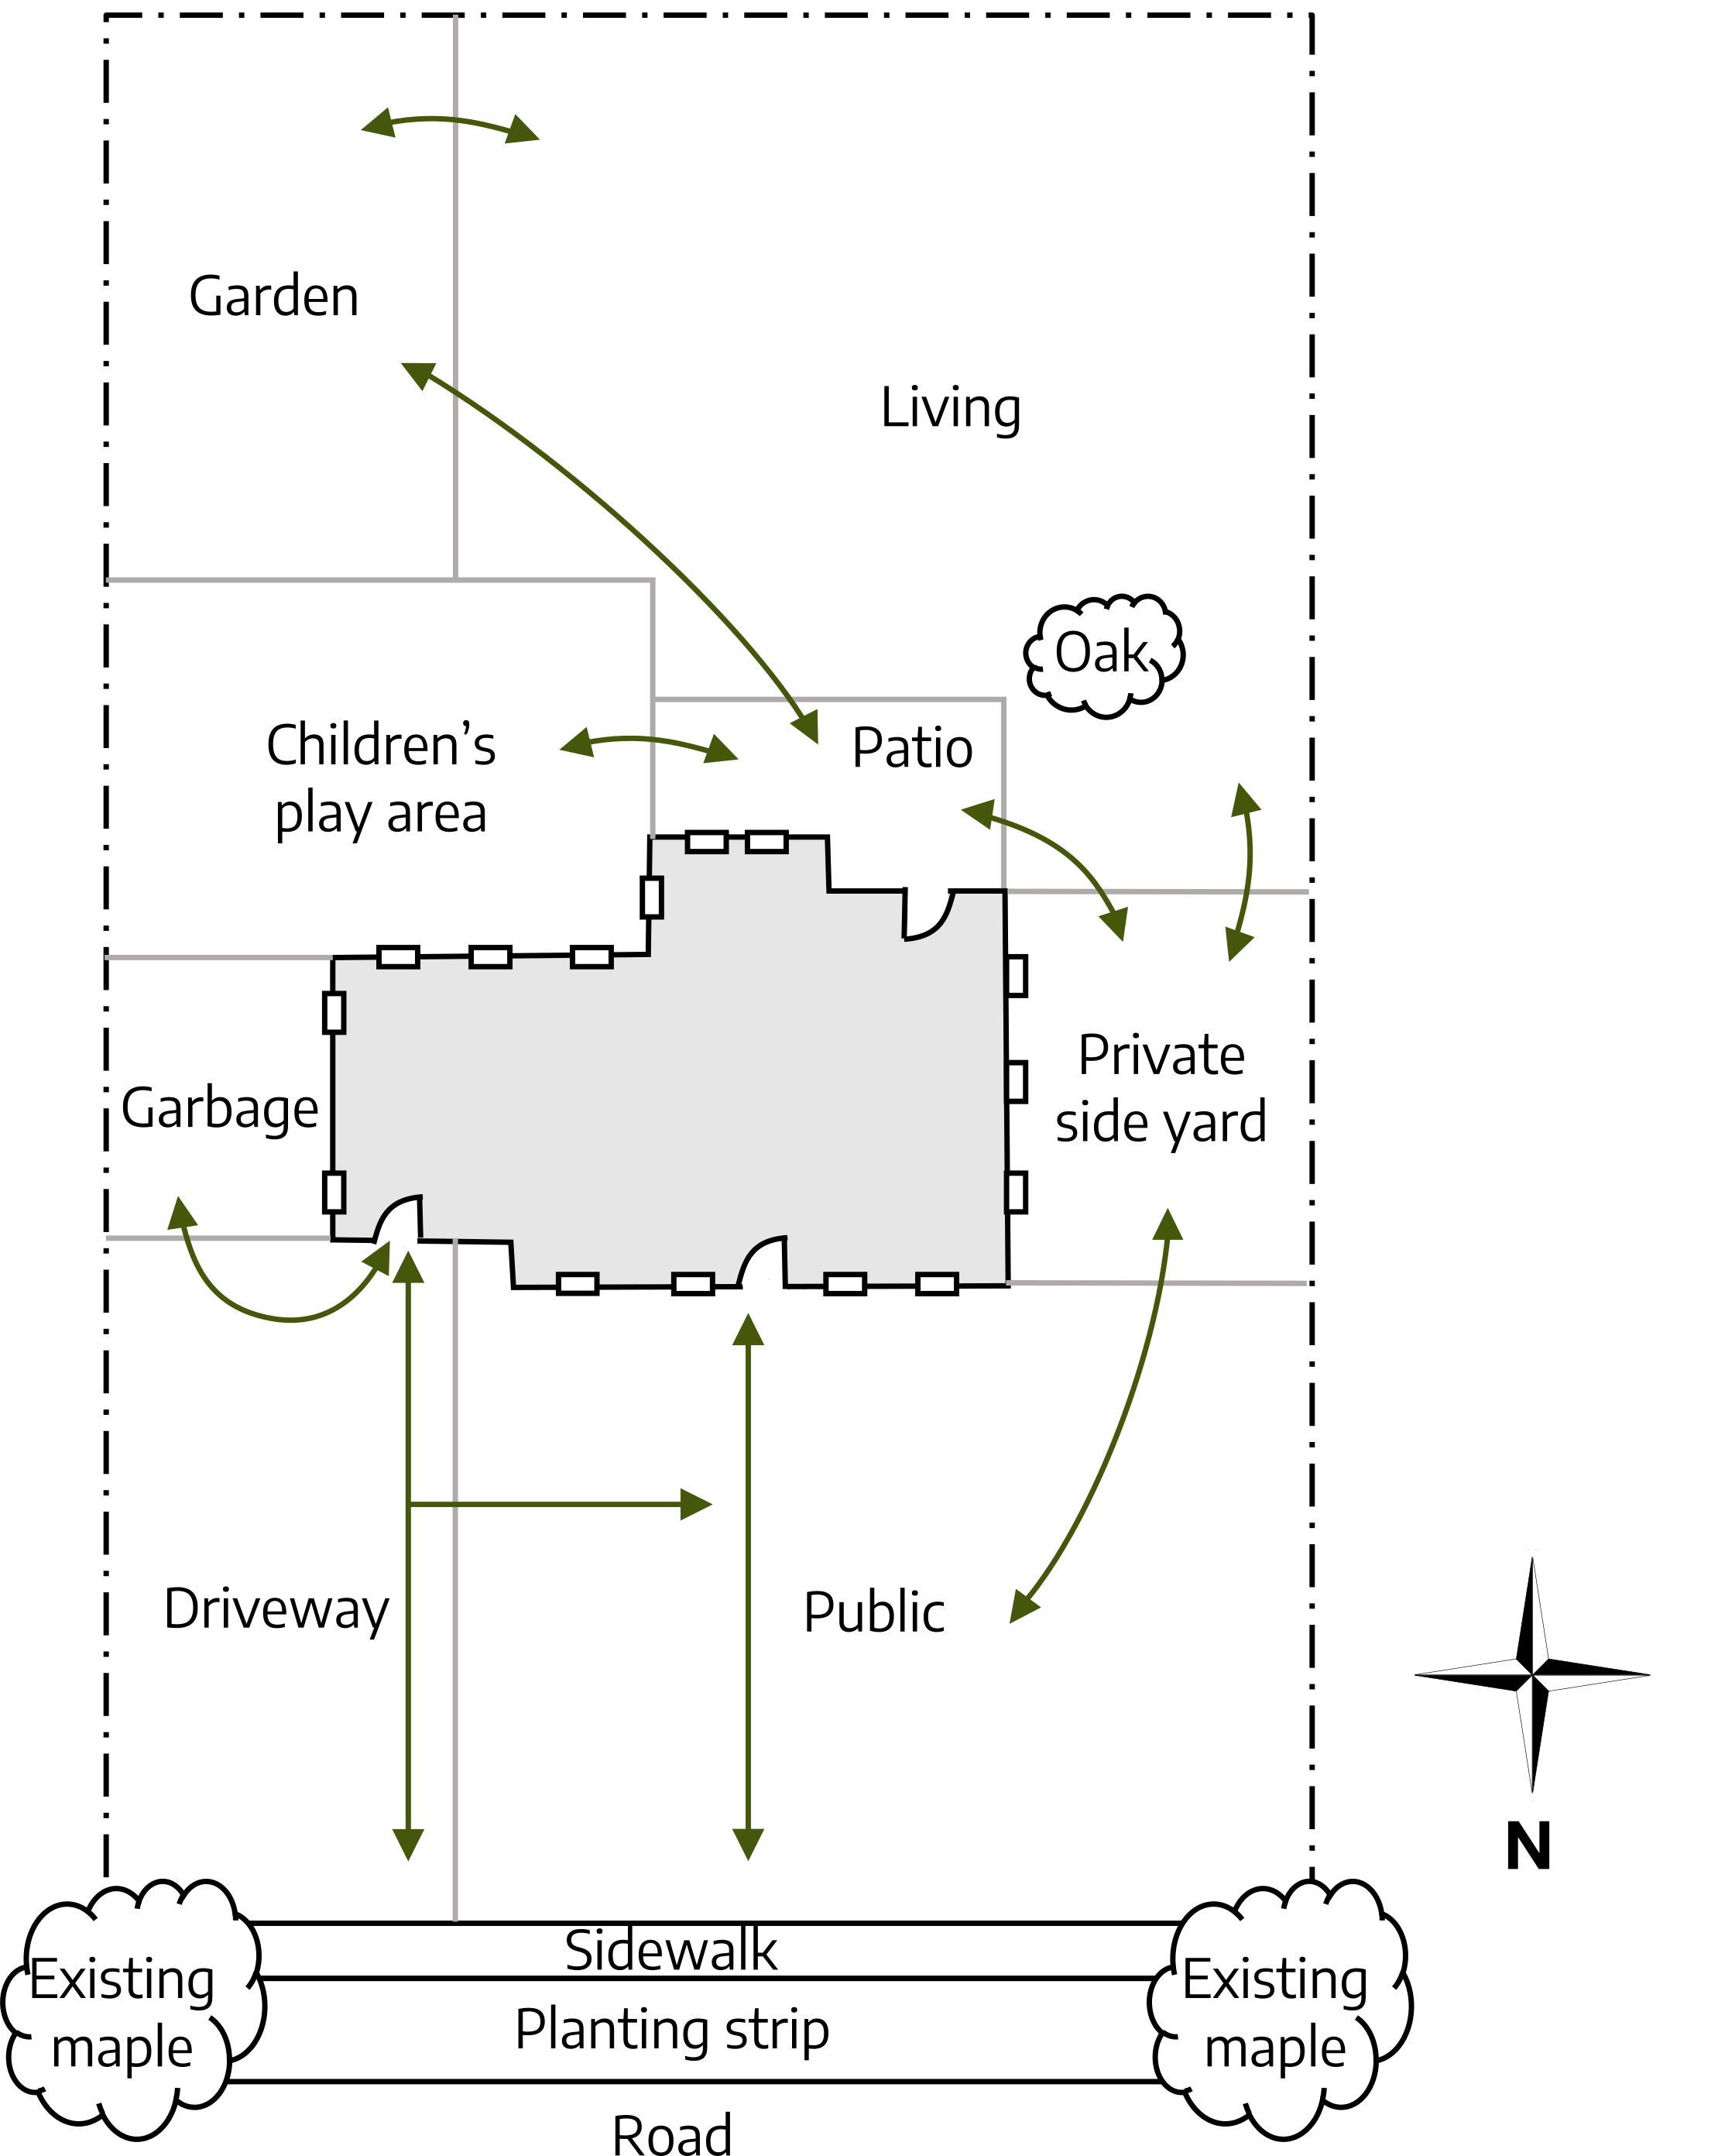
Think about different arrangements of these areas in relation to rooms in the house, user activities, views, and traffic flow. Draw the three general areas on one copy of the site map. Then within these large areas, draw smaller areas for specific functions or activities. Consider what is happening in each of the areas, time of day the area is being used, the frequency of use of each area and the traffic flow to, from, and through each area. Add lines to show vehicle and foot traffic patterns from area to area and from the house to each area. Different colors or line thicknesses can denote more frequently used walkways or vehicle routes. Don’t forget to create a legend to show what each color or line means. Consider whether the walkways should be formal or informal to fit into the overall design. Also note which walkways need to be wider, need lighting, or need heavy duty surfacing materials. For example, a wider walkway with an even surface is more formal and better for a front entrance, where garbage and recycling cans need to be wheeled, or for children, the elderly, high heels, and wheelchairs.
A narrower walkway with mulch or stepping stones is informal and can be used to meander through a garden area or across a turf area that is frequently mowed, or where there is infrequent activity or access. Heavy duty surfacing materials are needed for driveways, especially if there are turns for side parking areas or to pull into a garage. Consider using permeable paving materials for walkways and driveways for better water infiltration and reduced runoff. Also consider that driveways can serve additional functions such as a basketball court, tricycle riding area, or chalk art canvas.
Space Transitions and Dividers
Different areas of the landscape need to flow into each other and sometimes they need to be delineated, separated, or protected by fencing or screening.
- Transitions are the connecting links between spaces. For example: between the house and the landscape, between the front yard and backyard, between the service and private areas. Transitions should be composed of characteristics that are found in both of like common colors, textures, forms, plants, paving, or other materials.
- Dividers define or give privacy to spaces, create the background for outdoor activities, protect the landscape and house from prevailing winds or sun, and provide security. Dividers can be made up of fences, walls, plants as hedges, or plants as borders.
Elements and Principles of Design
The site and user analyses gather essential information that is incorporated into the landscape design. Each design is a unique creation. While there are no set rules, landscape designs are based on certain elements and principles. Keep the horizontal and vertical aspects of the site in mind when developing a design as landscapes are three-dimensional.
Scale
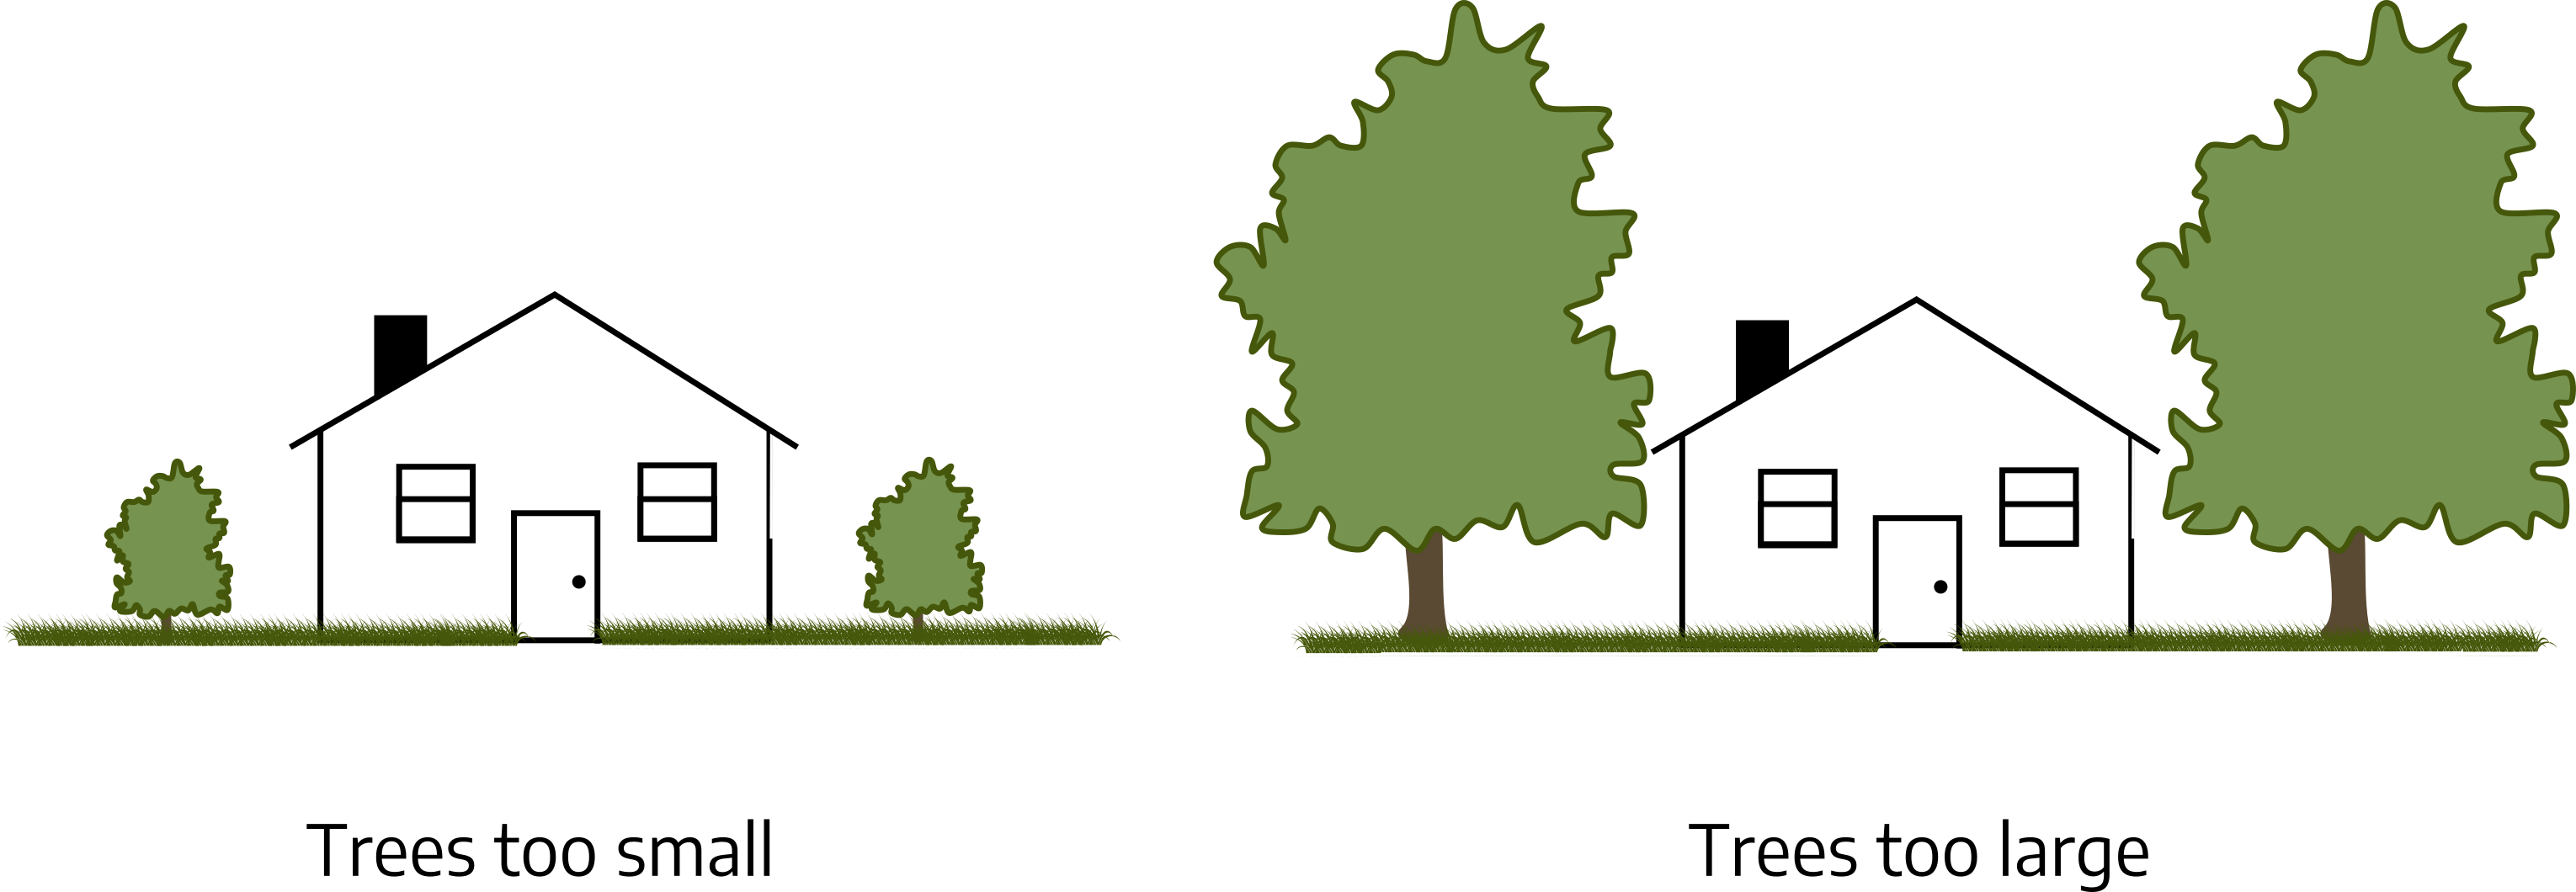
Scale refers to the size relationship or proportion between different parts of a landscape. This could be between buildings and plants, plants and plants, or plants and people. Scale can change over time as plants grow, so design using the mature size (height and spread) of the plants. This is especially important when locating trees and shrubs near a building. Plants that grow large may overwhelm a small building or small plants around a large building can be similarly out of scale. When a landscape is out of scale, it appears uninviting and awkward like something is missing or not in the right place.
Balance

Balance in landscaping refers to an aesthetically pleasing integration of elements. It is a sense of one part being of equal visual weight or mass to another. There are two types of balance — symmetrical and asymmetrical. Symmetrical balance is formal. It has an obvious axis with everything on one side duplicated or mirrored on the other side. Asymmetrical balance is more informal, and is achieved by using different objects on both sides of a less obvious axis. For example, when there is a large existing tree or shrub, a grouping or cluster of smaller plants is used to counterbalance it. Balance may also be achieved through the use of color and texture. Whichever type of balance is used in the design, the result is the same; there is equal visual weight or mass on each side of the axis.
Unity (Harmony or Simplicity)
Unity is grouping or arranging different parts of the design to appear as a single unit. Repetition of shapes, lines or colors creates unity. The design should look like everything belongs together and be aesthetically pleasing from every view. Groundcovers and turf unify a landscape by connecting different spaces. Repetition of the same plants in sweeps or groupings creates unity. A landscape with too many different plants, accessories (sculpture, yard ornaments, etc.), colors, shapes or textures in a limited area lacks unity. The landscape is chaotic, confusing, and disordered. The viewer doesn’t know where to look or go. A landscape with unity complements the house, draws the eye and the traffic flow in a specific direction, and presents an overall theme, tone, and order to the space.
Rhythm
Rhythm is even repetition, and it directs the eye in the landscape through continuity and flow. Rhythm is repetition of color, line, shape, or texture in regular measures and in a definite direction. Some examples are: several of the same plant planted exactly the same distance apart in a bed, the same curves repeated along a walkway or bed edges, the same paver pattern repeated every 3 steps in the walkway.
Accent (Focal Point)
An accent or focal point is something that deliberately stands out from the overall landscape. It gives the eye a place to rest. Without them, landscapes can appear monotonous or dull. Both the public and private areas of a landscape should have an accent. If those areas are divided into smaller areas, then each space should have one. Usually there is only one accent per space. Accents can be: sculpture, specimen plants, garden accessories, a water feature, boulders, the front door, or the house itself.
More Than Just a Pretty Space

Scott Douglas, Director Hahn Horticulture Garden, Virginia Tech
As landscape designers, our first goal is to create beautiful spaces, but what if you want more from your design? We can all go beyond visual beauty by creating aesthetic landscapes that also serve a purpose. Your design could also support pollinators, provide habitat for wildlife, grow food for nearby residents, improve water quality (rain gardens), or any combination of those purposes.
At the residential level, every gardener can support pollinators by planting a wide variety of blooming plants (including a lot of native plants) to extend the bloom period as long as possible. In order to maximize your bloom period, start by focusing on the extremes with early spring bloomers (bulbs and spring ephemerals) and late fall bloomers (asters and Russian sage). Once you have those bookends established, you can shift your attention to filling in between them with your favorite summer flowers.
Keep in mind that your plantings can evolve as the growing season progresses. If you underplant perennial plantings with bulbs and spring ephemerals, you can create multiple flushes of color in your beds. For example, daffodils and hyacinths can create a beautiful spring display and once they start dying back, the coneflowers, black-eyed susans, and other summer bloomers can take over and hide the dying foliage of the early bloomers.
As the size of the property you are designing increases, the greater the overall impact can be. Most office parks and corporate campuses have massive swaths of turf that could be transformed into meadows or large-scale rain gardens. Many college campuses have underutilized outdoor spaces that could serve similar purposes. At the national scale, our highway and interstate systems feature thousands of acres of highly managed turf along the shoulders and medians that could be converted into productive landscapes. Imagine if the interstate near you was a lush landscape of native grasses and wildflowers!
While this all sounds very euphoric, there are some challenges to designing beyond the typical landscapes that we see today. All landscapes require maintenance, even something as “wild” and “native” as a meadow planting. A meadow garden will require long-term maintenance by people with strong horticultural knowledge, way beyond what is required for the “mow-blow-go” landscapes that we are accustomed to seeing these days. Maintenance staff will need strong plant identification skills so they can determine which plants should stay and which plants need to be removed. Invasive weeds will continually assault these landscapes, with their seeds being blown in or deposited by birds and other animals. Once these invasive plants establish themselves, they will self-seed and slowly take over the planting. It will be a continual battle to keep the weeds at bay.
There is so much opportunity in the landscape and every landscape can serve a purpose beyond just aesthetics. What purpose will yours serve?
Sustainability
Sustainable landscaping can also be called low maintenance, green, environmentally friendly, or conservation landscaping. The following sustainable concepts and practices should be kept in mind as a landscape design is developed. All the practices can’t be used in every landscape, but even incorporating a few will make the landscape healthier, more resilient, and less maintenance intensive.
Sustainable Concepts
- Biological diversity – using many different plant species promotes beneficial insects, provides food and habitat for animals, and reduces pest and weather impacts.
- Resource conservation – using existing topography, water, plants, and views in the design reduces costs and disturbance to the environment, using locally sourced plants, construction, and other materials saves transportation costs and supports the local economy.
- Long term planning – planning for mature plant sizes and the long-term look and use of the landscape reduces labor and costs by minimizing plant crowding and maintenance.
- Low impact / input – disturbing the site as little as possible and using healthy, site appropriate plants reduce maintenance and pesticide and fertilizer use.
- Water conservation – grouping plants with similar water needs, using rain sensors, rain chains, rain barrels, and rain gardens/swales to collect and manage runoff, help to conserve valuable water resources.
Sustainable practices include:
- Rain chains and barrels
- Rain sensors
- Landscaped swales
- Permeable paving
- Ground covers and mulches
- Compost
- Canopy layering
- Passive solar heating/cooling
- Plant diversity
- Plant selection and spacing
- Plant grouping based on water
- Drip irrigation and watering bags
- Aeration
- Long term planning
- Correct planting
- Minimal site disturbance
- Grasscycling
- Recycled products
- Low input lawn
- Reduced or no fertilizers
- Zero or as needed pesticides
- Solar lights
- Soil testing
- Storm drain protection
- Use native plants
- Minimal deadheading
Construction Materials
Landscape design is not synonymous with plants. Often there are structures (pergolas, gazebos, fences, sheds, decks, arbors, benches, etc.) and hardscape (walls, walkways, steps, terraces, patios, outdoor kitchens, fire pits, lighting, etc.) included in a design. Careful consideration should be given to the construction materials and their use in order to create the desired design aesthetic. A wide variety of products are available, and many factors influence the choices.
Considerations:
- The specific look or effect being created
- Budget – may need to do it in phases
- Do it yourself or hire someone
- Timeline for the project(s) and best time of year to do it
- Natural, synthetic, or recycled products
- Source location – local, non-local, on-line
- Availability of the product
- Shipping/hauling/delivery expenses
- Durability and weather resistance
- Space to store materials and supplies (e.g., piles of stone or pallets of pavers)
- Security of stored materials (from vandalism or theft)
- Access for delivery or transportation of materials to specific construction site (e.g., delivered in the front driveway, but need to transport to the back yard for use)
- Any property restrictions (e.g., colors, fence height/style, historic, easements, etc.)
Planting Design (Plan)
On a fresh copy of the site base map, mark where plants are needed for:
- Separating areas
- Screening undesirable views or privacy
- Providing shade or windbreaks
- Accent (e.g., specimen plant or to complement the house)
- User activities (e.g., turf for play, herbs and vegetables, plant collections, butterfly, cutting or rain garden, erosion control, pet area, seasonal interest, etc.)
- Specific conditions (e.g., dry shade, hot and dry southwest exposure)
Review the site analysis maps and information and the user analysis information to determine what plants are needed where on the site. Think about individual plants and groups of plants that will meet the desires of the user(s), serve a purpose (functionality), tie the various areas together into a unified plan (aesthetics), and be environmentally sustainable. Keep in mind that landscapes are dynamic. Plants grow and change over time. Consider successional planting. For example, planting annuals or perennials between the shrubs until they mature or planting a sun loving groundcover under the newly planted small tree, to be changed to a shade loving groundcover in several years when the tree canopy widens).
Different symbols should be used to indicate the different types of trees, shrubs, groups, and groundcovers. Create a legend and label each symbol or use these examples. Add symbols for the hardscape later. A first draft of a planting design might just be different sizes of circles in the general locations. As the design comes together, the next drafts should use the different symbols for specific types of plants. The symbols should be drawn to scale (plant or group width) in order to see how many of a plant are needed or will fit into the actual space. Examples of common symbols are below. More complicated symbols can be found on-line. All of this can be done without knowing the exact plants. For example, an evergreen hedge is needed for privacy on the east side of the site or a deciduous tree is needed on the southwest corner of the house, or a butterfly garden is located off the patio in a sunny area.
As the planting design becomes more detailed, exact plants can be specified. Sometimes there may only be a certain amount of space available at a site location and that will determine which exact plant is used (e.g., only 6’ width for a hedge). Sometimes the user already knows exactly which plant(s) they want and that is incorporated into the design (e.g., a 15’ wide weeping Japanese maple accent plant or a 60’ wide chestnut oak for shade). Sometimes research to find the exact plant for a location or purpose is needed. In that case, make a list of the specifications to help narrow down the plant choices.
Plant choice specifications:
- Height – low, medium, tall
- Form – spreading, upright, arching, globe
- Purpose – shade, background hedge, screen, accent, mass
- Seasonal Interest – fruit, flowers, foliage, bark, fragrance
- Type – annual, perennial, woody, herbaceous, evergreen, deciduous, tree, shrub, bulb
- Maintenance – pests, pruning, debris (leaves, berries, cones)
- Cultural Needs – shade, sunlight, moisture requirements, hardiness zone
Add a planting key to the planting design to list the exact plants as they are selected. Keep a “backup” list of second and third choices in case the first plant choice isn’t available. The planting design may need to be implemented in phases if there are time, availability, or budget constraints. For example, bed areas can be defined, prepared, and mulched during the summer but planted in the fall; large trees, which are expensive, can be planted first and the other plants when the budget allows; or the area around the patio can be planted but the back of the yard can wait until later. Numerous resources are easily available to help with plant selection. A good place to start is at the local Extension office, nearby botanical or public gardens, or with local garden groups, clubs, or societies.
Using native plants is becoming the norm rather than the exception. While there are many reasons and benefits to using native plants, the design rule should always be put the right plant in the right place. The Virginia Department of Conservation and Recreation and the Virginia Native Plant Society are good resources for more information on native plants.
Benefits of using native plants:
- Increase landscape biodiversity, sustainability, and resilience
- Reduce maintenance and chemical (fertilizer and pesticide) inputs
- Provide food and habitat for beneficial insects and wildlife
- Support the local ecology
- Provide a sense of place (e.g., palm tree in Florida, cactus in Arizona)
- Manage erosion and stormwater
- Prevent invasive plants
- Provide beauty
- Improve soil, water, and air quality
Considerations for using native plants:
- Make sure the plant is native to the area (plants native to other parts of the United States may not do well in Virginia)
- Do not dig native plants from the wild and transplant into a landscape (unless they are being rescued)
- Urban/developed sites often don’t have the specific growing conditions needed (soil, water, sun/shade exposure)
- A native plant just may not be the best choice for a particular location or design need
- Native plants can sometimes be difficult to find, transplant, and establish
- Native plants may not be as “ornamental” or aesthetically pleasing as non-natives
- Many native species are too large in size for smaller landscapes
- Some native species are aggressive spreaders or seeders and can be a maintenance headache or invasive
- There is often controversy about what exactly is native (i.e., before a certain historical time, are cultivars or varieties of a native species is truly “native”)
Energy Conservation through Landscaping
A well designed landscape can significantly reduce home heating and cooling cost; making the home and budget more comfortable while conserving energy and helping the environment.
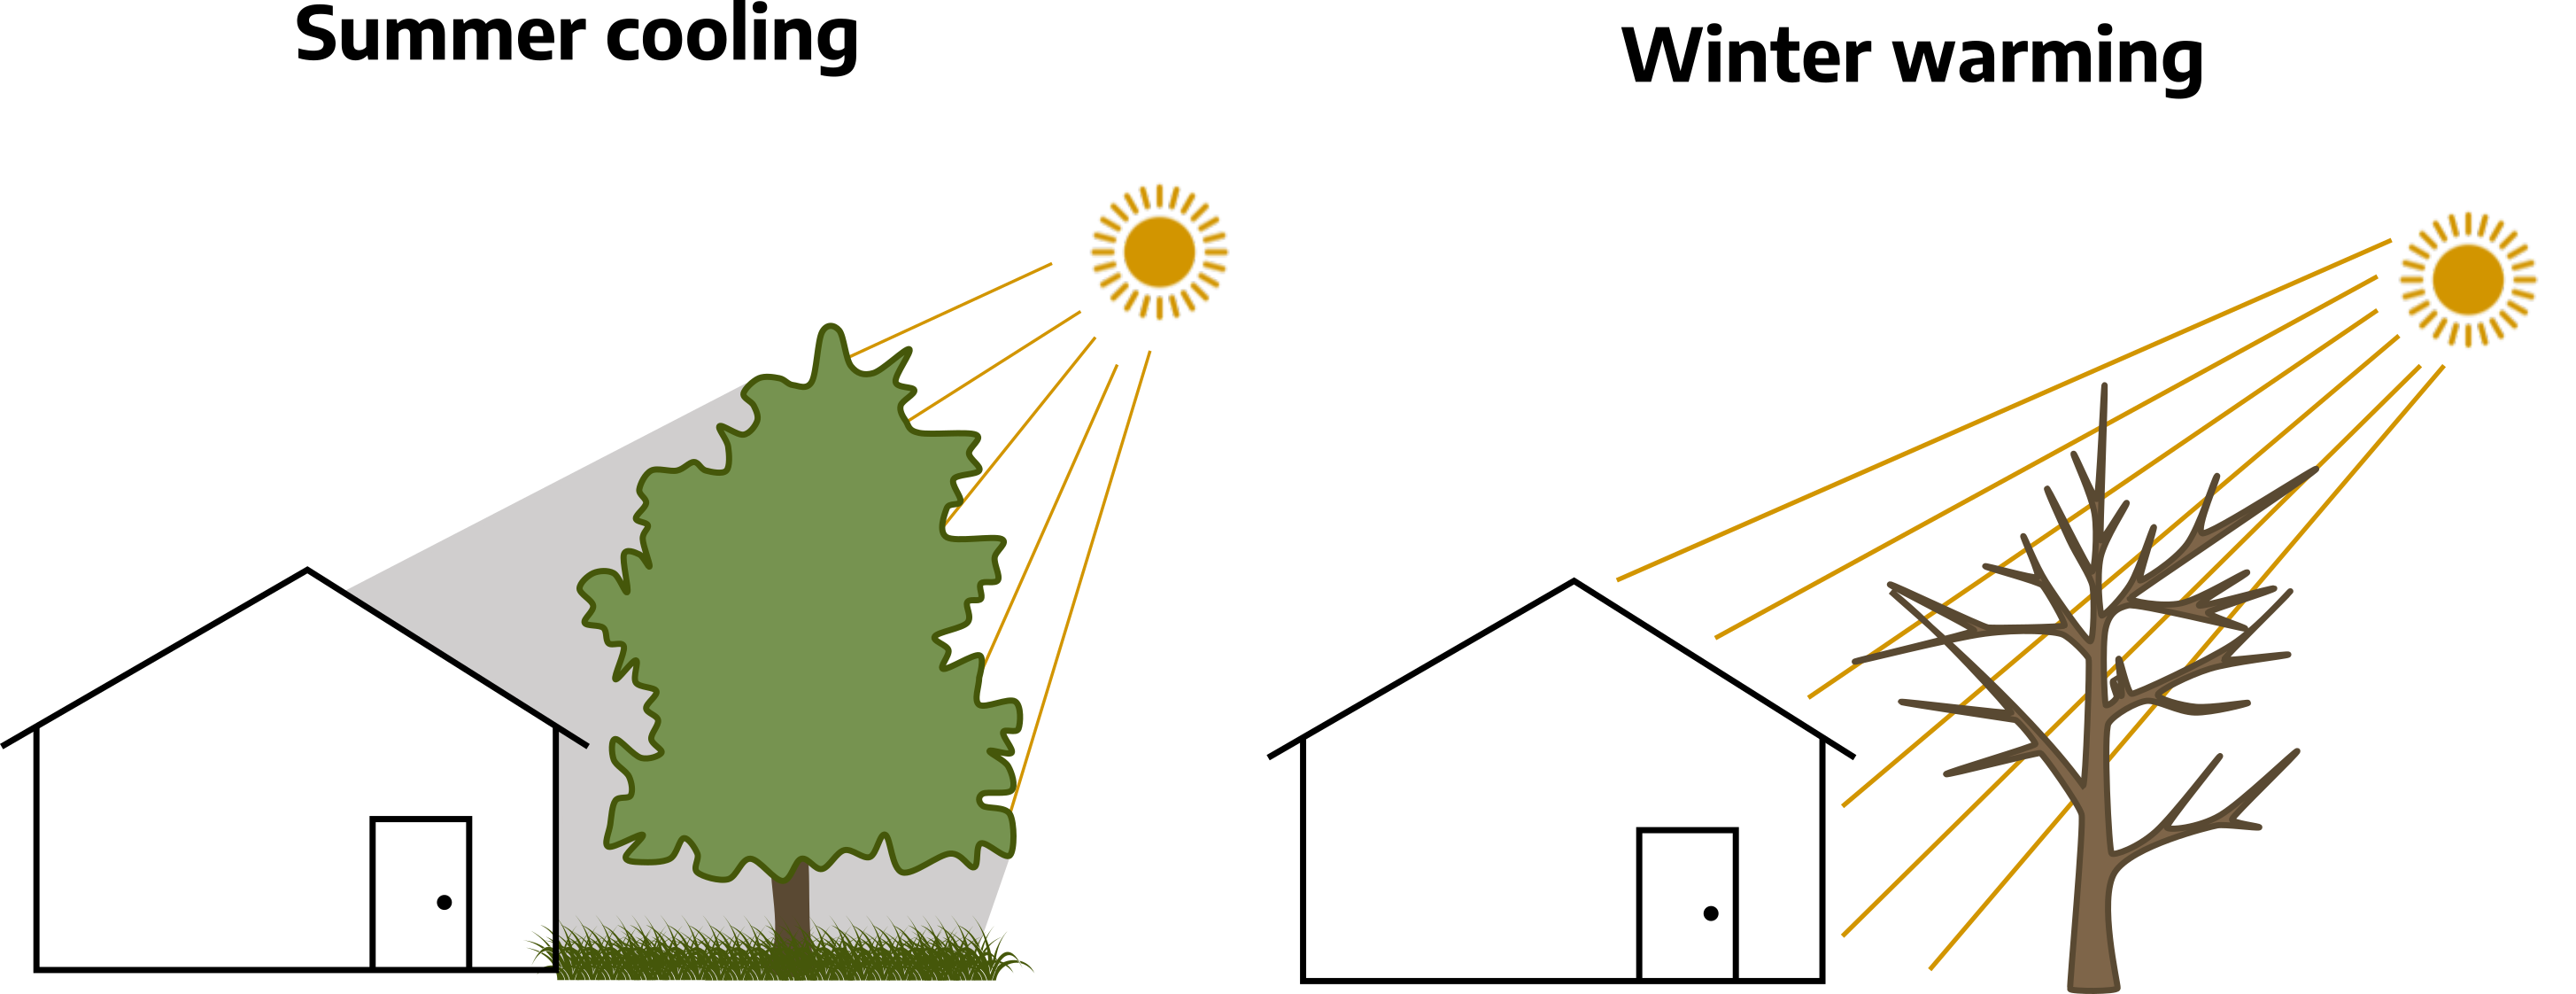
- Deciduous trees (those that shed their leaves) planted on the west sides of a house cast shade on the house keeping it cooler which reduces air conditioning costs. In the winter when the leaves fall off, the sun warms the house reducing heating costs. This is especially effective on houses with brick, concrete, or dark colored walls. Remember to account for the mature size of the tree canopy and don’t plant it too close to the house. Branches that extend over the room can drop debris that can stain shingle and clog gutters. Also don’t plant a tree if it will block any solar panels on the house.
- Collectively, tree and shrub canopies cool the air through transpiration; thus conserving energy.
- If trees can’t be used to shade the house, then partial shading can be accomplished with shrubs. Plant them far enough away from the foundation so that the mature canopy edge reaches 1’ from the house. This creates shade and an insulation space, but keeps the branches from rubbing the house or causing mold or mildew problems and provides access space.
- Using trees, shrubs or a trellis or fence to shade the air conditioning unit reduces the air temperature around the unit which make it more efficient. Again, this reduces costs and energy use, and can also increase the life expectancy of the unit.
- Evergreen trees planted on the north side of the house block cold winter winds which reduces the amount of heating required in the winter.
- Trees can also be planted to influence wind movement around and through a house. The idea isn’t to reduce winds (as they can help cool the house), but to influence the wind’s circulation patterns. This is appropriate for times of the year when temperatures are mild and air conditioning is not needed or when there is no air conditioning. Determine the prevailing wind direction, then plant trees along that pathway to act as a funnel for breezes into the windows, thereby maximizing natural cooling. If there are existing trees, then prune up the low branches to allow the breezes to pass through to the house. If air conditioning is used frequently, then directing winds with tree position can actually increase air conditioning use and thus cost.
- Light-colored construction materials in the landscape (for roofs, fences, decks, and patios) reflect light and don’t absorb as much heat; keeping the house and surrounding living areas cooler. Planting a green roof on the house acts as insulation. Inside temperatures are more even and heating and cooling costs are reduced. Green roofs also significantly lengthen the life expectancy of a roof and reduce stormwater runoff. For more information on conserving energy with the landscape see VCE Publication “Conserving energy with the landscape” 426-712.
Maintenance
Landscape maintenance should be assessed in the user analysis and accounted for in the design process. The level of maintenance (low, moderate, high) is subjective and totally dependent on the user. Someone who enjoys working in the yard, may consider pruning, raking leaves, mowing or pulling weeds low or moderate maintenance. Someone who wants a well maintained landscape but can’t or doesn’t like to do those tasks would probably consider a landscape requiring them high maintenance. Realize that all landscapes need maintenance. New landscapes or recently renovated areas in a landscape will need more as plants get established. Mature or more naturalized landscapes should require less maintenance unless renovation or invasive species control is needed. Landscapes that have more spaces, are more elaborate, are large, are formal, or are heavily used often need more maintenance. A low-maintenance plan is the goal of most homeowners, and that can be achieved through thoughtful design, careful planning, and smart plant choices.
Practices for cost efficiency and lower maintenance:
- Keep the overall design simple.
- Decide which tasks the user can/will do and which will be hired out.
- Have a small lawn area or none at all.
- Avoid sharp angles, tight corners, and irregular areas that are hard to mow.
- Layer plant canopies (tree, shrub, groundcover) for habitat for beneficial insects and birds.
- Use groundcovers or natural mulches to reduce weeds and conserve water.
- Use permeable paving in heavily traveled areas to reduce compaction and runoff.
- Provide mowing strips of brick or concrete to edge flower beds and shrub borders.
- Use fences or walls instead of clipped formal hedges for screening.
Use fewer annuals and more trees, shrubs, perennials and bulbs for color. - Use annuals in small amounts for accent in highly visible areas.
Select plants well adapted to the site conditions, with pest resistance (including any turf). - Do not have an irrigation system.
- Group plants with similar water requirements.
- Use plants that have low debris (pine cones, leaves, fruit, sap, etc.)
- Avoid aggressive plants (spread quickly or seed prolifically)
- Scout frequently to catch any problems early.
Themes
A theme is an idea or concept. There are as many themes for landscapes as there are gardeners and designers. An entire landscape can be designed around one theme, or the design can incorporate several themes. Theme can be based on particular historic periods, location, plant species, colors, architectural or gardening styles, hobbies, etc.
Examples of garden themes:
- Rose or bulb
- Butterfly or pollinator
- Water or bog
- Topiary
- Rain garden
- Medicinal
- Herb or vegetable
- Seaside
- Tropical Fragrance or texture
- English cottage
- Winter interest
- Native plant
- Mediation
- Evening or night
- Cut flower
- Edible landscape
- Rock or xeriscape
- Japanese
- Wildlife habitat
- Sculpture
Additional Resources
- VCE Publication “Problem Free Trees for Virginia Landscapes” 450-236 (PPWS-69P)
- VCE Publication “Trees for Problem Landscape Sites — Air Pollution” 430-022 (HORT-123P)
- VCE Publication “Rain Garden Plants” 426-043 (SPES-57P)
- VCE Publication “Backyard Wildlife Habitats” 426-070
- VCE Publication “The Effect of Landscape Plants on Perceived Home Value” 426-087
- VCE Publication “Planning the Flower Border” 426-202
- VCE Publication “Patriotic Gardens: How to Plant a Red, White, and Blue Garden” 426-210 (HORT-185)
- VCE Publication “What About Landscaping and Energy Efficiency?” BSE-145(BSE-334NP)
- VCE Publication “Selecting Landscape Plants: Flowering Trees” 426-611 (SPES-321P)
- VCE Publication “Selecting Landscape Plants: Boxwoods” 426-603 (HORT-290P)
- VCE Publication “Selecting Landscape Plants: Ground Covers” 426-609
- VCE Publication “Selecting Landscape Plants: Shade Trees” 426-610
- VCE Publication “Selecting Landscape Plants: Flowering Trees” 426-611
- VCE Publication “Selecting Plants for Virginia Landscapes: Edible Landscape Species – Trees” SPES-316
- VCE Publication Energy series: “What about Landscaping and Energy Efficiency?” BSE-145NP
- VCE Publication “Creating a Water-wise Landscape” 426-713
- VCE Publication “Landscaping for Less in the Landfill” 426-716
- VCE Publication “Selecting Turfgrass” 426-719
- VCE Publication “Mulching for a Healthy Landscape” 426-724
- VCE Publication “Tree Fruit in the Home Garden” 426-841
- VCE Publication “Virginia Firescapes: Firewise Landscaping for Woodland Homes” 430-300
- VCE Publication “Problem-free Shrubs for Virginia Landscapes” 450-236
- VCE Publication “Problem-free Trees for Virginia Landscapes” 450-237
- VCE Publication “Introduction to Cold-Hardy Tropicals for Virginia Landscapes” 3005-1446
- VCE Publication “Virginia Turfgrass Variety Recommendations” CSES-17NP
- VCE Publication “A Lawn To Dye For – How to Create a Perfect Lawn: Choosing The Right Grass” CSES-41NP
- VCE Publication “For the Birds, Butterflies & Hummingbirds: Creating Inviting Habitats” HORT-59NP
- VCE Publication “Selecting Plants for Virginia Landscapes: Showy Flowering Shrubs” HORT-84P
- VCE Publication “Selecting Plants for Virginia Landscapes: Edible Landscapes” SPES-317
- Landscape for Life
- US National Arboretum
- VA Dept. of Conservation & Recreation (native plants)
- State Arboretum of Virginia
Books
- The Plant Growth Planner, Caroline Boisset, ISBN 0-13-681230-9
- The Principles of Gardening, Hugh Johnson, ISBN 0-671-50805-9
- Taylor’s Guide to Gardening in the South, ISBN 0-395-59681-5
- The New York/Mid Atlantic Garden’s Book of Lists, ISBN 0-87833-261-8
- Best Plants for Hampton Roads A Landscape & Garden Companion, ISBN 0-9726455-0-0
- Bringing Nature Home, ISBN 978-0-88192-992-8
- The Living Landscape, ISBN 978-1-60469-408-6
- Sustainable Landscaping for Dummies, ISBN 978-0-470-41149-0
- Conservation Landscaping Guidelines, ISBN 978-1-49362-497-3
- The Essential Garden Design Workbook: Second Edition, ISBN 978-0-88192-975-1
Attributions
- Sabrina Morelli, Arlington Extension Master Gardener (2021 reviser)
- Laurie J. Fox, Horticulture Associate, Horticulture Department, Hampton Road AREC (2015 reviser)
Image Attributions
- Figure 16-1: Suggested symbols for plans and maps. Grey, Kindred. 2022. CC BY-NC-SA 4.0.
- Figure 16-2: Map example. Grey, Kindred. 2022. CC BY-NC-SA 4.0. Includes Simple compass rose by Brosen (modification by Howcheng) from WikimediaCommons CC BY 3.0.
- Figure 16-3: Daily shade pattern. Grey, Kindred. 2022. CC BY-NC-SA 4.0. Includes Simple compass rose by Brosen (modification by Howcheng) from WikimediaCommons CC BY 3.0 and sun by andainul muttaqin from Noun Project (Noun Project license).
- Figure 16-4: Exposures. Grey, Kindred. 2022. CC BY-NC-SA 4.0. Includes Simple compass rose by Brosen (modification by Howcheng) from WikimediaCommons CC BY 3.0
- Figure 16-5: Winter and summer sun direction. Grey, Kindred. 2022. CC BY-NC-SA 4.0. Includes Simple compass rose by Brosen (modification by Howcheng) from WikimediaCommons CC BY 3.0 and sun by andainul muttaqin from Noun Project (Noun Project license).
- Figure 16-6: Energy efficient tree placement. Grey, Kindred. 2022. CC BY-NC-SA 4.0. Includes sun by andainul muttaqin from Noun Project (Noun Project license).
- Figure 16-7: Landscape area examples. Grey, Kindred. 2022. CC BY-NC-SA 4.0.
- Figure 16-8: Traffic flow. Grey, Kindred. 2022. CC BY-NC-SA 4.0. Includes Simple compass rose by Brosen (modification by Howcheng) from WikimediaCommons CC BY 3.0.
- Figure 16-9: Tree out of scale with house. Grey, Kindred. 2022. CC BY-NC-SA 4.0.
- Figure 16-10: Landscape balance. Grey, Kindred. 2022. CC BY-NC-SA 4.0.
- Figure 16-11: Conceptual image of a productive highway corridor. Douglas, Scott. 2021. CC BY-NC-SA 4.0.
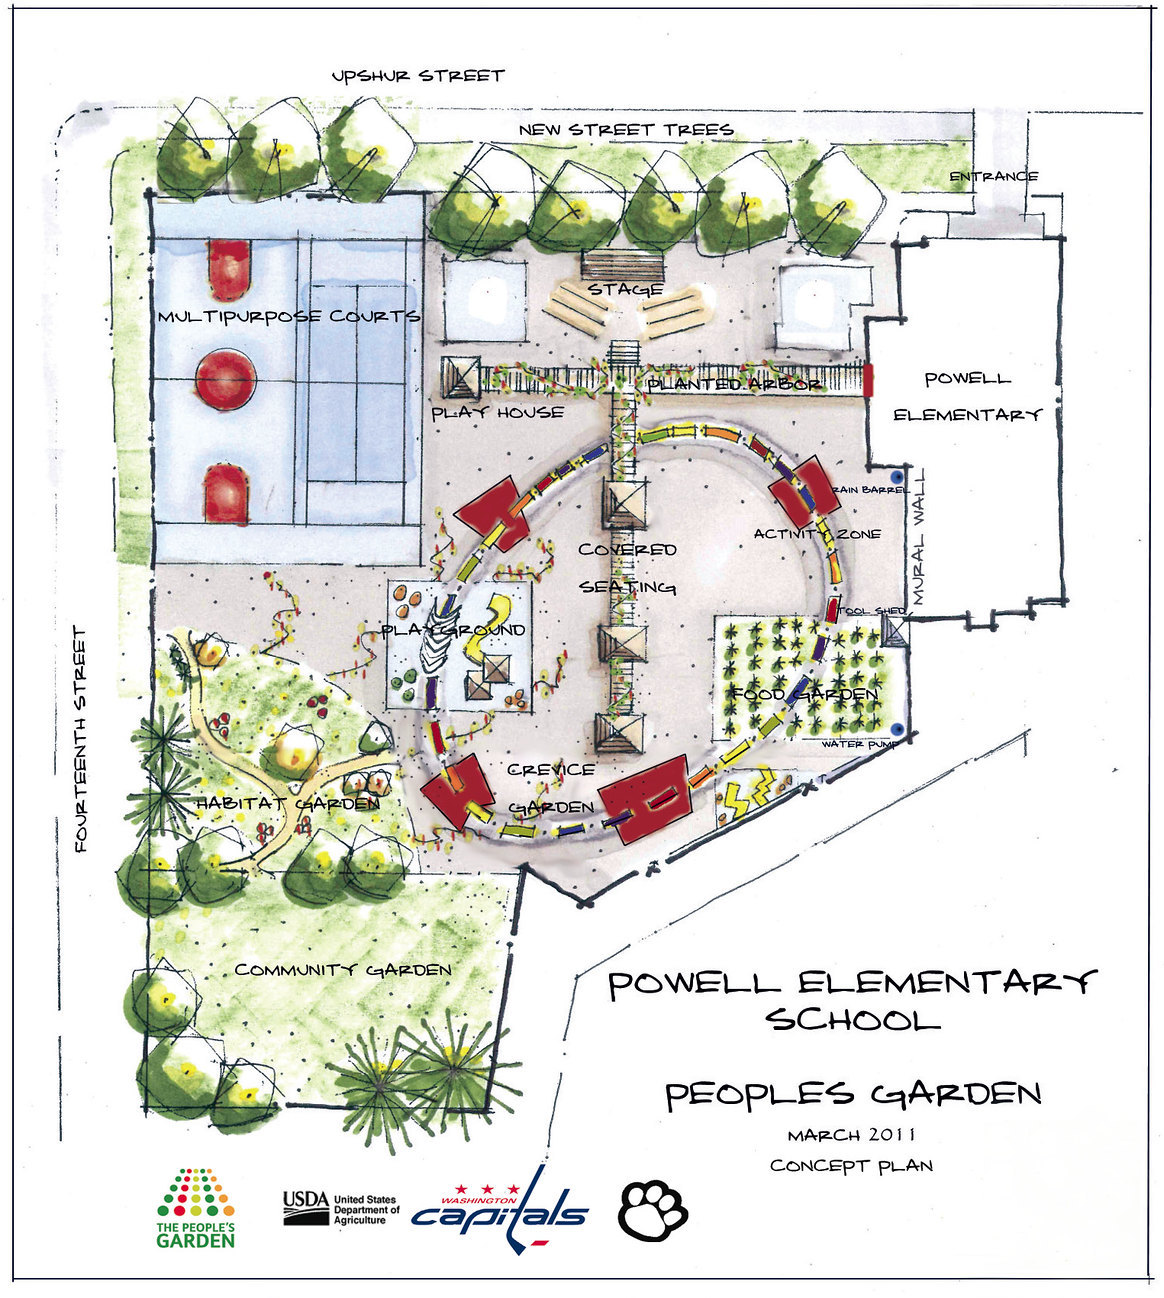
- Figure 16-12: Plan example. “110310_DM_LSC_0127.” Arnn, Matt. U. S. Department of Agriculture. 2011. Flickr. CC BY-ND 2.0
The process of planning and organizing the natural and man-made parts of the landscape into an aesthetic, functional, and environmentally sustainable space
Design principle that refers to the size relationship or proportion between different parts of a landscape. This could be between buildings and plants, plants and plants, or plants and people
Design principle that refers to an aesthetically pleasing integration of elements; a sense of one part being of equal visual weight or mass to another
Design principle created by repetition of shapes, lines or colors, the grouping or arranging different parts of the design to appear as a single unit
Design principle of even repetition, and it directs the eye in the landscape through continuity and flow
Focal point, something that deliberately stands out from the overall landscape
Angiosperm trees that lose their leaves in the fall
