Chapter 7: Integrated Pest Management and Pesticide Safety
Chapter Contents:
What Is a Pest?
Most organisms are not considered pests. However, certain situations may occur that prompt an organism to be labeled a pest. Organisms are considered pests when they
- Damage food, fiber, structures, or other materials that humans need or value.
- Cause or spread disease.
- Live or grow where they are not wanted.
- Cause general annoyance or anxiety.
A pest can be an invertebrate (e.g., insect, mite, tick, slug), pathogen (e.g., bacteria, fungi, virus), plant (weed), vertebrate (e.g., deer, rodent), or other unwanted organism. It is important to correctly define an organism as a pest, and verify the identity of a pest, before making any pest management decisions.
Integrated Pest Management
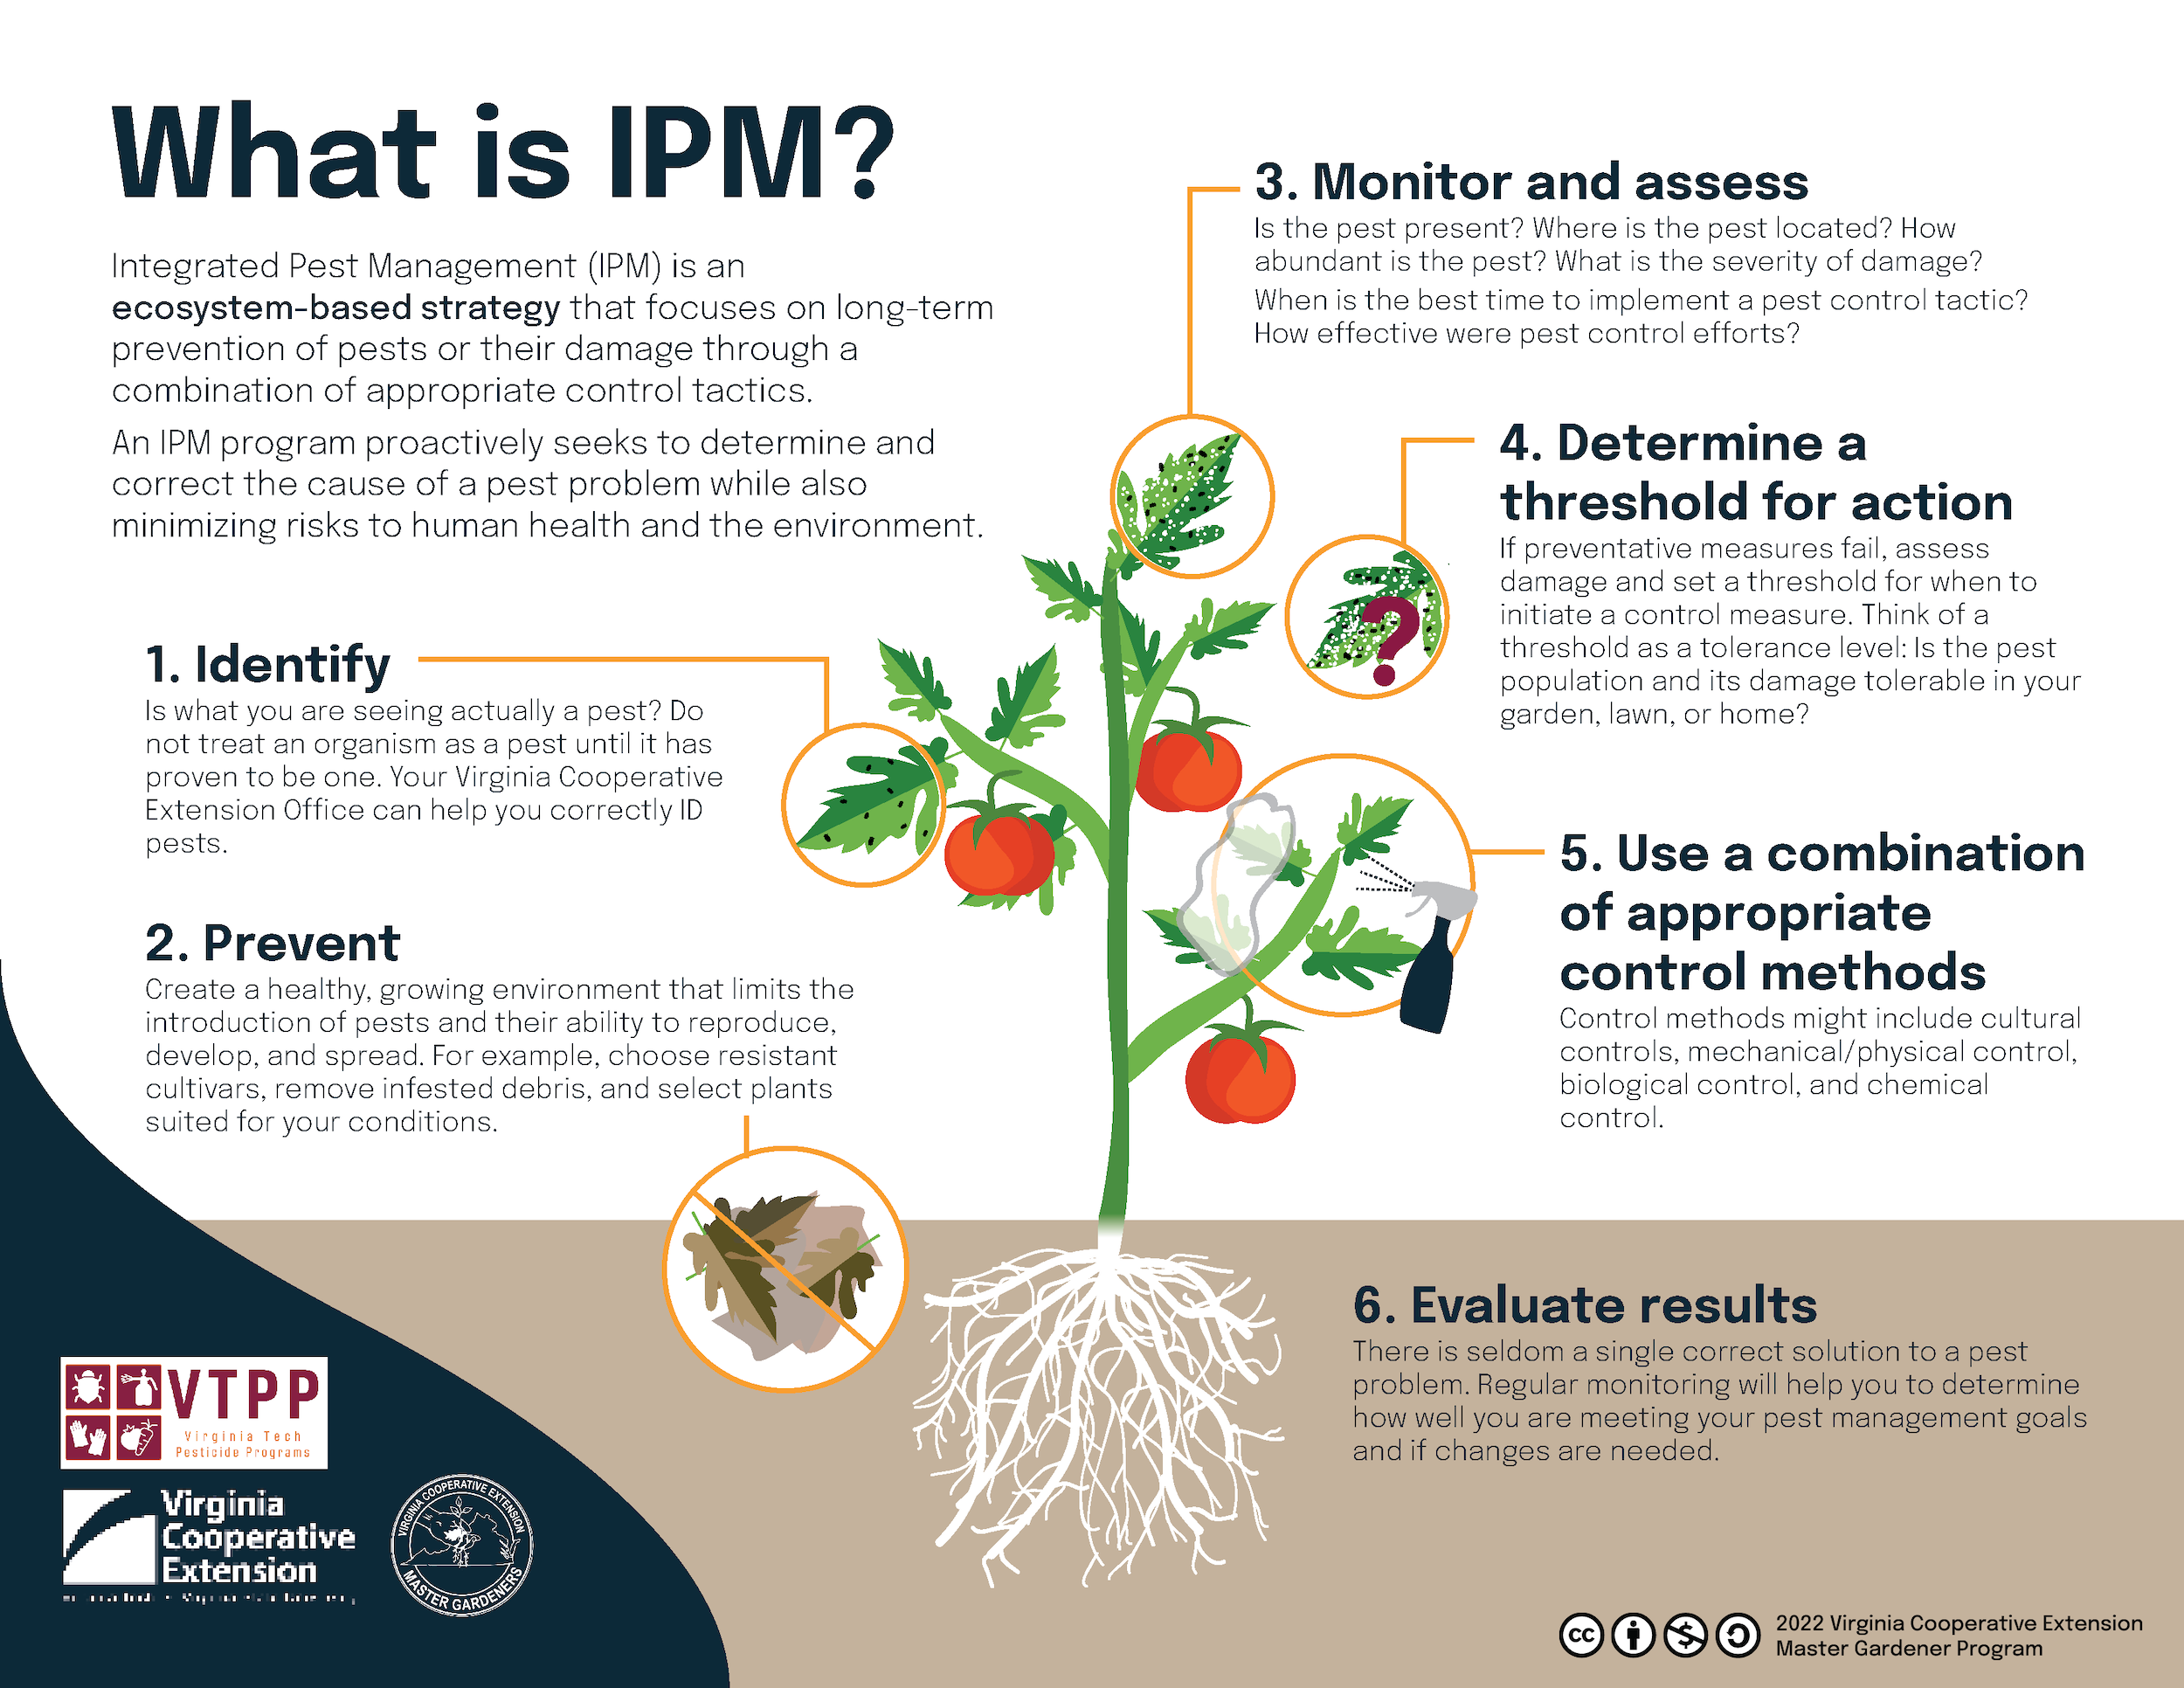
Integrated pest management (IPM) is an ecosystem-based strategy that focuses on long-term prevention of pests or their damage through a combination of appropriate control tactics. These tactics can be preventative, curative, or both and are often combined to provide the best possible results. An IPM program proactively seeks to determine and correct the cause of a pest problem while also minimizing risks to human health and the environment. In short, IPM can be thought of as best practices for managing pests. IPM plans can be developed for virtually any setting where pests occur such as gardens, farms, natural areas, homes, or schools.
When dealing with any pest issue, there are important questions to ask and decisions to make. Start by identifying or describing the problem. Ask yourself these questions:
- Is the problem actually caused by a pest?
- If so, what kind of pest?
- Is the problem severe enough to require action?
- Can the pest be controlled at this stage of its life or growth cycle?
- What control options are available? Which control options are compatible?
- If pesticides are needed, are there effective, legal, and manageable chemical control options for this site and situation?
The process of answering these questions will help you begin implementing an integrated pest management plan.
Understanding IPM
The purpose of IPM is to provide practical, cost-effective solutions for managing pests while protecting people, animals, and the environment. A major goal of IPM is to reduce reliance on pesticides by using a variety of control methods. Integrating multiple control methods has the added benefit of helping to avoid or delay development of resistance to any one pest control technique or tactic. However, before focusing on the methods for managing pests, it is important to first think about your pest control goals.
The objective of IPM in most outdoor situations is not to eliminate the pest population, but to suppress pest numbers or damage to a tolerable level. In many cases, a certain level of pest presence can be tolerated because the complete eradication of a pest species may be prohibitively expensive or technically impossible. In indoor areas, eradication of a pest population is often more feasible because the environment is smaller, less complex, and more easily controlled than outdoor areas. In either case, determining what a tolerable level is for your situation is essential during the goal setting process. When establishing tolerance levels, a number of factors can be considered such as the potential damage (economic, aesthetics, health, etc.) from the pest’s activities and the cost and/or time involved to control the pest.
Once pest control goals have been established, you can begin developing your IPM plan. Although IPM plans can vary with each situation, they all follow a similar process:
- Identify the pest(s) to be managed.
- Use prevention strategies to deter the pest(s).
- Monitor pest populations and assess their damage.
- Determine a guideline (threshold) for when control action(s) is needed.
- Use a combination of appropriate control actions to reduce pest populations.
- Evaluate the results of control efforts.
Together, these actions enable informed and intelligent decision-making regarding pest control.
Prevention Strategies
Prevention strategies can help limit the factors that contribute to pest issues in our gardens, homes, lawns, and other areas. Preventative measures taken before a pest appears can result in fewer rescue treatments, and should be used first if practical and available. It may be easier and more effective to remove the reason why the pest is present in the first place, as opposed to controlling the pest after the fact. Prevention strategies are used to create a healthy, growing environment that limits the introduction of pests and their ability to reproduce, develop, and/or spread. Preventative tactics can include:
- Selecting plants that are best suited to the existing site conditions (e.g., hardiness zone, sun exposure, soil type, drainage).
- Choosing disease or pest resistant plant cultivars/varieties.
- Using pest-free seeds or transplants.
- Cleaning and disinfecting tools, equipment, and potting materials.
- Ensuring that appropriate growing practices are implemented (e.g., providing adequate moisture and fertilization, proper maintenance).
Pest Identification
Correct identification of the pest or problem is the foundation of any IPM plan and can be considered the most important step. It starts with asking yourself if what you are seeing is actually a pest. Do not treat an organism as a pest until it has proven to be one. Make sure the damage observed is due to the pest and not another cause.
Proper identification will provide you with important information about the pest. This can include its preferred habitat, life cycle, and the factors that influence its spread and development. The more information that can be gathered about a pest, the greater the opportunity for cost-effective and successful pest control. Although identifying a pest can sometimes be difficult, there are several Virginia Cooperative Extension resources that can help.
- Virginia Tech Diagnostic Labs:
- Virginia Cooperative Extension Publications:
- Your Local Extension Agent
- Your Local Extension Master Gardeners
Monitoring and Assessment
Another key component to a successful IPM plan is regular monitoring of pest populations or their damage. Monitoring can answer several important questions:
- Is the pest present?
- Where is the pest located?
- How abundant is the pest?
- What is the severity of damage?
- When is the best time to implement a pest control tactic?
- How effective were pest control efforts?
To aid monitoring efforts, it is important to learn about the preferences and common problems relevant to the system being managed. For example, in a vegetable garden it is important to know what healthy plants look like, so you can quickly notice if something is abnormal or does not quite look right. Pest management guides can be used to familiarize yourself with some of the common pests and problems in the systems being managed.
Regular monitoring of a garden, lawn, home, or other site will allow for early detection of pests, which can help prevent or minimize a pest outbreak. Specifics on how often monitoring should be conducted depends on the system being managed and the pest. Regardless, it is often easier to control a pest problem in the early stages before populations have increased in size and spread.
Pest populations can vary from one location to another and from year to year. For this reason, it is important to consider keeping records of your monitoring activities. Records can help you manage pests during the current growing season, evaluate current control methods, and predict problems in the future.
Determining Thresholds
If preventative measures fail to control a pest population, you will need to assess their damage and set a threshold for when to initiate a control measure or rescue treatment. A threshold can be thought of as a tolerance level. In other words, is the pest population and its damage tolerable in your garden, lawn, or home? Or is it causing economic, aesthetic, or other losses? Remember, finding a single pest or low levels of a pest may not indicate you should take action for its control. Only when the pest and/or its harm surpass a set level of tolerable damage should controls be implemented. Determining a threshold for each pest you are assessing will help you move forward with implementing control tactics only when necessary.
For some pests and commodities, thresholds have been developed based on economic or other considerations and are often based on monitoring data. For example, in tree fruit, if captures of codling moth in pheromone baited traps exceeds five moths per trap per week, control is necessary to prevent economic losses from this pest. For other pests, thresholds may involve some other assessment such as percent defoliation, leaf wetness duration, or population numbers per unit area.
In some situations, thresholds cannot be developed or have limited value. This is particularly true for many plant diseases, disease vectors (e.g., mosquitoes, ticks, fleas), or newly invasive species, which essentially have a threshold of zero. Controls for these pests are often initiated preventively or immediately upon detection.
Control Methods
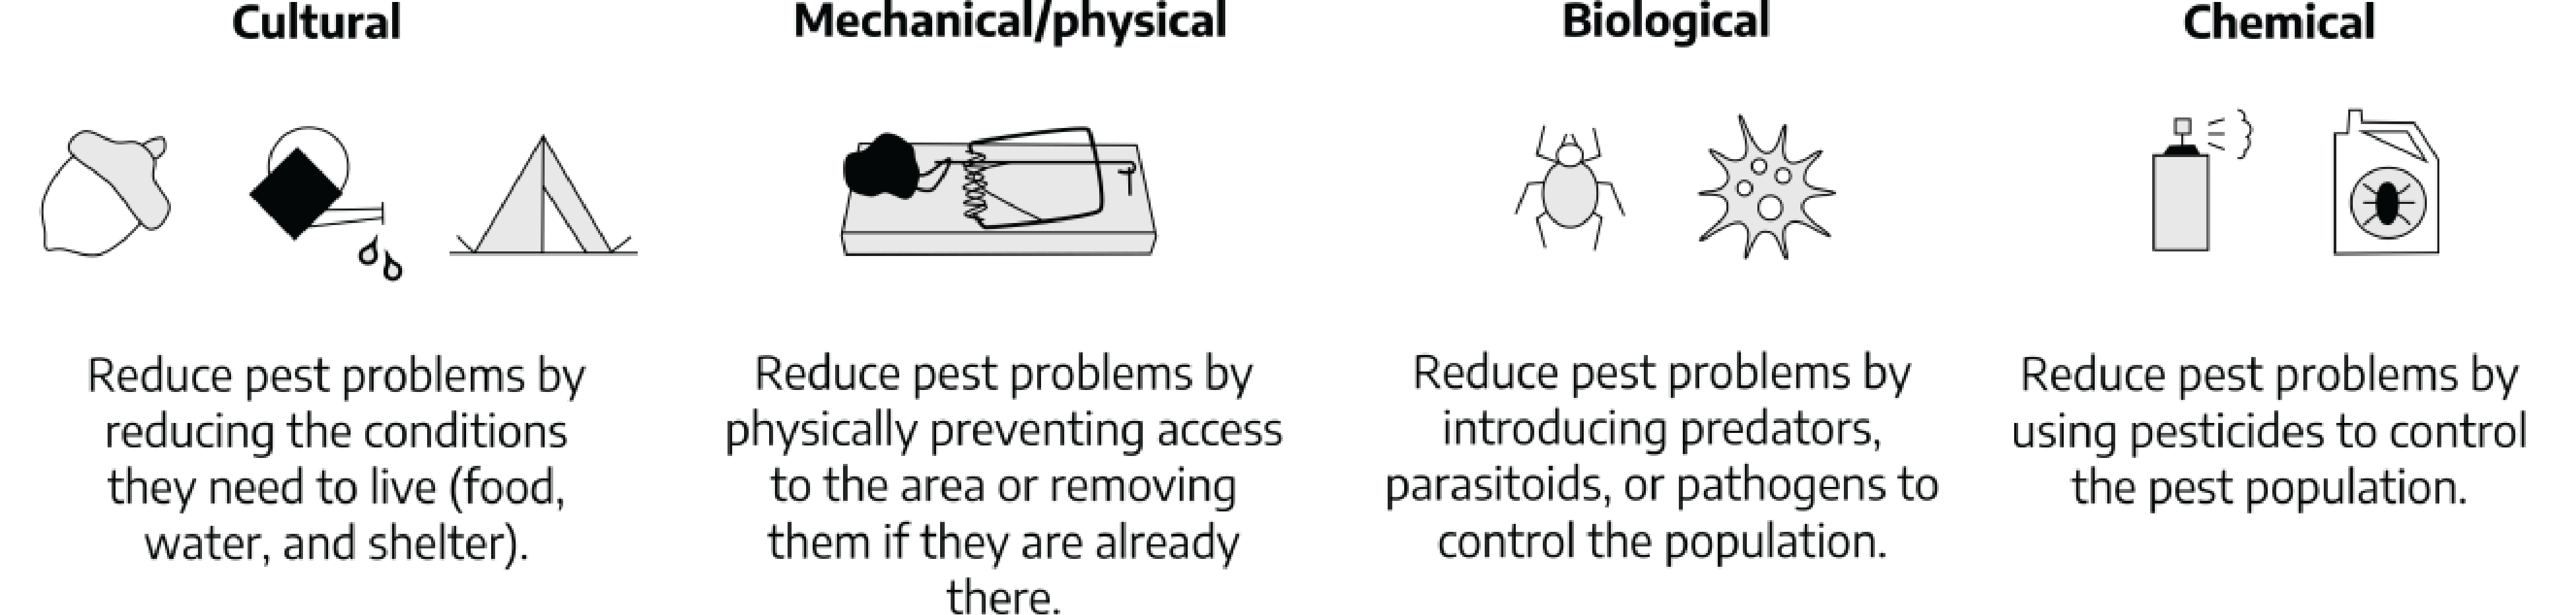
When pest populations and/or their damage exceed established thresholds, it is time to initiate a control measure or rescue treatment. In an IPM program there are nonchemical and chemical control methods available. Nonchemical control methods should be used first if available and feasible. The techniques or tactics you choose will depend on the target pest and the kind and amount of control needed. IPM promotes the use of four basic pest control methods, as explained below.
Cultural Control: Controlling a pest with cultural methods involves modifying or disrupting the pest environment to make it less habitable. Many cultural control tactics can be thought of as preventative because they keep pest populations from developing or delay their impact. Examples of cultural control tactics include:
- Sanitation practices (e.g., removing plant residues or other food sources from the site).
- Eliminating alternative hosts or habitats (e.g., removing nearby weedy species that serve as a reservoir for pests and diseases).
- Crop rotations.
- Varying the time of planting.
- Intercropping.
Mechanical/Physical Control: This method involves the use of hands-on techniques or simple equipment/devices to reduce or prevent the spread of pest populations. This is often achieved through activities that directly remove or exclude the pest from the system. Examples of removal include the use of traps to remove rodents from a structure, or hand removal of weeds from a garden bed. Techniques that focus on removal can be particularly effective if pest populations have not already reached high levels. Exclusionary tactics limit pest access into the system. Examples of exclusion include the use of row covers or fencing to prevent pests from feeding on plants in a garden, or the use of tight-fitting screens on windows and doors to prevent pest entry into a home.
Biological Control: This method involves the use of living organisms (i.e., natural enemies) to reduce pest populations (typically insects and weeds). Introducing or encouraging natural enemies can reduce the severity of potential pest outbreaks. Natural enemies can typically be grouped as predators, parasitoids, or pathogens. Predators feed on multiple prey throughout their life (e.g., insects, spiders, birds, fish). Parasitoids feed and develop on or within another invertebrate host, eventually killing it (e.g., parasitic wasps and flies). Pathogens are microorganisms that cause disease in their host (e.g., bacteria, fungi, nematodes, viruses).
Conservation of natural enemies (i.e., protecting and maintaining existing populations) is a readily available form of biological control for gardeners. Common conservation practices include limiting the use of broad-spectrum pesticides that kill a wide range of organisms, and providing habitat that promotes the establishment and survival of natural enemies.
Chemical Control: This method involves the use of pesticides to reduce pest populations. A pesticide is any substance that is used to prevent, destroy, repel, or mitigate any pest. Pesticides can be synthetic (man-made), or natural products derived from plants, microorganisms, or inorganic elements. Although a major goal of IPM is to reduce reliance on pesticides, they are sometimes necessary to control pests and their damage. When selecting a pesticide, it is important to choose a product that is compatible with any nonchemical control methods that may already be in place. Safe use and other considerations regarding pesticides will be discussed in further detail later in this chapter.
Evaluating Results
An important, but often overlooked, step is to evaluate the results of your control efforts. Because of the variability present in any biological system, the effectiveness of an IPM plan may change over time or between sites. Understand that IPM plans are not static, but constantly evolve as more information is collected and new control tactics are developed. There is seldom a single correct solution to a pest problem. Regular monitoring will help you to determine how well you are meeting your pest management goals and if changes are needed. Be aware that some control tactics may be slow to show noticeable results. It is also important to evaluate any potential negative impacts your control efforts may have on the target treated, natural enemies present, and the environment before deciding to continue using them in the future.
Pesticide Safety
If you decide to include chemical control in your pest management plan, do so safely. Proper selection and proper use of pesticides is key for not only controlling the pest, but protecting yourself, others, and the environment. Following safety precautions and using common sense can prevent pesticides from causing unintended and unnecessary harm. Always read the pesticide product label before purchasing, using, storing, or disposing of a pesticide product or its container.
When selecting a pesticide, choose a product that is labeled for the site you need to treat and effective against the pest you need to control. Consider only those products you have the equipment and expertise to handle. If there is a choice of several products, select the least hazardous product with the lowest toxicity. For pest management recommendations, contact your local Extension office or consult the Virginia Cooperative Extension “Pest Management Guide: Home Grounds and Animals” 456-018
Some pesticides are specifically intended for home use. These products are packaged in small quantities (i.e., pints, quarts, and ounces) and are often ready-to-use. Their label directions are less technical than those intended for occupational users. Most pesticide products intended for home use are low in toxicity but can still be dangerous if used improperly. It is important to read and follow all label directions to help prevent pesticide related accidents.
Some pesticide products available for purchase are intended for agricultural and professional/commercial use. These products will have statements on the front of the label that indicate the intended user. You should not purchase these products. Often, these products are higher in toxicity because they are highly concentrated or contain higher amounts of active ingredients. They may require special protective clothing and application equipment. They are also sold in larger containers, which means the homeowner will have more material than can be used in a reasonable amount of time. Additionally, application rates are often given on a per-acre basis, making them difficult to mix.
Reading the label before purchasing a pesticide is the only way to be sure you can use the product as directed. Be sure you have the proper handling and measuring devices, application equipment, and protective clothing. Read the mixing instructions and application directions. Note any special handling instructions, specific warnings, and precautions.
Pesticides and the Law
The U.S. Environmental Protection Agency (EPA) and the Virginia Department of Agriculture and Consumer Services, Office of Pesticide Services (VDACS-OPS) are the regulatory agencies charged with enforcing pesticide laws and regulations. Under the Federal Insecticide, Fungicide, and Rodenticide Act, it is illegal to use a pesticide on a site unless that site (plant, animal, place) is listed on the label. You may not exceed the application rate or other special use restrictions as directed by the label.
You are liable for misuse of pesticides on your property, which includes applications you may make or the applications of any commercial applicators you hire. Serious misuse may result in drift on to other people’s property, leaching of a pesticide into water supplies, or other problems related to application of a pesticide contrary to label directions.
Some pesticide products are extremely hazardous to humans and/or the environment. The EPA classifies these products as restricted use pesticides (RUPs). A certificate issued by VDACS-OPS is required to purchase and use RUP products. If a person intends to use RUPs to produce agricultural commodities on their farm or land they lease, they are required to have private pesticide applicator certification. Anyone who uses RUPs as a part of their job duties, must obtain a commercial pesticide applicator or registered technician certification. The process of certification and use of RUP products is NOT intended for the home gardener.
Pesticide Terminology
The words “insecticides” and “pesticides” are often used interchangeably. However, these two words have different meanings. As you can see in Table 7-1, an insecticide is just one type of pesticide.
Table 7-1: Types of Pesticides and Functions
| Type of Pesticide | Function |
|---|---|
| Acaricide | Controls mites, ticks, and spiders. |
| Attractant | Lures pest (to trap or bait). |
| Disinfectant/Antimicrobial | Controls microorganisms. |
| Fungicide | Controls fungal plant pathogens. |
| Herbicide | Controls plants. |
| Insecticide | Controls insects. |
| Miticide | Controls mites. |
| Nematicide | Controls nematodes. |
| Plant Growth Regulator | Stops, speeds up, or otherwise changes normal plant development processes. |
| Repellent | Keeps pests away. |
| Rodenticide | Controls rodents. |
Pesticides work in different ways. They can be grouped in any of several ways on the basis of their chemistry, how/when they work, or their site of action (see Table 7-2 for examples).
Table 7-2: Pesticide Activity - How Pesticides Work
| Pesticide Activity | Explanation of Effect |
|---|---|
| Selective | Affects only certain kinds of plants or animals. For example, the herbicide 2,4-D is used to control weeds in lawns because it kills many broadleaf plants but does not harm grasses. |
| Nonselective | Kills a wide variety of pests. |
| Contact | Kills the pest simply by touching it. |
| Systemic | Are absorbed or ingested and circulate throughout the sap of a plant or blood of an animal. |
| Translocated | Are absorbed and move from the point of initial application to circulate throughout the plant. |
| Stomach Poison | Kills pests when swallowed, or when treated materials are eaten. |
| Protectant | Prevents certain diseases. Protectants must be applied before the disease has a chance to invade. |
| Curative/Eradicant | Cures fungal diseases. |
The Pesticide Label

In order for a pesticide to be sold, purchased, or used in the United States, the pesticide must be registered by the EPA. Registration decisions are based on the agency’s examination of the
- Ingredients of the pesticide.
- Intended application site.
- Amount, frequency, and timing of use.
- Storage and disposal practices.
The EPA assesses both risks and benefits of a product. They only register pesticide products that the agency has determined will not pose unreasonable adverse effects to humans, the environment, and nontarget species when used according to label directions. A product cannot be legally sold, purchased, or used as a pesticide until it is registered with the EPA’s Office of Pesticide Programs.
Another category of available products is Section 25(b), minimum-risk pesticides. Minimum-risk pesticides are exempt from federal registration by the EPA because they have been determined to pose little to no risk to human health or the environment. Minimum-risk pesticides are often derived from plant and food compounds and therefore are considered relatively benign. Although EPA does not require federal registration of Section 25(b), minimum-risk pesticides, many states require them to be registered with their state pesticide regulatory agency. In Virginia, these products must be registered with the VDACS-OPS if they are to be manufactured, distributed, sold, or used within the state. Be aware that because minimum-risk pesticides are exempt from the federal registration process, their labels may offer limited information on safety and efficacy. Exercise caution and follow all label directions if using minimum-risk pesticides no matter how natural the ingredients appear.
Federal law defines pesticide labeling as all of the print information and graphics (label, booklet) attached to or sold with the product. The pesticide label is a binding legal agreement among three parties: the product registrant (manufacturer), the EPA, and the end user.
The pesticide label must provide the user with all the necessary information on safe and effective use, proper storage, and proper disposal of the pesticide and its container. Pesticide users are required to follow all label directions. Using a pesticide in any manner that is inconsistent with the labeling is against the law.
Specific parts of the label identify the product, its hazards and precautions for handlers, and directions for proper use, storage, and disposal. The following section lists the information commonly found in specific parts of the pesticide label.
Brand Name: Each company uses brand names to identify their products. The brand name is displayed prominently on the front panel of the label.
Ingredients Statement: The ingredients statement lists the active ingredients (the chemicals that affect or control the target pest). It must list the chemical name and amount of each active ingredient (as a percentage by weight of the total product). The label must also show what percent of the total contents are other (inert) ingredients.
EPA Registration Number: A registration number must be on every pesticide label. This number shows that the product has been registered with the EPA for the uses listed on the label. EPA registration numbers are unique to each individual pesticide product.
EPA Establishment Number: The establishment number identifies the facility where the pesticide was produced.
Name and Address of Manufacturer: The law requires the manufacturer or distributor of a pesticide product to print the name and address of their company on the label.
Net Contents: The front panel of a pesticide states how much product is in the container. This can be listed as pints, pounds, quarts, gallons, or other units of measure.
Type of Pesticide: The front panel usually indicates in general terms what the pesticide will control. This statement might also indicate how the product may be used.
Type of Formulation: A pesticide formulation is the mixture of chemical ingredients (active and inert) that allows the product to be used effectively for the purpose claimed. Pesticide formulations can be sold as ready-to-use (meaning no further mixing is required) or as concentrated formulations, which require mixing and/or application equipment. Sometimes the formulation of a specific product is written on the label or is part of the product name (e.g., bait, dust, granule).
“Restricted Use” Designation: When a pesticide is classified as restricted use, the label will state “Restricted Use Pesticide” in a box at the top of the front panel. There may also be a statement describing the reason for the restricted use classification. Restricted use pesticides are not for home and garden use and should only be used by a certified pesticide applicator.
Precautionary Statements: Precautionary statements identify hazards associated with the use of the product, how to avoid them, and first aid for various exposure situations. The product’s toxicity is described by the signal word. All pesticide products carry the child hazard warning statement “Keep Out of Reach of Children.” The precautionary statements section of a label may also include personal protective equipment (PPE) requirements, user safety requirements and recommendations, environmental hazards, and physical or chemical hazards.
Signal Words and Symbols: You can tell how acutely toxic a pesticide product is by the signal word on the label.
Table 7-3: Signal Words and Meaning
| Signal Word | Toxicity Level | Lethal Oral Dosage | Skin, Eye, or Respiratory Injury |
|---|---|---|---|
| DANGER/POISON or DANGER | High | A drop to a teaspoonful. | Corrosive; permanent or severe damage. |
| WARNING | Moderate | A teaspoonful to a tablespoonful. | Moderate damage. |
| CAUTION | Low (or relatively nontoxic) | More than an ounce. | Mild damage or irritation. |
Pesticides with the signal word DANGER are typically not sold in the lawn and garden trade.
First Aid (Statement of Practical Treatment): The label provides emergency first aid instructions and describes the types of exposure requiring medical attention. Four routes of exposure can be harmful: ingestion (swallowing), inhalation (inhaling vapors), ocular (eyes) exposure, and dermal (skin) exposure.
Personal Protective Equipment (PPE): The label lists all protective clothing and equipment you must use when handling the product. At minimum, you should always wear long pants, a long-sleeved shirt, socks, and closed-toed shoes.
Hazards to Humans and Domestic Animals: This section must be included if a product is hazardous to humans or domestic animals. It will tell you if and how a product may harm people and animals. It will also describe any special steps necessary to avoid exposures.
Environmental Hazards: The label tells you how to avoid harm to the environment — including water, soil, air, and beneficial insects, plants, and/or wildlife. Some examples of hazard statements are:
- “This product is highly toxic to bees. Do not apply this product to blooming crops or weeds when bees are actively visiting the treatment area.”
- “This product is highly toxic to fish. Do not apply directly to water.”
Physical and Chemical Hazards: This section lists any specific fire, explosive, or chemical hazards the product may have.
Directions for Use: This section describes where, when, and how to apply the product, how much to use, and how to handle the product from start to finish. These instructions will:
- Identify the sites (whether it is crops, animals, or other locations) that can be treated legally and safely with the product.
- Describe anything you must do — or not do — to prevent contamination or exposure to sensitive areas and nontarget species.
- List the pests the product will control.
- Explain how the product should be applied (application equipment or methods to use).
- Tell you when to apply this product (season; pest or host growth stage; restrictions based on temperature, weather, or time of day, if any).
- List the restricted entry interval and pre-harvest interval* (if applicable).
- Tell you how much to use (how much to mix).
- Give you instructions regarding storage and disposal.
All pesticide labels have a restricted entry interval (REI). The REI indicates how long to stay out of treated areas. Some products instruct you to keep people or pets out of the treated area for a short period of time, or until certain conditions are met. For example, the label may state, “Do not allow people or pets to enter the treated area until sprays have dried.”
*Pesticides labeled for use on food crops have a pre-harvest interval (PHI). The PHI is a period between the time of application and the time it is safe to pick and use the crop. A pre-harvest interval is usually written as “days to harvest.”
Misuse Statement: This section will remind you that it is a violation of federal law to use a product in a manner that is inconsistent with its labeling.
In summary, pesticide product labels provide instructions for all steps of pesticide use. Applicators must read, understand, and follow label directions carefully. Remember:
- Pesticides may not be applied to any plant, animal, or site not listed on the product label.
- Pesticides may not be applied at higher rates or more frequently than the label directs.
- Pesticide applicators are required to follow label directions for transport, mixing, loading, application, storage, and disposal of pesticide products and their containers.
Pesticide label directions are NOT advice; they are legal requirements. Read the label before you purchase a pesticide product and before, during, and after each use. THE LABEL IS THE LAW!
Pesticide Formulations
The pesticide formulation describes the physical state of a pesticide. Pesticides are usually formulated as a mixture of active and other (inert) ingredients. The active ingredient is the chemical that affects or controls the target pest. The inert ingredients dilute the pesticide and make it easier or safer to handle.
Pesticide active ingredients are often formulated as liquid or dry materials. In some cases, abbreviations on the pesticide label are used to describe the formulation. The same pesticide active ingredient may be available in more than one formulation. You should choose a formulation that is right for the job. Common pesticide formulations are listed below.
- Aerosols (A): These are low-concentrate solutions that are applied as a fine spray or mist. Ready-to-use aerosols are generally sold in pressurized cans that release pesticide when the nozzle valve is triggered. Use caution with these products as they pose a risk of inhalation exposure. Examples of aerosols include wasp or hornet control products.
- Baits (B): These are made by adding the active ingredient to an edible or attractive substance. They are ready-to-use but require careful placement to avoid contact with nontarget wildlife, children, and pets. Examples of baits include ant and cockroach control products.
- Dusts (D): These are made by adding the active ingredient to a fine, inert powder or talc. Most dusts are ready-to-use and do not require further dilution or mixing. They must be used with caution as they have the potential to drift offsite and can cause inhalation exposure.
- Emulsifiable Concentrates (EC or E): These contain an oil-soluble liquid active ingredient, one or more petroleum-based solvents, and an emulsifier (mixing agent). The emulsifier allows the product to mix with water to form an emulsion. Emulsifiable concentrates are a popular formulation for agricultural pest control.
- Granules (G): These are similar to dust formulations, except the carrier particles are larger and heavier. Granular pesticides are ready-to-use but do require application equipment to broadcast the coarse particles. Examples of granules include “weed and feed” type products for lawns, which contain both herbicides (for weed control) and fertilizer.
- Pellets (P): These are similar to granules but are more uniform in their shape and size. Pellets are ready-to-use and are often used as spot treatments.
- Solution (S): These are often diluted with water to form a true solution that will not settle out or separate. Solutions are a popular formulation in household pest control products. They can be sold as ready-to-use products or as concentrates (C) which require mixing before use.
- Ready-to-Use (RTU): As the name implies, these formulations are ready for use. No further dilution or mixing is required. Ready-to-use products are packaged in their application equipment. RTU liquid formulations may come in a spray bottle or aerosol can. RTU dry formulations like dusts are packaged in application canisters. Many pesticide products are sold ready-to-use to make applications safer and easier for consumers.
- Wettable Powders (WP): These are made by combining the active ingredient with a fine powder. A wettable powder may look like a dust, but it is made to be mixed with water and applied as a spray with its particles suspended in water. Wettable powders need continuous agitation to keep the particles in suspension, which can make them difficult for home gardeners to use. In contrast, soluble powders (SP) dissolve readily in water to form a true solution and are much easier to mix and apply.
Adjuvants
Adjuvants are added to a pesticide mix to improve the action of the pesticide or to modify the properties of the formulation or mix for better application. There are many types of adjuvants. They include wetting agents, spreaders, stickers, emulsifiers, plant penetrants, drift control additives, buffers or pH modifiers, and antifoaming agents. If an adjuvant is not already present in the formulation, recommendations for adding adjuvants will appear on the label as necessary. Adjuvants are sold separately from pesticides unless they are already included in a formulation. Make sure to follow all label directions and recommendations concerning adjuvants exactly.
Personal Safety
In general, two factors determine your risk when using a pesticide: your exposure to the product and its toxicity. The best way to manage risk is by reducing exposure through use of personal protective equipment. PPE provides an additional line of defense to prevent accidental exposure. Select ready-to-use products that are sold in an application device whenever possible. This will help minimize or eliminate the need to handle pesticides during mixing, measuring, or loading. In addition, careful product selection, such as choosing the least toxic chemical (based on the label’s signal word), can further help to minimize risk. Always read and follow the product label before you purchase or apply any pesticide.
Never eat, drink, or smoke while handling pesticides. Before applying a pesticide, clear all people, pets, and livestock from the area. If possible, to reduce your own exposure while spraying, aim the spray so you will not walk through just-treated areas. After using any pesticide, wash your hands and arms thoroughly with soap and water. If you have been doing a lot of spraying or dusting, take a shower as soon as possible.
Personal Protective Equipment
The product label lists the minimum personal protective equipment required for handling the pesticide. Requirements and recommendations for PPE vary and depend on the toxicity and the formulation of the product. Any time you handle pesticides, wear at a minimum a long-sleeved shirt, long pants, socks, and close-toed shoes. Additional activities such as mixing and loading may require further PPE like unlined chemical-resistant gloves, an apron, and/or goggles. Consider wearing additional PPE for:
- Mixing concentrates and loading an application device.
- Making a broadcast spray application with hand-held equipment.
- Walking into a recently treated area.
- Treating an enclosed space.
- Using an aerosol or powder duster (especially indoors).
- Making an overhead application (like spraying fruit trees).
Protective clothing and equipment should be laundered separately from the family wash. After laundering, run an empty load (hot water and detergent) through your washing machine to rinse out any leftover pesticide residues. Line dry items on a sunny day to help break down remaining pesticide residues. Do not dry your protective clothing in a dryer.
If you spill pesticide on yourself or your clothing, shower immediately. Follow the first aid procedures on the pesticide label. Any clothing that was fully saturated should be discarded.
Safety Precautions
Pesticides can cause severe illness or even death if misused. It is important to follow all label directions for use (PPE, application instructions, storage, disposal) to help prevent accidents. Applicators can become ill from mishandling or accidental spills. Always use safety precautions and treat all pesticides with respect. Keep all pesticides in their original containers and out of the reach of children and pets.
Symptoms of Pesticide Poisoning
Awareness of the early symptoms and signs of a pesticide poisoning is important. Unfortunately, all pesticide poisoning symptoms are not the same and can resemble other illnesses like the flu or heat stress. It is important to monitor yourself after working with pesticides. If symptoms develop, they will come in stages, usually in this order:
- Mild Poisoning or Early Symptoms of Acute Poisoning: Fatigue, headache, dizziness, blurred vision, excessive sweating and salivation, nausea and vomiting, stomach cramps, or diarrhea.
- Moderate Poisoning or Intermediate Symptoms of Acute Poisoning: Symptoms described above become more severe. In addition, new symptoms may include the inability to walk, weakness, chest discomfort, muscle twitches, or constriction of the pupil of the eyes.
- Severe Poisoning or Advanced Symptoms of Acute Poisoning: Unconsciousness, severe constriction of the pupil of the eyes, muscle twitches, convulsions, secretions from the mouth and nose, and difficulty breathing. Death may occur without medical treatment.
In cases of acute poisoning, ill effects will appear soon after exposure — usually within 24 hours. Acute effects are usually obvious and often reversible if the person receives proper medical treatment. Talk with your physician if you begin feeling ill after working with pesticides.
Emergency Procedures
Read the first aid section on the label before using a product. The directions can save lives. In pesticide emergencies, the best first aid is to stop the exposure as soon as possible. The pesticide label directions describe how to handle each type of exposure (i.e., dermal, ocular, inhalation, and ingestion).
In case of acute poisoning, seek medical attention immediately. If you call a physician, give the victim’s name, age, and sex. Identify yourself and your relationship to the victim. As with any poisoning incident, have the pesticide packaging on hand. Tell the physician what chemical was involved (and how much) and how the victim was exposed. Describe the incident to the best of your ability. If you take a victim to a hospital, take the pesticide container or the labeling with you. Transport the pesticide product safely. Never carry a pesticide container in the passenger space of a car or truck.
In the case of a poisoning emergency, assistance is available from Virginia’s Poison Control Centers. The telephone number of the nearest Poison Control Center, along with other emergency information, is listed in the introductory sections of the Virginia Cooperative Extension Pest Management Guides. To purchase one of these guides or to ask about emergency information in advance, contact your local Extension agent.
Protecting the Environment
Pollinator Protection: Gardeners should give special consideration to protecting pollinators and other beneficial insects from pesticide poisoning. There is detailed information about pollinator protection in the Virginia Cooperative Extension, “Pest Management Guide: Home Grounds and Animals.” Often, pesticide labels recommend restricted application times to protect pollinators. In general, bees are less active in the late evening and early morning. Do not apply insecticides to plants in bloom. If possible, choose an active ingredient that is relatively nontoxic to bees. Also, if possible, use products formulated as granules, liquid concentrates, or ready-to-use spray solutions rather than dusts, or sprays made from dry formulated materials.
Pesticide Movement: Pesticides cause problems when they move off target. This may mean drifting in the form of airborne dust or fine mist, moving with soil particles through erosion, leaching through the soil, being carried as residues on crops or livestock, or evaporating into vapors and moving with air currents.
Pesticides should be directed to the target. To minimize drift, do not apply them on windy days. Applications can be managed in a light, steady breeze. However, if strong or gusty winds begin while you are working, stop immediately. Generally, the safest time of day to spray to reduce the hazard of drift is early morning or late in the evening.
Vaporization (or volatilization) is the evaporation of a pesticide during or after application. Pesticide vapors can cause injury to highly sensitive plants like grapevines and tomatoes. High temperatures increase vaporization. Some pesticide products and formulations are very volatile and can move for miles under favorable conditions. Choose pesticide formulations that do not volatilize easily, if possible. Check the pesticide label for temperature restrictions relating to application.
Do not mix or load where a spill will contaminate water. Do not apply pesticides close to a well, creek, pond, or other water supply.
Pesticide Application Equipment
Using the same spray equipment for weed and insect control is neither safe nor desirable. No matter how well a tank is rinsed after using some herbicides, a residue may be left in the tank, gaskets, hoses, and other parts. If the same equipment is then used to spray a plant with insecticide or fungicide, the herbicide residue may kill or injure the plant. The wisest policy is to maintain two sprayers: one for herbicides and another for insecticides and fungicides. Have them clearly labeled according to use pattern.
Sprayers should be rinsed after each use. Do not forget to flush the hoses and nozzles. Proper rinsing will keep sprayers clean and in good working order. Also, replace nozzles when they begin to show signs of wear and tear.
Pesticide application equipment comes in all shapes, sizes, types, and prices. Select equipment that best suits your application needs.
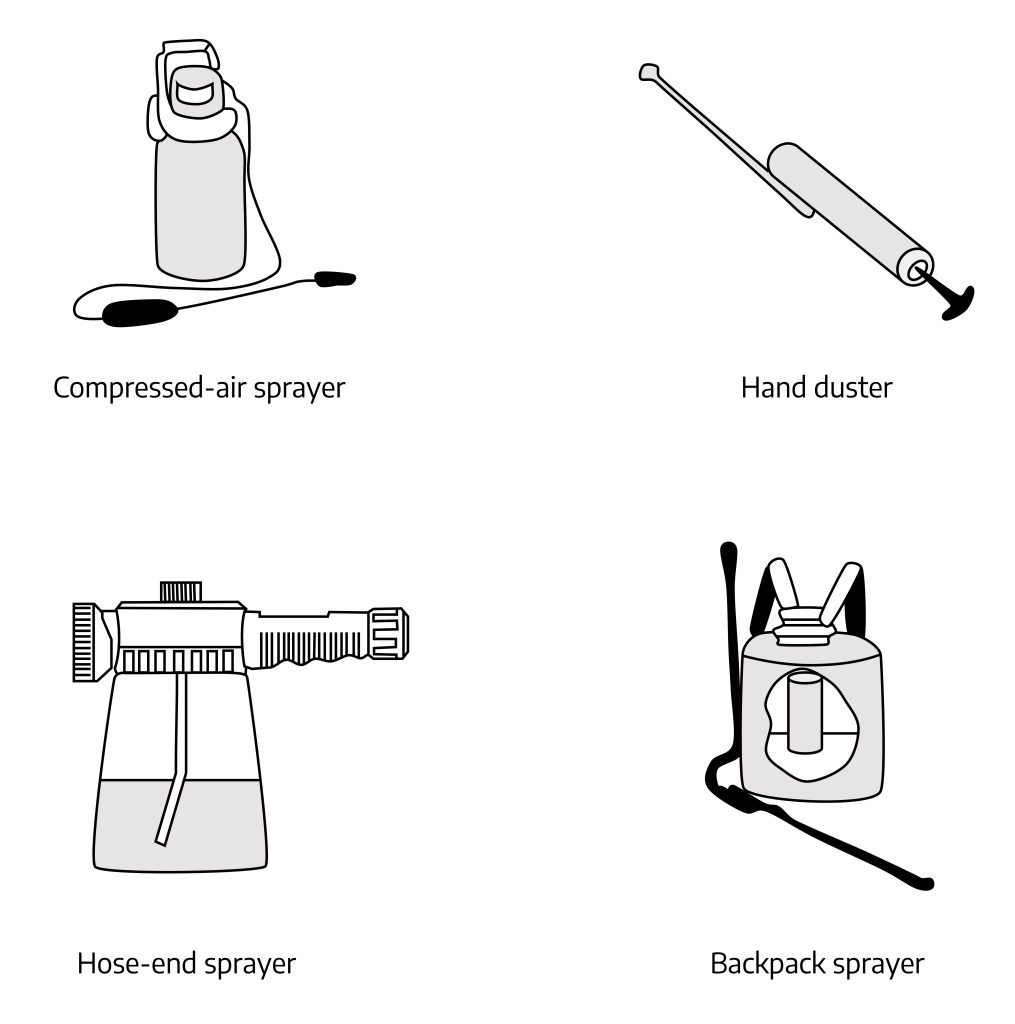
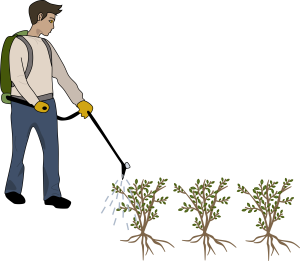
Backpack Sprayer and Compressed-Air Sprayer: These sprayers have a small tank, generally one to four gallons, where the pesticide is mixed with a diluting agent such as water. A hand-operated pump supplies pressure for the application, and a single nozzle releases the spray at the end of a hand-held wand. Backpack sprayers are carried over the shoulders like a knapsack. Compressed-air sprayers have a small tank carried by a handle. These types of sprayers typically do not have in-tank agitation. As a result, some formulations, like wettable powders, would be difficult to apply because the product in the spray mix will settle out due to lack of agitation.
Hand Duster: The duster may consist of a squeeze tube or shaker, a plunger that slides through a tube, or a fan powered by a hand crank. Uniform coverage of target surfaces is often difficult to achieve with many dusters. Dusts are more subject to drift than liquid formulations due to their light weight and poor sticking qualities. Many dust formulations are sold in dispenser canisters.
Hose-End Sprayer: These hand-held sprayers attach to a garden hose to deliver the spray mix from a quart-sized tank. Some hose-end sprayers are set to apply the spray mix at a fixed rate, while others may have a dial that allows for an adjustable rate. Fixed rate versions typically come ready-to-use, while adjustable rate versions require product to be added to the tank.
Spreaders: (not pictured) These are designed to apply granule or pellet formulations to lawns or crop fields. The two main types of spreaders are drop spreaders and rotary (or broadcast) spreaders. As the name implies, drop spreaders let pesticide drop from the opening under the spreader onto the ground directly below. Rotary spreaders release pesticide onto a turning disk that broadcasts it out in a circular pattern around the spreader.
Equipment Calibration and Care
Calibration is the process of measuring and adjusting the amount of pesticide that a piece of application equipment distributes over a target area. There are different processes for calibrating different types of equipment (e.g., backpack sprayer versus rotary spreader). For assistance with equipment calibration, contact your local Extension agent.
When and how you calibrate will depend on the pesticide label. All pesticide labels have mixing and application instructions. Some pesticides give application rates in teaspoons, tablespoons, or ounces per gallon. For example, an herbicide label may direct the user to make a 1% solution by mixing three tablespoons per gallon of water and then spray the target plants until their foliage is wet. In this instance, there is no need to calibrate the application equipment. However, the spray must be directed to the target, and coverage instructions must be followed.
Other labels give rates of application in volume per unit area; for example, teaspoons per 100 square feet or ounces per 1,000 square feet. This is often true for lawn herbicides and insecticides. Pesticides with rates given in volume per unit area must always be delivered with properly calibrated equipment.
Regular equipment maintenance is critical to accurate pesticide application. Always check spray equipment for leaking hoses or connections and plugged, worn, or dripping nozzles before adding pesticide. This will help prevent accidental spillage of chemicals. Check openings/gates of granular application devices (rotary or drop spreaders) to be sure they are clean and free of debris.
Storage and Disposal
Storage: Always read the pesticide label for specific storage requirements. The chemical and container in which it is purchased must be maintained in good condition. This is necessary to ensure the material remains useful and to avoid environmental or human health hazards.
Design or designate a pesticide storage area that has the following characteristics:
- Secure.
- Well-ventilated and dry.
- Protected from temperature extremes.
- Constructed in such a manner that leaks and/or spills may be contained.
A good storage area is safe from unwanted visitors — especially children and animals. Proper ventilation is important to protect the health of anyone using the storage area. It is essential to store pesticides where their fumes cannot invade areas used by people or pets. Dampness is a serious problem, as it reduces the shelf life of many chemicals and causes metal and paper containers to decompose. It is imperative that storage areas be designed so that there is no danger of chemicals being washed into storm drains or other water sources by flooding or accidental spills. Freezing and high heat are dangerous because temperature extremes may cause containers to rupture. Extreme heat and cold can also cause physical or chemical changes in some pesticide formulations. This can make the product less effective over time. Pesticide product labels often list temperature storage requirements. Finally, the storage area should be set up so that leaks and spills can be contained. Contained spills can be cleaned up without compromising the soil and water quality in the vicinity.
Keep cleanup materials (absorbent [e.g., kitty litter], broom, dustpan, water) separate but in close proximity to your storage area. Keep pesticides in their original containers. Do not store pesticides with or near food, medicine, cleaning supplies, seed, or animal feed. Do not store flammable materials with pesticides. Routinely inspect your storage area, and check containers for damage or leaks.
Disposal: Waste minimization and careful planning can reduce or eliminate disposal problems. Buy only the amount of pesticide you need for a job or the growing season. Consider small volume containers, even if you pay more for the active ingredient. Look for pesticides packaged in ways that reduce or eliminate container waste. Choose product formulations that simplify measuring and mixing. Often, ready-to-use products are the best choice for small pest-management jobs.
Never pour pesticides down the sink, into the toilet, or down any sewer or street drains. Never dump, bury, or burn excess pesticides. The best way to dispose of unmixed pesticide product is through proper use. Other methods for disposal include:
- Following label disposal directions.
- Participating in a local household hazardous waste collection program.
- Participating in a state pesticide collection program (check the VDACS Pesticide Collection Program website for more information).
Careful planning should prevent the problem of dealing with excess mixed pesticides. Once a pesticide has been mixed for an application, it should NOT be stored. The best disposal option for excess pesticide mix is to apply it to a legal site according to label directions. This means that the site (plant, place) must be listed on the product label, and the amount applied does not exceed the application rate allowed on the pesticide label. The best way to deal with leftover pesticide mixes is to avoid having any.
Be sure that rinse water does not become a pollutant. Water collected from cleaning pesticide-contaminated equipment can be applied to a properly labeled site.
Empty, properly rinsed, and drained pesticide containers should be disposed of according to label directions. In many cases, these can be placed in household trash or offered for recycling if available in your locality. Empty pesticide containers should be punctured to prevent re-use before discarding. However, you should never puncture (or burn) a pressurized container such as an aerosol can because it can explode. Always refer to the pesticide label for directions on container disposal.
If you have questions about proper pesticide disposal, contact your local solid waste authority; the VDACS-OPS; or your local Extension office.
Spill Management: The best defense against pesticide spills is to work carefully. Keep PPE and spill cleanup materials handy — close to the place where you are mixing and loading application equipment. In case of an accident, refer to the product label for directions for spill management. If there are no specific directions regarding spill remediation, remember the three C’s: control, contain, and clean up.
Control the spill by first taking steps to protect yourself and others. Put on PPE if you need to handle a leaking container or may be exposed when controlling a spill. Then, stop the source of the spill. This may be as simple as placing a leaking container into a larger, chemical-resistant one or setting a fallen container upright. Do not leave a spill unattended until it is cleaned up.
Contain a liquid spill by confining it with soil, kitty litter, newspaper, vermiculite, sand, or absorbent pads. You can contain dry pesticides such as dusts, granules, or powders by covering them up with a sheet of plastic. Do not apply water — that will just spread the material over a wider area and make clean up more difficult.
Clean up a liquid spill by using a broom and dustpan to sweep up any absorbent materials you used to contain the spill, and place it into a heavy-duty plastic bag or bucket. Clean up a dry spill by sweeping up the pesticide with a broom and dustpan. If the pesticide was not contaminated, you may use it for a later application. If too much debris is mixed with the spilled pesticide, place the pesticide into a heavy-duty plastic bag or bucket. Decontaminate the spill site by washing the area with water and heavy-duty detergent (only use enough water to clean the area). Cover the area again with absorbent material, sweep up the contents, and add them to your heavy-duty bag or plastic bucket. These materials will need to be properly disposed of according to label directions. Clean all PPE and equipment used during the spill cleanup. Then be sure to wash yourself thoroughly with soap and water.
Things to keep on hand in case you need to handle a small spill include:
- Chemical-resistant gloves and absorbent materials for containing/absorbing liquid spills.
- A broom, dustpan, and heavy-duty detergent.
- A heavy-duty plastic bag or bucket.
- Any other spill cleanup materials specified on the labels of the products you use.
- Emergency contact information.
Choosing the Right Pesticide
Avoid problems by taking the time to study your pesticide needs carefully. Your local Extension agent or certified nursery employee can help with pesticide recommendations and suggest ways you can tailor the pesticide application to the intended site. Personal and environmental safety are prime concerns when selecting pesticides.
Consider the Site: Read the label of each product under consideration to ensure it can be used in the place and manner you intend. For example, if the label indicates the pesticide is toxic to fish, do not use the product on plants that border a pond. If the label requires that you wait two weeks from the time you spray until the time you harvest, do not use the product on vegetables or fruits that are almost ripe. If the product label lists only ornamental uses, do not apply it to fruits or vegetables. If a specific product gives application instructions for some types of vegetables but not others, use it ONLY on the crops listed in the “Directions for Use” section of the label. Consider all uses of the site to which the pesticide will be applied. Protect children, pets, and wildlife by careful pesticide selection and use.
Application Equipment and PPE: Do you have the right equipment and PPE? If not, are you willing to purchase, use, and maintain it? Do you want a pesticide that must be mixed and loaded into a sprayer? If you do not have the right PPE and equipment, you might consider other pesticide options that will suit your needs. A ready-to-use product may get the job done while saving you time and money.
Minimize Waste: Purchase only the amount of pesticide you anticipate using in one season. Most pesticides have a limited shelf life. If pesticides are stored, they must be protected from temperature extremes and moisture, and they must be kept in a secure location. Read the storage section of the product label prior to purchase, and do not buy a product that you cannot store as directed. Remember, pesticides must be kept in their original containers with the label intact.
Choose the Least Toxic Product: Compare pesticides based on how hazardous they are. The signal word on the label indicates a product’s acute toxicity. For example, products marked CAUTION are less toxic than products marked WARNING, and should be considered first.
Environmental Hazards: Be especially cautious with pesticides that contain warnings regarding impacts on water, fish, birds, and pollinator health.
Disposal Directions: Be sure you can properly dispose of any unused or unwanted pesticide product and its container according to the label recommendations.
Pesticides can be valuable gardening tools and an important part of a well-planned IPM program, but they must be selected with personal and environmental safety in mind. As with other tools, it is important to use the right pesticide for the job. Care and planning before pesticides are purchased can ensure safe and proper use.
Additional Resources
Attributions
Written by Stephanie Blevins Wycoff, Extension Associate, Virginia Tech Pesticide Programs; and Daniel Frank, Director, Virginia Tech Pesticide Programs (2022)
Edited by Dana Beegle, Publications Manager, Virginia Tech Pesticide Programs (2022)
Reviewed by Elizabeth Brown, Bedford Extension Master Gardener (2022)
Image Attributions
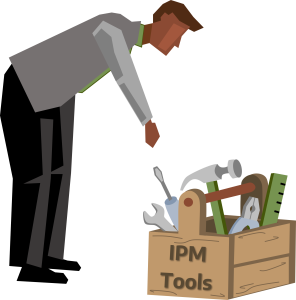
- Figure 7-1: IPM Toolbox. Grey, Kindred. 2022. CC BY-NC-SA 4.0.
- Figure 7-2: What is IPM Infographic. Johnson, Devon. 2022. CC BY-NC-SA 4.0.
- Figure 7-3: Control Methods. Grey, Kindred. 2022. CC BY-NC-SA 4.0.
- Figure 7-4: Pesticide label. Grey, Kindred. 2022. CC BY-NC-SA 4.0.
- Figure 7-5: Personal protective equipment. Grey, Kindred. 2022. CC BY-NC-SA 4.0.
- Figure 7-6: Application methods. Grey, Kindred. 2022. CC BY-NC-SA 4.0.
An ecosystem-based strategy that focuses on long-term prevention of pests or their damage through a combination of appropriate control tactics. These tactics can be preventative, curative, or both and are often combined to provide the best possible results.
Modifying or disrupting the pest environment to make it less habitable for a pest
Using hands-on techniques or simple equipment/devices to reduce or prevent the spread of pest populations
Using living organisms (i.e., natural enemies) to reduce pest populations (typically insects and weeds)
Use of pesticides to reduce pest populations. A pesticide is any substance that is used to prevent, destroy, repel, or mitigate any pest
Any substance that is used to prevent, destroy, repel, or mitigate any pest. Can be synthetic (man-made), or natural products derived from plants, microorganisms, or inorganic elements
