Chapter 8: Plant Propagation
Chapter Contents:
Plant propagation is the process of multiplying the numbers of or perpetuating a species or a specific individual plant. There are two types of propagation: sexual and asexual. Sexual reproduction requires the union of the sperm and egg and results in a plant with a new combination of genes. It involves the floral parts of a plant. Asexual propagation involves taking a part of one plant and causing it to regenerate itself into a new plant. Genetically it is identical to its “parent.” Asexual propagation involves the vegetative parts of a plant: stems, roots, or leaves.
There can be advantages to sexual propagation. Sexual propagation may be quicker than other methods for some species, may be the only way to obtain new varieties and strong hybrids, may be the only viable method for propagation in some species, and can help avoid transmission of certain diseases. Asexual propagation has advantages as well. It may be easier and faster in some species, may be the only way to perpetuate some cultivars, and it bypasses the juvenile characteristics of certain species.
Sexual Propagation
Sexual propagation involves the union of the sperm (male) with the egg (female) to produce a seed. The seed is made up of three major parts: the outer seed coat, which protects the seed, the food reserve (usually the endosperm), and the embryo, which is the young plant itself (refer to Chapter 1: “Botany”). When a seed is mature, not in dormancy, and placed in a favorable environment, it will germinate, or begin active growth. In the following section, seed germination and transplanting of seeds will be discussed.
Seed
To obtain quality plants, start with good quality seed from a reliable supplier. Select varieties to provide the size, color, and habit of growth desired. Choose varieties adapted to your area which will reach maturity before an early frost. Many new vegetable and flower varieties are hybrids (a hybrid is the result of a sexual cross between two or more plants that are somewhat related), which cost a little more than open pollinated types (open pollinated seed is self or cross-pollinated by wind or insects and is produced by isolating plants from other plants of different varieties to produce seed that is “true to type”). However, hybrid plants usually have more vigor, more uniformity, and better production than non-hybrids and sometimes have specific disease resistance or other unique cultural characteristics.
Although some seeds will keep for several years if stored properly, it is advisable to purchase only enough seed for the current year’s use. Good seed will not contain seed of any other crop, weeds, or other debris. The seed packet usually indicates essential information about the variety, the year for which the seeds were packaged, germination percentage you may typically expect, and notes of any chemical seed treatment. If seeds are obtained well in advance of the actual sowing date or are stored surplus seeds, keep them in a cool, dry place. Laminated foil packets help ensure dry storage. Paper packets are best kept in tightly closed containers and maintained around 40ºF in a low humidity environment.
Some gardeners save seed from their own gardens; however, if such seed are the result of random pollination by insects or other natural agents, they may not produce plants typical of the parents. This is especially true of the many hybrid varieties. (See Chapter 9: “The Vegetable Garden” for information on saving vegetable seed.) Most seed companies take great care in handling seeds properly. Generally, do not expect more than 65% to 80% of the seeds to germinate, with lower rates as time passes. From those germinating, expect about 60% to 75% to produce satisfactory, vigorous, sturdy seedlings.
Germination
There are four environmental factors which affect germination: water, oxygen, light, and heat.
Water for germination
The first step in the germination process is the imbibition or absorption of water. Even though seeds have great absorbing power due to the nature of the seed coat, the amount of available water in the germination medium affects the uptake of water. An adequate, continuous supply of water is important to ensure germination. Once the germination process has begun, a dry period will cause the death of the embryo.
Light for germination
Light is known to stimulate or to inhibit germination of some seed. The light reaction involved here is a complex process. Some crops which have a requirement for light to assist seed germination are ageratum, begonia, browallia, impatiens, lettuce, and petunia. Conversely, calendula, centaurea, annual phlox, verbena, and vinca will germinate best in the dark. Other plants are not specific at all. Seed catalogs and seed packets often list germination or cultural tips for individual varieties. When sowing light-requiring seed, do as nature does and leave them on the soil surface. If they are covered at all, cover them lightly with fine peat moss or fine vermiculite. These two materials, if not applied too heavily, will permit some light to reach the seed without limiting germination and will help keep soil uniformly moist. When starting seed in the home, supplemental light can be provided by fluorescent or LED fixtures suspended 6 to 12 inches above the seeds for 16 hours a day.
Oxygen for germination
Respiration takes place in all viable seed. The respiration in dormant seed is low, but some oxygen is required. The respiration rate increases during germination, therefore, the medium in which the seeds are placed should be loose and well-aerated while still holding adequate water. If the oxygen supply during germination is limited or reduced, germination can be severely retarded or inhibited.
Heat for germination
A favorable temperature is another important requirement of germination. It not only affects the germination percentage but also the rate of germination. Some seeds will germinate over a wide range of temperatures, whereas others require a narrow range. Many seeds have minimum, maximum, and optimum temperatures at which they germinate. For example, tomato seed has a minimum germination temperature of 50ºF and a maximum temperature of 95ºF, but an optimum germination temperature of about 80ºF. Where germination temperatures are listed, they are usually the optimum temperatures unless otherwise specified. Generally, 65 to 75ºF is best for most plants. This often means the germination flats may have to be placed in special chambers or on radiators, heating cables, or heating mats to maintain optimum temperature. The importance of maintaining proper medium temperature to achieve maximum germination percentages cannot be overemphasized.
Germination will begin when certain internal requirements have been met. A seed must not be in a dormant state, have a mature embryo, contain a large enough endosperm to sustain the embryo during germination, and contain sufficient hormones or auxins to initiate the process.
Methods of breaking dormancy
One of the functions of dormancy is to prevent a seed from germinating before it is surrounded by a favorable environment. In some trees and shrubs, seed dormancy is difficult to break, even when the environment is ideal. Various treatments are performed on the seed to break dormancy and begin germination. Most vegetable and flowering annuals do not have significant dormancy.
Seed scarification
Seed scarification involves breaking, scratching, or softening the seed coat so that water can enter and begin the germination process. There are several methods of scarifying seeds. In mechanical scarification, seeds are filed with a metal file, rubbed with sandpaper, or cracked with a hammer to weaken the seed coat. Hot water scarification involves putting the seed into hot water (170 to 212ºF). The seeds are allowed to soak in the water, as it cools, for 12 to 24 hours before being planted. A fourth method is one of warm, moist scarification. In this case, seeds are stored in non-sterile, warm, damp containers where the seed coat will be broken down by decay over several months. Acid scarification involves dissolving the seed coat with acid.
Seed stratification
Seeds of some fall-ripening trees, shrubs, some perennials and other plants of the temperate zone will not germinate unless chilled underground as they overwinter. Gardeners can replicate this with cold stratification, or exposing seeds to a period of cold temperatures to break their dormancy cycle.
The following procedure is usually successful. Put sand or vermiculite in a clay pot to about 1 inch from the top.
Place the seeds on top of the medium and cover with 1/2 inch of sand or vermiculite. Wet the medium thoroughly and allow excess water to drain through the hole in the pot. Place the pot containing the moist medium and seeds in a plastic bag and seal. Place the bag in a refrigerator. Periodically check to see that the medium is moist, but not wet. Additional water will probably not be necessary. After 10 to 12 weeks, remove the bag from the refrigerator. Take the pot out and set it in a warm place in the house. Water often enough to keep the medium moist. Soon the seedlings should emerge. When the young plants are about 3 inches tall, transplant them into pots to grow until they are ready to be set outside.
Another procedure that is usually successful uses sphagnum moss or peat moss. Wet the moss thoroughly, then squeeze out the excess water with your hands. Mix seed with the sphagnum or peat and place in a plastic bag. Seal the bag and put it in a refrigerator. Check periodically. If there is condensation on the inside of the bag, the process will probably be successful. After 10 to 12 weeks remove the bag from the refrigerator. Plant the seeds in pots to germinate and grow. Handle seeds carefully. Often the small roots and shoots are emerging at the end of the stratification period. Care must be taken not to break these off. Temperatures in the range of 35 to 45ºF (2 to 7ºC) are effective. Most refrigerators operate in this range. Seeds of most fruit and nut trees can be successfully germinated by these procedures. Seeds of peaches should be removed from the hard pit. Care must be taken when cracking the pits. Any injury to the seed itself can be an entry path for disease organisms.
Starting Seed Indoors
Media
A wide range of materials can be used to start seeds, from plain vermiculite or mixtures of soilless media to the various amended soil mixes. With experience, you will learn to determine what works best under your conditions. However, keep in mind what the good qualities of a germinating medium are. It should be rather fine and uniform (to promote good seed to soil contact), yet well-aerated and loose. It should be free of insects, disease organisms, and weed seeds. It should also be of low fertility or total soluble salts and capable of holding and moving moisture by capillary action. Traditionally, one mixture which has been used to supply these factors is a combination of 1/3 sterilized soil, 1/3 sand or vermiculite or perlite, and 1/3 peat moss. Ideally seedlings are started in a mixture compound of sphagnum peat moss and vermiculite. Do not use garden soil by itself to start seedlings; it is not sterile, is too heavy, and will not drain well.
The importance of using a sterile medium and container cannot be overemphasized. The home gardener can treat a small quantity of soil mixture in an oven. Place the slightly moist soil in a heat-resistant container in an oven set at about 250ºF. Use a candy or meat thermometer to ensure that the mix reaches a temperature of 180ºF for at least 1/2 hour. Avoid over-heating as this can be extremely damaging to the soil. Be aware that the heat will release very unpleasant odors in the process of sterilization. This treatment should prevent damping-off and other plant diseases, as well as eliminate potential plant pests. Growing containers and implements should be washed to remove any debris, then rinsed in a dilution of 9 parts water to 1 part 5.25% sodium hypochlorite (bleach) or 14 parts water to 1 part 8.25% sodium hypochlorite.
An artificial, soilless mix also provides the desired qualities of a good germination medium. The basic ingredients of such a mix are sphagnum peat moss and vermiculite, both of which are generally free of diseases, weed seeds, and insects. Sphagnum peat moss also contains anti-fungal properties which can be beneficial for seedlings. The ingredients are also readily available, easy to handle, lightweight, and produce uniform plant growth. “Peat-lite” mixes or similar products are commercially available or can be made at home using this recipe: 4 quarts of shredded sphagnum peat moss or coconut coir, 4 quarts of fine vermiculite, 1 tablespoon of superphosphate, and 2 tablespoons of ground limestone. Mix thoroughly. These mixes have little fertility, so seedlings must be watered with a diluted fertilizer solution soon after they emerge.
Containers
Flats and trays can be purchased or you can make your own containers for starting seeds by recycling such things as cottage cheese containers, styrofoam cups, the bottoms of milk cartons or bleach containers, recycled newspaper pots, and pie pans, as long as good drainage is provided. You can also purchase tools to make your own compressed soil blocks for starting seed.
Clay or plastic pots can be used, and numerous types of pots and strips made of compressed peat are also on the market. Plant bands and plastic cell packs are also available. Each cell or minipot holds a single plant which reduces the risk of root injury when transplanting. Peat pellets, peat or fiber-based blocks, and expanded foam cubes can also be used for seeding.
Seeding
The proper time for sowing seeds for transplants depends upon when plants may safely be moved outdoors in your area. This period may range from 4 to 12 weeks prior to transplanting, depending upon the speed of germination, the rate of growth, and the cultural conditions provided. A common mistake is to sow the seeds too early and then attempt to hold the seedlings back under poor light or improper temperature ranges. This usually results in tall, weak, spindly plants which do not perform well in the garden.
After selecting a container, fill it to within 3/4-inch of the top with moistened growing medium. For very small seeds, at least the top 1/4-inch should be a fine, screened mix or a layer of vermiculite. Firm the medium at the corners and edges with your fingers or a block of wood to provide a uniform, flat surface.
For medium and large seeds, make furrows 1 to 2 inches apart and 1/8 to 1/4-inch deep across the surface of the container using a narrow board or pot label. By sowing in rows, good light and air movement results, and if damping-off fungus does appear, there is less chance of it spreading. Seedlings in rows are easier to label and handle at transplanting time than those which have been sown in a broadcast manner. Sow the seeds thinly and uniformly in the rows by gently tapping the packet of seed as it is moved along the row. Lightly cover the seed with dry vermiculite or sifted medium if they require darkness for germination. A suitable planting depth is usually about twice the diameter of the seed.
Do not plant seeds too deeply. Extremely fine seed such as petunia, begonia, and snapdragon are not covered, but lightly pressed into the medium or watered in with a fine mist. If these seeds are broadcast, strive for a uniform stand by sowing half the seeds in one direction, then sowing the other way with the remaining seed in a crossing pattern.
Large seeds are frequently sown directly into some sort of a small container or cell pack which eliminates the need for early transplanting. Usually 2 or 3 seeds are sown per unit and later thinned to allow the strongest seedling to grow.
Pregermination
Another method of starting seeds is pregermination. This method involves sprouting the seeds before they are planted in pots (or in the garden). This reduces the time to germination, as the temperature and moisture are easy to control. A high percentage of germination is achieved since environmental factors are optimum. Lay seeds between the folds of a cotton cloth, paper towel, or on a layer of vermiculite in a shallow pan. Keep moist, in a warm place. When roots begin to show, place the seeds in containers or plant them directly in the garden. While transplanting seedlings, be careful not to break off tender roots. Continued attention to watering is critical.
Watering
After the seed has been sown, moisten the planting mix thoroughly. Use a fine mist or place the containers in a pan or tray which contains about 1 inch of warm water. Avoid splashing or excessive flooding which might displace small seeds. When the planting mix is saturated, set the container aside to drain. The soil should be moist but not wet.
Ideally, seed flats should remain sufficiently moist during the germination period without having to add water. One way to maintain moisture is to slip the whole flat or pot into a clear plastic bag after the initial watering. The plastic should be at least 1 inch from the soil. Many home gardeners cover their flats with panes of glass instead of using a plastic sleeve. Keep the container out of direct sunlight, otherwise the temperature may rise to the point where the seeds will be harmed. Be sure to remove the plastic bag or glass cover as soon as the first seedlings appear. Surface watering can then be practiced if care and good judgement are used.
Temperature and light after germination
Several factors for good germination have already been mentioned. The last item, and by no means the least important, is temperature. Since most seeds will germinate best at an optimum temperature that is usually higher than most home night temperatures, often special warm areas must be provided. Seed starting mats are an excellent method of providing constant heat.
After germination and seedling establishment, move the flats to a light, airy, cooler location, at a 55 to 60ºF night temperature and a 65 to 70ºF day reading. This will prevent soft, leggy growth and minimize disease troubles.
Some crops, of course, may germinate or grow best at a different constant temperature and must be handled separately from the bulk of the plants. Check the packet for proper germination temperature.
Seedlings grown indoors must receive bright light after germination, and natural daylight (even that from a south-facing window) is most often not adequate enough to produce viable seedlings indoors. Instead, place the seedlings under a fluorescent or LED light. Position the plants 6 inches from the tubes and keep the lights on about 16 hours each day. As the seedlings grow, the lights should be raised. When seedlings have formed 1 to 2 sets of true leaves, they are ready to be transplanted. For more information on planting seeds outdoors, see Chapter 9: “The Vegetable Garden.”
Table 8-1: Seed germination requirements
| Plant | Approximate time to seed before last spring frost | Approximate germination time (days) | Germination Temperature (°F) | Germinate in light (L) or dark (D) conditions |
|---|---|---|---|---|
| Begonia | 12 weeks or more | 10-15 | 70 | L |
| Browallia | 12 weeks or more | 15-20 | 70 | L |
| Geranium | 12 weeks or more | 10-20 | 70 | L |
| Larkspur | 12 weeks or more | 5-10 | 55 | D |
| Pansy (Viola) | 12 weeks or more | 5-10 | 65 | D |
| Vinca | 12 weeks or more | 10-15 | 70 | D |
| Dianthus | 10 weeks | 5-10 | 70 | - |
| Impatiens | 10 weeks | 15-20 | 70 | L |
| Petunia | 10 weeks | 5-10 | 70 | L |
| Portulaca | 10 weeks | 5-10 | 70 | D |
| Snapdragon | 10 weeks | 5-10 | 65 | L |
| Stock | 10 weeks | 10-15 | 70 | - |
| Verbena | 10 weeks | 15-20 | 65 | D |
| Ageratum | 8 weeks | 5-10 | 70 | L |
| Alyssum | 8 weeks | 5-10 | 70 | - |
| Broccoli | 8 weeks | 5-10 | 70 | - |
| Cabbage | 8 weeks | 5-10 | 70 | - |
| Cauliflower | 8 weeks | 5-10 | 70 | - |
| Celosia | 8 weeks | 5-10 | 70 | - |
| Coleus | 8 weeks | 5-10 | 65 | L |
| Dahlia | 8 weeks | 5-10 | 70 | - |
| Eggplant | 8 weeks | 5-10 | 70 | - |
| Head lettuce | 8 weeks | 5-10 | 70 | L |
| Nicotiana | 8 weeks | 10-15 | 70 | L |
| Pepper | 8 weeks | 5-10 | 80 | |
| Phlox | 8 weeks | 5-10 | 65 | - |
| Aster | 6 weeks | 5-10 | 70 | D |
| Balsam | 6 weeks | 5-10 | 70 | - |
| Centaurea | 6 weeks | 5-10 | 65 | - |
| Marigold | 6 weeks | 5-10 | 70 | D |
| Tomato | 6 weeks | 5-10 | 80 | - |
| Zinnia | 6 weeks | 5-10 | 70 | - |
| Cucumber | 4 weeks or less | 5-10 | 85 | - |
| Cosmos | 4 weeks or less | 5-10 | 70 | - |
| Muskmelon | 4 weeks or less | 5-10 | 85 | - |
| Squash | 4 weeks or less | 5-10 | 85 | - |
| Watermelon | 4 weeks or less | 5-10 | 85 | - |
Transplanting and Handling
If the plants have not been seeded in individual containers, they must be transplanted to give them proper growing space. One of the most common mistakes made is leaving the seedlings in the seed flat too long. The ideal time to transplant young seedlings is when they are small and there is little danger from setback. This is usually when the first set of true leaves appear above or between the cotyledon leaves (the cotyledons or seed leaves are the first leaves the seedling produces). Don’t let plants get hard and stunted or tall and leggy.
Seedling growing mixes and containers can be purchased or prepared similar to those mentioned for germinating seed. The medium should contain more plant nutrients than a germination mix, however. Some commercial soilless mixes have fertilizer already added.
Containers for transplanting
There is a wide variety of containers from which to choose for transplanting seedlings. These containers should be economical, durable, and make good use of space. The type selected will depend on the type of plant to be transplanted and individual growing conditions. Standard pots are not recommended for the transplant from germination flats as they waste a great deal of space and may not dry out rapidly enough for the seedling to have sufficient oxygen for proper development.
There are many types of containers available commercially. Those made out of pressed peat can be purchased in varying sizes. Individual pots or strips of connected pots fit closely together, are inexpensive, and can be planted directly in the garden. When setting out plants grown in peat pots, be sure to cover the pot completely. If the top edge of the peat pot extends above the soil level, it will act as a wick, and draw water away from the soil in the pot. To avoid this, tear off the top lip of the pot and then plant flush with the soil level. Compressed peat pellets, when soaked in water, expand to form compact, individual pots. They waste no space, don’t fall apart as badly as peat pots, and can be set directly out in the garden. If you wish to avoid transplanting seedlings altogether, compressed peat pellets are excellent for direct sowing.
Community packs are containers in which there is room to plant several plants. These are generally inexpensive. The main disadvantage of a community pack is that the roots of the individual plants must be broken or cut apart when separating them to put out in the garden. Cell packs, which are strips of connected individual pots, are also available in plastic and are frequently used by commercial bedding plant growers, as they withstand frequent handling. In addition, many homeowners find a variety of materials from around the house useful for containers. These homemade containers should be deep enough to provide adequate soil and have plenty of drainage holes in the bottom. For example, styrofoam egg cartons make good cell packs.
Transplanting
Carefully dig up the small plants with a knife or plant label. Avoid tearing roots in the process. Let the group of seedlings fall apart and pick out individual plants. Gently ease them apart in small groups which will make it easier to separate individual plants. Handle small seedlings by their leaves, not their delicate stems. Punch a hole in the medium into which the seedling will be planted. Make it deep enough so the seedling can be put at the same depth it was growing in the seed flat. After planting, firm the soil and water gently. Keep newly transplanted seedlings in the shade for a few days, or place them under fluorescent lights. Keep them away from direct heat sources. Begin a fertilization program. When fertilizing, use a soluble house plant fertilizer, at the dilution recommended by the manufacturer, about every 2 weeks after the seedlings are established. Remember that young seedlings are easily damaged by too much fertilizer, especially if they are under any moisture stress.
Hardening plants
Hardening is the process of altering the quality of plant growth to withstand the change in environmental conditions which occurs when plants are transferred from a greenhouse or home to the garden. A severe check in growth may occur if plants produced in the home are planted outdoors without a transition period. Hardening is most critical with early crops, when adverse climatic conditions can be expected. To avoid sun scorch, cold shock, and/or wind damage, plants must be hardened off.
Hardening can be accomplished by gradually lowering temperatures and relative humidity and reducing water. This procedure results in an accumulation of carbohydrates and a thickening of cell walls. A change from a soft, succulent type of growth to a firmer, harder type is desired.
This process should be started at least 2 weeks before planting in the garden. If possible, plants should be moved to a 45 to 50ºF temperature indoors or outdoors in a shady location. A coldframe is excellent for this purpose. When put outdoors, plants should be shaded, then gradually moved into sunlight. Each day, gradually increase the length of exposure. Don’t put tender seedlings outdoors on windy days or when temperatures are below 45ºF. Reduce the frequency of watering to slow growth, but don’t allow plants to wilt. Even cold-hardy plants will be hurt if exposed to freezing temperatures before they are hardened. After proper hardening, however, they can be planted outdoors and light frosts will not damage them.
The hardening process is intended to slow plant growth. If done too quickly, growth will stop and significant damage can be done to certain crops. For example, cauliflower will make thumb size heads and fail to develop further if hardened too severely.
Propagation by Spores
Though ferns are more easily propagated by other methods, some gardeners like the challenge of raising ferns from spores. One tested method for small quantities follows:
Put a solid, sterilized masonry brick (bake at 250ºF for 30 minutes) in a pan and add water to cover the brick. When the brick is wet throughout, squeeze a thin layer of moist soil and peat (1:1) into the top of the brick. Pack a second layer (about an inch) on top of that. Sprinkle spores on top. Cover with plastic (not touching the spores) or put in a plastic shoe box and put in a warm place in indirect light. It may take a month or more for the spores to germinate. Keep moist at all times. A prothallus (one generation of the fern) will develop first from each spore, forming a light green mat. Mist lightly once a week to maintain high surface moisture; the sperm must be able to swim to the archegonia (female parts). After about three weeks, fertilization should have occurred. Pull the mat apart with tweezers in 1/4-inch squares and space them 1/2-inch apart in a flat containing a 2-inch layer of sand, 1/4-inch of charcoal, and about 2 inches of soil/peat mix. Cover with plastic and keep moist. When fern fronds appear and become crowded, transplant to small pots. Gradually reduce the humidity until they can survive in the open. Light exposure may be increased at this time.
Asexual Propagation
Asexual propagation is the best way to maintain some species, particularly an individual that best represents that species.
The major methods of asexual propagation are cuttings, layering, division, and budding/grafting. Cuttings involve rooting a severed piece of the parent plant. Layering involves rooting a part of the parent and then severing it. Budding and grafting are joining two plant parts from different varieties. Clones are groups of plants that are identical to their one parent and that can only be propagated asexually. The Bartlett pear (1770) and the Delicious apple (1870) are two examples of clones that have been asexually propagated for many years.
Rooting Media
Rooting media for asexual propagation should be clean and sterile. Cuttings are not susceptible to damping-off, but are attacked by other fungi and bacteria which may come along in the medium. Most commercially prepared media are purchased clean.
This media needs a combination of good aeration and water-holding capacity. In order for a plant to form a new root system, it must have a ready moisture supply at the cut surface. Oxygen, of course, is required for all living cells. The coarse-textured media choices often meet these requirements.
The media should be low in fertilizer, as discussed for sexual propagation. Excessive fertility will damage or inhibit new roots.
100% coarse perlite can be used to start some cuttings. This doesn’t hold much water for long, but it is fine for rooting cuttings of cactus-type plants which would ordinarily rot in higher moisture media. 100% coarse vermiculite has excellent water holding capacity and aeration, but may dry out rapidly via evaporation if not covered in some way. 50% peat moss and 50% perlite is a good mix that favors aeration. An equal mix of peat moss, vermiculite, and perlite is also a good mix which favors moisture retention.
Plain water can be used to propagate some cuttings. This is possible and actually works quite well for some species which root easily. It certainly provides the needed moisture, but if the water is not changed on a weekly basis it will become stagnant, oxygen deficient, and inhibitory to rooting. Furthermore, roots produced in 100% water are different than those produced in solid media; they may undergo greater transplant shock with a greater incidence of death. So it is not the most desirable, but certainly feasible.
Rooting Enhancement Conditions
Once you’ve selected the right medium, your first priority is to get roots produced as quickly as possible. The consequences of slow rooting invariably mean death because the cutting must rely on its limited water reserves. Water is required for major chemical reactions in plants which will be shut down in its absence. Even though the exposed cells on the cut surface of the cutting ordinarily transport water throughout the plant, they are not equipped to absorb it from the medium. This can only be done in most plants by roots, and particularly root hairs. Root hairs are tiny, single-cell projections from the larger roots.
Make sure the medium is moist prior to inserting cuttings. If incompletely moist, then the cut surface may contact a dry pocket and have its own water absorbed away by the medium component. Try to keep both the air and medium temperature warm: 70-75ºF. Higher temperatures enhance growth, but excessively high temperatures do not allow for production via photosynthesis to keep up with food breakdown in normal cell energy use (respiration). You can buy electric heating pads to put beneath containers holding cuttings to maintain a constant temperature.
Get some air circulation around the cuttings as often as possible. This discourages fungal growth. Place in bright, but not direct light. An east window is fine, but a west window is too warm; a south facing window is too bright and a north facing window is too dim. Indoor florescent or LED lights are the best way to ensure adequate light supply to the cuttings.
One way to provide good environmental conditions for asexual propagation is through the use of a mist bed. This system sprays a fine mist of water over the cuttings once every few minutes, and the time is adjustable. It should only be on during the day, as nighttime operation would keep the medium too wet and encourage rotting. Misting inhibits transpiration and forces the plant to conserve water while it forms new roots. If a mist system is unavailable, one can be imitated in a small propagation tray in the home. Choose an appropriate medium, moisten it, and place it in a tray. Place the tray in a perforated or slitted clear plastic bag. This increases the relative humidity and inhibits water loss by the plant and medium yet allows air circulation.
Tug gently at the cuttings after 2-3 weeks to test for rooting and transplant to individual pots when roots resist your tugs. Dig them out, do not pull them out! Different plants require different rooting times, so do not expect them all to root at the same time. For information on starting plants outdoors, see Chapter 9: “The Vegetable Garden.”
Cuttings
Many types of plants, both woody and herbaceous, are frequently propagated by cuttings. A cutting is a vegetative plant part which is severed from the parent plant in order to regenerate itself, thereby forming a whole new plant. Take cuttings from healthy, disease-free plants, preferably from the upper part of the plant (this season’s growth). Avoid taking cuts from leggy stems, heavily fertilized plants, or plants showing symptoms of moisture stress or nutrient deficiency.
Remove cuttings from the plant with a sharp blade to reduce injury to the parent plant. Dip the cutting tool in rubbing alcohol (70% or higher) or a mixture of one part bleach to nine parts water to prevent transmitting diseases from infected plant parts to healthy ones. Remove flowers and flower buds to allow the cutting to use its energy and stored carbohydrates for root and shoot formation rather than fruit and seed production. To hasten rooting, increase the number of roots, or to obtain uniform rooting, use a rooting hormone, preferably one containing a fungicide. Prevent possible contamination of the entire supply of rooting hormone by putting some in a separate container for dipping cuttings.
Place stem and leaf cuttings in bright, indirect light. Root cuttings can be kept in the dark until new shoots appear. Some additional tips for successful propagation include: cuttings from young plants root better than those from mature plants; lateral shoot cuttings are more successful than terminal shoots; avoid flower buds; take cuttings in the morning and keep them cool and moist until ready to plant; space cuttings so that each will receive adequate light and ventilation; ensure that buds on cuttings are pointed upwards.
Three methods of cuttings, described below, can be used: stem cuttings, leaf cuttings, and root cuttings.
Stem cuttings
Numerous plant species are propagated by stem cuttings. Some can be taken at any time of the year, but stem cuttings of many woody plants must be taken in the fall or in the dormant season. Success with herbaceous plants is generally enhanced when done in the spring; these plants are actively growing then, and more apt to root quickly on their own. There are several different types of stem cuttings depending on the part of the stem needed. At least one node should be below the surface. Although some plants root at internodes, others only root at nodal tissue.
How to: Stem cutting
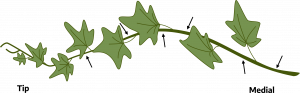
Tip cuttings: Detach a 2-6 inch piece of stem, including the terminal bud. Make the cut just below a node. Remove leaves that would touch or be below the medium. Cuttings should retain three or four leaves for best rooting. Dip the stem in rooting hormone if desired. Gently tap the end of the cutting to remove excess hormone. To prevent the root hormone from being scraped off, create a hole in the media with a pencil before inserting the cutting into the media. Insert deeply enough into the media for the tip to be able to support itself. Firm medium around stem.
Medial cuttings: Make the first cut just above a node, and the second cut just below a node 2 to 6 inches down the stem. Remove the leaves below the bottom node. Prepare and insert the cutting as you would a tip cutting. Be sure to position right side up. Axial buds are always above leaves.
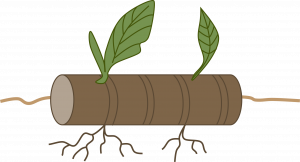
Cane cuttings:Cane cuttings provide an easy way to propagate new plants from overgrown ones, especially houseplants such as dieffenbachia, corn plant, Chinese evergreen, and other plants with thick stems. Cut cane-like stems into sections containing one or two eyes, or nodes. Dust ends with fungicide or activated charcoal. Allow to dry several hours. Lay horizontally with about half of the cutting below the media surface, eye facing upward. Cane cuttings are usually potted when roots and new shoots appear but new shoots from dracaena and croton are often cut off and rerooted in sand.
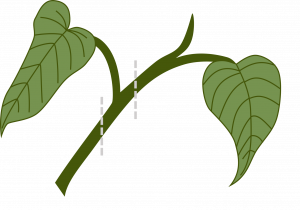
Single eye: The eye refers to the bud which emerges at the axil of the leaf at each node. This is used for plants with alternate leaves when space or stock material are limited. Cut the stem about 1/2 inch above and 1/2 inch below a node. Place the cutting horizontally or vertically in the medium.

Double eye: This method is used for plants with opposite leaves when space or stock material is limited. Cut the stem about 1/2 inch above and 1/2 inch below the same node. Insert the cutting vertically in the medium with the node just touching the surface.
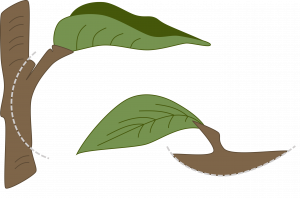
Heel cutting: This method uses stock material with woody stems efficiently. Make a shield-shaped cut about halfway through the wood around a leaf and axial bud. Insert the shield horizontally into the medium.
Leaf cuttings
Leaf cuttings are used almost exclusively for a few indoor plants. Leaves of most plants will either produce a few roots but no plant, or just decay. Examples of plants that propagate from leaf cuttings include African violets, bush-type peperomias, sansevieria, jade plant, and jelly bean plant.
How to: Leaf cuttings
Whole leaf with petiole: Detach the leaf and up to 1-1/2 inches of petiole. Insert the lower end of the petiole into the medium. One or more new plants will form at the base of the petiole. The leaf may be severed from the new plants when they have their own roots, and the petiole can be reused. (Example: African violet).
Whole leaf without petiole: This is used for plants with sessile leaves (leaves without petioles). Insert the cutting vertically into the medium. A new plant will form from the axillary bud. The leaf may be removed when the new plant has its own roots. (Example: donkey’s tail).

Split vein: Detach a leaf from the stock plant. Slit its veins on the lower leaf surface. Lay the cutting, lower side down, on the medium. New plants will form at each cut. If the leaf tends to curl up, hold it in place by covering the margins with the rooting medium. (Example: Rex begonia).

Leaf sections: This method is frequently used with snake plant and fibrous rooted begonias. Cut begonia leaves into wedges with at least one vein. Lay leaves flat on the medium. A new plant will arise at the vein. Cut snake plant leaves into 2-inch sections. Consistently make the lower cut slanted and the upper cut straight so you can tell which is the top. Insert the cutting vertically. Roots will form fairly soon, and eventually a new plant will appear at the base of the cutting. Do not allow cuttings to become too moist because they may rot.
For all leaf cuttings (except for succulents), enclose the potted cuttings in a plastic bag and monitor to make sure the leaf stays in contact with the growing media.
Root cuttings
Root cuttings are usually taken from 2-or-3-year-old plants during their dormant season when they have a large carbohydrate supply. Root cuttings of some species produce new shoots, which then form their own root systems, while root cuttings of other plants develop root systems before producing new shoots.
How to: Root cuttings
Plants with large roots: Make a straight top cut. Make a slanted cut 2-6 inches below the first cut. Store about 3 weeks in moist sawdust, peat moss, or sand at 40ºF. Remove from storage. Insert the cutting vertically with the top approximately level with the surface of the rooting medium. This method is often used outdoors (Example: horseradish).
Plants with small roots: Take 1-2 inch sections of roots. Insert the cuttings horizontally about 1/2 inch below the medium surface. This method is usually used indoors or in a hotbed. (Example: bleeding heart).
Layering
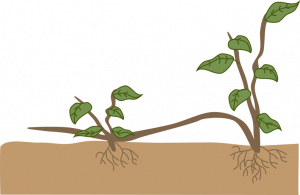
Stems still attached to their parent plants may form roots where they touch a rooting medium. Severed from the parent plant, the rooted stem becomes a new plant. This method of vegetative propagation, called layering, promotes a high success rate because it prevents the water stress and carbohydrate shortage that plague cuttings. Some plants layer themselves naturally, but sometimes plant propagators assist the process. Layering may be enhanced by wounding one side of the stem or by bending it very sharply. The rooting medium should always provide aeration and a constant supply of moisture.
How to: Layering
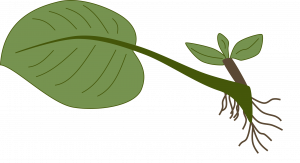
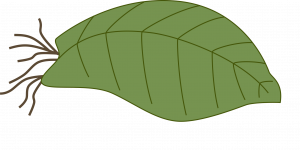
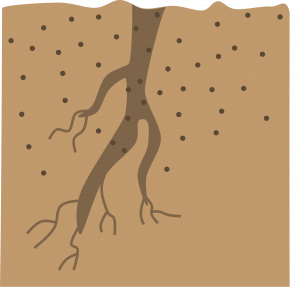
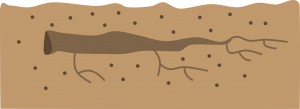
Tip layering: Dig a hole 3-4 inches deep. Insert the shoot tip and cover it with soil. The tip grows downward first, then bends sharply and grows upward. Roots form at the bend, and the recurved tip becomes a new plant. Remove the tip layer and plant it in the early spring or late fall. Examples: purple and black raspberries, trailing blackberries.
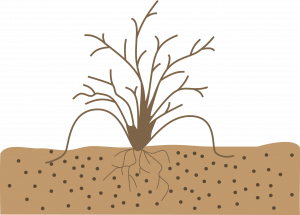
Simple layering: Bend the stem to the ground. Cover part of it with soil, leaving the last 6-12 inches exposed. Bend the tip into a vertical position and stake in place. The sharp bend will often induce rooting, but wounding the lower side of the branch or loosening the bark by twisting the stem may help. Examples: forsythia, honeysuckle.
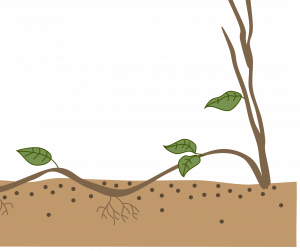
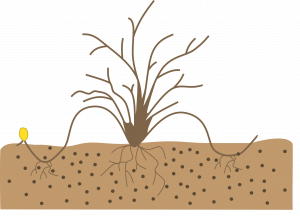
Compound layering: This method works for plants with flexible stems. Bend the stem to the rooting medium as for simple layering, but alternately cover and expose stem sections. Wound the lower side of the stem sections to be covered. Examples: heart-leaf philodendron, pothos.
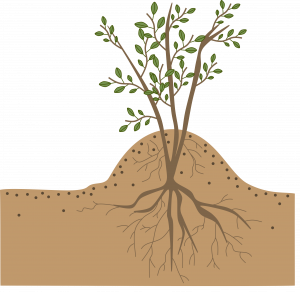
Mound (stool) layering: Cut the plant back to 1 inch above the ground in the dormant season. Mound soil over the emerging shoots in the spring to enhance their rooting. Examples: gooseberries, apple rootstocks.
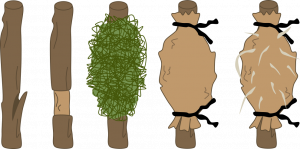
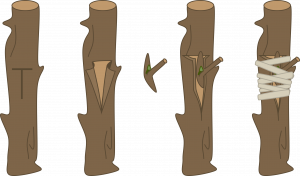
Air layering: Air layering is used to propagate some indoor plants with thick stems, or to rejuvenate them when they become leggy. On monocots, slit the stem just below a node; for dicots, girdle the stem as show in the figure. Pry the slit open with a toothpick. Surround the wound with wet unmilled sphagnum moss. Wrap plastic or foil around the sphagnum moss and tie in place. When roots pervade the moss, cut the plant off below the root ball.
Propagation from plant parts can be considered a modification of layering, as the new plants form before they are detached from their parent plants.
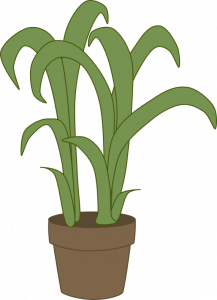
Division
Most perennials left in the same place for more than 3 years are likely to be overgrown, overcrowded, have dead or unsightly centers, and need basic fertilizer and soil amendments. The center of the clump will grow poorly, if at all, and the flowers will be sparse. The clump will deplete the fertility of the soil as the plant crowds itself. To divide mature clumps of perennials, select only vigorous side shoots from the outer part of the clump. Discard the center of the clump. Divide the plant into clumps of three to five shoots each. Be careful not to over-divide; too small a clump will not give much color the first year after replanting. Divide perennials when the plants are dormant just before a new season of growth, or in the fall so they can become established before the ground freezes. Stagger plant divisions so the whole garden will not be redone at the same time; good rotation will yield a display of flowers each year. Do not put all the divisions back into the same space that contained the original plant. That would place too many plants in a given area. Give extra plants to friends, plant them elsewhere in the yard, or discard them.
How to: Division
Stolons and runners: A stolon is a horizontal, often fleshy stem that can root, then produce new shoots where it touches the medium. A runner is a slender stem that originates in a leaf axil and grows along the ground or downward from a hanging basket, producing a new plant at its tip. Plants that produce stolons or runners are propagated by severing the new plants from their parent stems. Plantlets at the tips of runners may be rooted while still attached to the parent, or detached and placed in a rooting medium. Examples: strawberry, spider plant.
Offsets: Plants with a rosetted stem often reproduce by forming new shoots at their base or in leaf axils. Sever the new shoots from the parent plant after they have developed their own root system. Unrooted offsets of some species may be removed and placed in a rooting medium. Some of these must be cut off, while others may be simply lifted off of the parent stem. Examples: date palm, haworthia, bromeliads, many cacti.
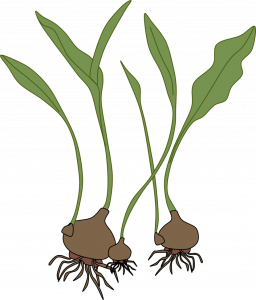
Bulbs (separation): New bulbs form beside the originally planted bulb. Separate these bulb clumps every 3-5 years for largest blooms and to increase bulb population. Dig up the clump after the leaves have withered. Gently pull the bulbs apart and replant them immediately so their roots can begin to develop. Small, new bulbs may not flower for 2 or 3 years, but large ones should bloom the first year. Examples: tulip, narcissus.

Corms (separation): A large new corm forms on top of the old corm, and tiny cormels form around the large corm. After the leaves wither, dig up the corms and allow them to dry in indirect light for 2-3 weeks. Remove the cormels, then gently separate the new corm from the old corm. Dust all new corms with a fungicide and store in a cool place until planting time. Examples: crocus, gladiolus.
Crowns (separation): Plants with more than one rooted crown may be divided and the crowns planted separately. If the stems are not joined, gently pull the plants apart. If the crowns are united by horizontal stems, cut the stems and roots with a sharp knife to minimize injury. Divisions of some outdoor plants should be dusted with a fungicide before they are replanted. Examples: snake plant, iris, prayer plant, day lilies.
Grafting
Grafting and budding are methods of asexual plant propagation that join plant parts so they will grow as one plant. These techniques are used to propagate cultivars that will not root well as cuttings, whose own root systems are inadequate, to get larger plants faster, or to improve disease resistance. One or more new cultivars (scion) can be added to existing fruit and nut trees by grafting or budding.
The portion of the cultivar that is to be propagated is called the scion. It consists of a piece of shoot with dormant buds that will produce the stem and branches. The rootstock (see Chapter 10: “Fruits in the Home Garden” for further discussion) provides the new plant’s root system and sometimes the lower part of the stem. The cambium is a layer of cells located between the wood and bark of a stem from which new tissues originate.
Four conditions must be met for grafting to be successful: the scion and rootstock must be compatible; each must be at the proper physiological stage; the cambial layers of the scion and stock must meet; and the graft union must be kept moist until the wound has healed.
Grafting tools that simplify the process are available commercially.
How to: Grafting
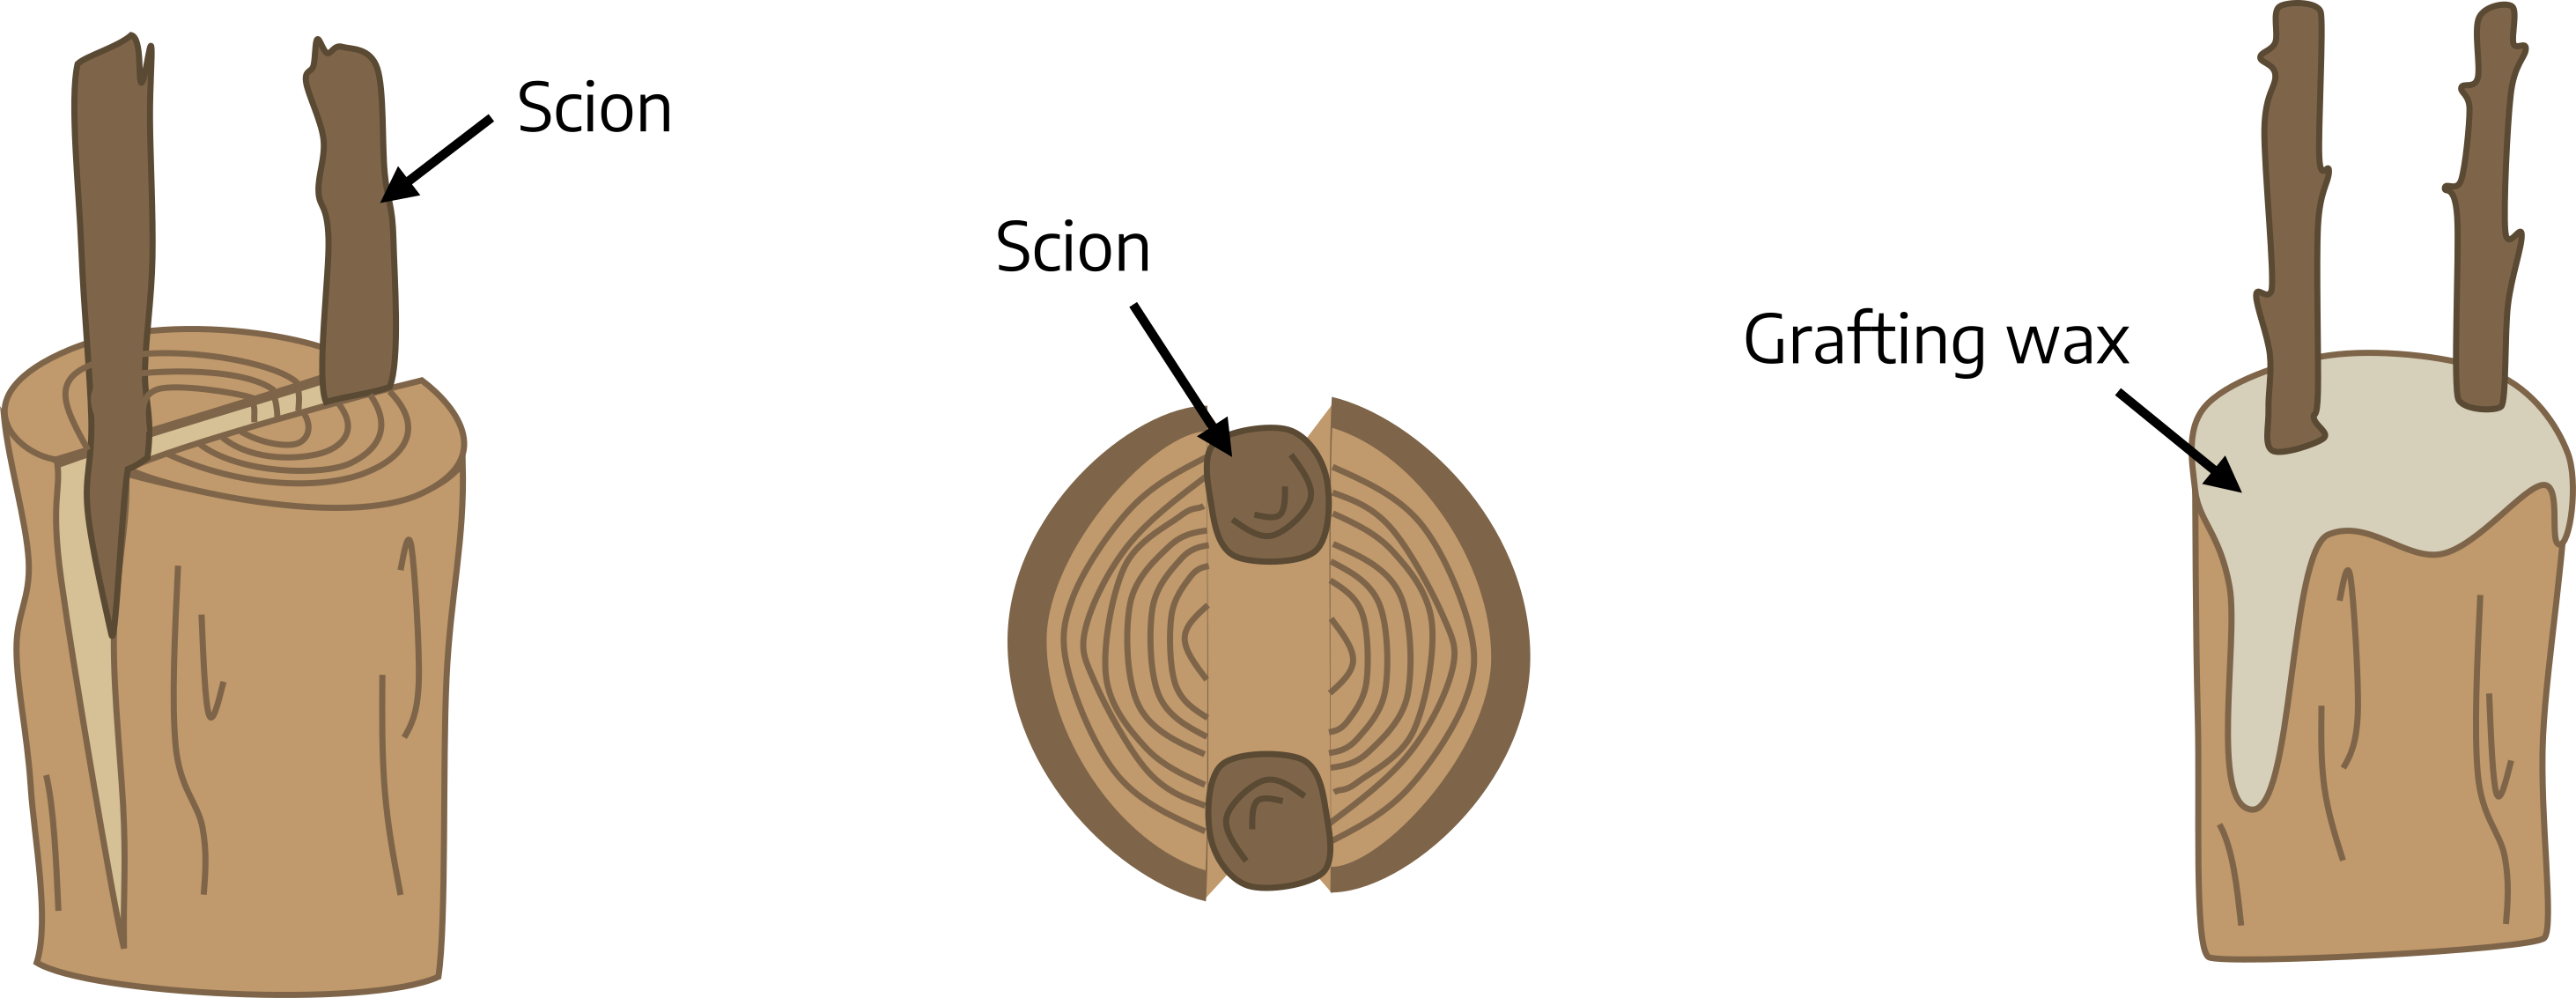
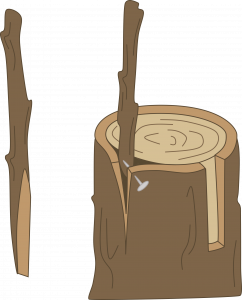
Cleft grafting: Cleft grafting is often used to change the cultivar or top growth of a shoot or a young tree (usually a seedling). It is especially successful if done in the early spring. Collect scion wood 3/8 to 1/2 inch in diameter. Cut the limb or small tree trunk to be reworked perpendicular to its length. Make a 2-inch vertical cut through the center of the previous cut. Be careful not to tear the bark. Keep this cut wedged apart. Cut the lower end of each scion piece into a wedge. Prepare two scion pieces 3-4 inches long. Insert the scions at the outer edges of the cut in the rootstock. Tilt the top of the scion slightly outward and the bottom slightly inward to be sure the cambial layers of the scion and rootstock touch. Remove the wedge propping the slit open and cover all cut surfaces with grafting wax.
Bark grafting: Unlike most grafting methods, bark grafting can be used on large limbs, although these are often infected before the wound can completely heal. Collect scion wood 3/8 to 1/2 inch in diameter when the plant is dormant, and store the wood wrapped in moist paper in a plastic bag in the refrigerator. Saw off the limb or trunk of the rootstock at a right angle to itself. In the spring, when the bark is easy to separate from the wood, make a 1/2-inch diagonal cut on one side of the scion, and a 1-1/2-inch diagonal cut on the other side. Leave two buds above the longer cut. Cut through the bark of the stock, a little wider than the scion. Remove the top third of the bark from this cut. Insert the scion with the longer cut against the wood. Nail the graft in.
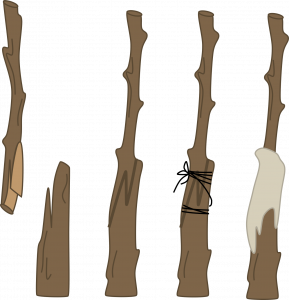
Whip or tongue grafting: This method is often used for material 1/4 to 1/2 inch in diameter. The scion and rootstock are usually of the same diameter, but the scion may be narrower than the stock if the cambium of the scion is aligned with the cambium of the root stock on one side. This strong graft heals quickly and provides excellent cambial contact. Make one 2-1/2-inch long sloping cut at the top of the rootstock and a matching cut on the bottom of the scion. On the cut surface, slice downward into the stock and up into the scion so the pieces will interlock. Fit the pieces together, then tie and wax the union.
Care of the graft
Very little success in grafting will be obtained unless proper care is maintained for the following year or two. If a binding material such as strong cord or nursery tape is used on the graft, this must be cut shortly after growth starts to prevent girdling. Rubber budding strips have some advantages over other materials. They expand with growth and usually do not need to be cut, as they deteriorate and break after a short time. It is also an excellent idea to inspect the grafts after 2 or 3 weeks to see if the wax has cracked, and if necessary, rewax the exposed areas. After this, the union will probably be strong enough and no more waxing will be necessary.
Limbs of the old variety which are not selected for grafting should be cut back at the time of grafting. The total leaf surface of the old variety should be gradually reduced as the new one increases until at the end of 1 or 2 years, the new variety has completely taken over. Completely removing all the limbs of the old variety at the time of grafting increases the shock to the tree and causes excessive suckering. Also, the scions may grow too fast, making them susceptible to wind damage. Future maintenance will be necessary to remove any sprouts from rootstock to prevent it crowding out the scion. If using a whip (1 branch) rootstock, remove all of the buds from the rootstock at the time of grafting.
Watch: Tomato grafting with the Extension Master Gardener Program
Budding
Budding is the union of one bud and a small piece of bark from the scion with a rootstock. It is especially useful when scion material is limited. It is also faster and forms a stronger union than grafting.
How to: Budding

Patch budding: Plants with thick bark should be patch budded. This is done while the plants are actively growing, so their bark slips easily (that is, it peels up in one even layer exposing the underlying wood). Remove a rectangular piece of bark from the rootstock. Cover this wound with a bud and matching piece of bark from the scion. If the rootstock’s bark is thicker than that of the scion, pare it down to meet the thinner bark so that when the union is wrapped the patch will be held firmly in place.
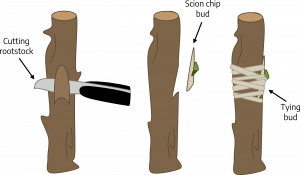
Chip budding: This budding method can be used when the bark is not slipping. Slice downward into the rootstock at a 45 degree angle through 1/4 of the wood. Make a second cut about one inch upward from the first cut. Remove a bud and attending chip of bark and wood from the scion shaped so that it fits the rootstock wound. Fit the bud chip to the stock and wrap the union.
T-budding: This is the most commonly used budding technique. When the bark is slipping, make a vertical cut (same axis as the root stock) through the bark of the rootstock, avoiding any buds on the stock. Make a horizontal cut at the top of the vertical cut (in a T shape) and loosen the bark by twisting the knife at the intersection. Remove a shield-shaped piece of the scion, including a bud, bark, and a thin section of wood. Push the shield under the loosened stock bark. Wrap the union, leaving the bud exposed.
Care of buds
Place the bud in the stock in August. Force the bud to develop the following spring by cutting the stock off 3 to 4 inches above the bud. The new shoot may be tied to the resulting stub to prevent damage from the wind. After the shoot has made a strong union with the stock, cut the stub off close to the budded area.
Plants Suited for Asexual Methods of Propagation
Example plants suitable for cuttings:
Stem cuttings:
- Tip – used for almost all house plants except those that don’t form stems such as African violet, and those with rigid stems such as dieffenbachia
- Medial – same as tip
- Cane – dieffenbachia, swiss cheese plant, aglaonema
- Single eye – alternate leaf plants such as devil’s ivy
- Double eye – opposite leaf plants such as coleus
- Heel – dieffenbachia
Leaf cuttings:
- Whole leaf with petiole – African violet, peperomia, begonia
- Without petiole – donkey’s tail, jade, ghost plant, peperomia
- Split vein – begonia
- Leaf sections – sansevieria, begonia
Root cuttings:
- Large – horseradish
- Small – bleeding heart, geraniums, ming aralia
Example plants suitable for layering:
- Tip – purple and black raspberries, trailing blackberries
- Simple – forsythia, honeysuckle, spider plant, most vine-type plants (philodendron, grape ivy, devil’s ivy, Swedish ivy, etc.)
- Compound – heartleaf philodendron, pothos
- Mound – gooseberries, apple rootstocks
- Air Layering – plants with rigid stems such as dieffenbachia, ficus, rubber plant, aralia, croton
Example plants suitable for division:
- Stolons/Runners – date palm, haworthia, bromeliads, cacti and succulents, flame violet, strawberry begonia, spider plant
- Separation – spider plant, strawberry begonia, bromeliads.
- Bulbs: tulip, narcissus, hyacinth, amaryllis, lilies
- Corm – crocus, gladiolus, freesia.
- Crowns: sansevieria, iris, prayer plant, day lilies, Boston fern, cast iron plant, peace lily
Example plants suitable for grafting:
Cacti and succulents, various fruit trees, ornamental trees
Example plants suitable for budding:
Various fruit trees, ornamental trees
Additional Resources
- Plant Propagation with the VCE Master Gardener Program playlist
- For information on providing supplemental light to seedlings, see The University of Minnesota Extension publication “Light for indoor plants and starting seeds.”
Attributions
- Susan Perry (2021 reviser)
- Beth Kirby (2021 reviser)
- Pamela H. Smith, Fairfax County Master Gardener Coordinator (2015 reviser)
- Roger Harris, Professor and Department Head, Department of Horticulture, Virginia Tech (2015 reviewer)
- Diane Relf, Extension Specialist, Horticulture (2009 reviser)
Image Attributions
- Figure 8-1: Tip and medial cuttings. Grey, Kindred. 2022. CC BY-NC-SA 4.0.
- Figure 8-2: Cane cutting. Grey, Kindred. 2022. CC BY-NC-SA 4.0.
- Figure 8-3: Single eye. Grey, Kindred. 2022. CC BY-NC-SA 4.0.
- Figure 8-4: Double eye. Grey, Kindred. 2022. CC BY-NC-SA 4.0.
- Figure 8-5: Heel cutting. Grey, Kindred. 2022. CC BY-NC-SA 4.0.
- Figure 8-6: Whole leaf with petiole. Grey, Kindred. 2022. CC BY-NC-SA 4.0.
- Figure 8-7: Whole leaf without petiole. Grey, Kindred. 2022. CC BY-NC-SA 4.0.
- Figure 8-8: Split vein. Grey, Kindred. 2022. CC BY-NC-SA 4.0.
- Figure 8-9: Leaf sections. Grey, Kindred. 2022. CC BY-NC-SA 4.0.
- Figure 8-10: Plants with large roots. Grey, Kindred. 2022. CC BY-NC-SA 4.0.
- Figure 8-11: Plants with small roots. Grey, Kindred. 2022. CC BY-NC-SA 4.0.
- Figure 8-12: Tip layering. Grey, Kindred. 2022. CC BY-NC-SA 4.0.
- Figure 8-13: Simple layering. Grey, Kindred. 2022. CC BY-NC-SA 4.0.
- Figure 8-14: Compound layering. Grey, Kindred. 2022. CC BY-NC-SA 4.0.
- Figure 8-15: Mound (stool) layering. Grey, Kindred. 2022. CC BY-NC-SA 4.0.
- Figure 8-16: Air layering. Grey, Kindred. 2022. CC BY-NC-SA 4.0.
- Figure 8-17: Stolons and runners. Grey, Kindred. 2022. CC BY-NC-SA 4.0.
- Figure 8-18: Offsets. Grey, Kindred. 2022. CC BY-NC-SA 4.0.
- Figure 8-19: Bulbs / separation (tulip bulbs). Grey, Kindred. 2022. CC BY-NC-SA 4.0.
- Figure 8-20: Corms. Grey, Kindred. 2022. CC BY-NC-SA 4.0.
- Figure 8-21: Cleft grafting. Grey, Kindred. 2022. CC BY-NC-SA 4.0.
- Figure 8-22: Bark grafting. Grey, Kindred. 2022. CC BY-NC-SA 4.0.
- Figure 8-23: Whip or tongue grafting. Grey, Kindred. 2022. CC BY-NC-SA 4.0.
- Figure 8-24: Patch budding. Grey, Kindred. 2022. CC BY-NC-SA 4.0.
- Figure 8-25: Chip budding. Grey, Kindred. 2022. CC BY-NC-SA 4.0.
- Figure 8-26: T-budding. Grey, Kindred. 2022. CC BY-NC-SA 4.0.
Involves the union of the sperm (male) with the egg (female) to produce a seed
The result of a sexual cross between two or more plants that are somewhat related
Seed that is self or cross-pollinated by wind or insects and is produced by isolating plants from other plants of different varieties to produce seed that is "true to type"
Breaking, scratching, or softening the seed coat so that water can enter and begin the germination process
Process where seeds are exposed to a period of cold temperatures to break their dormancy cycle
Sprouting the seeds before they are planted in pots (or in the garden)
The process of altering the quality of plant growth to withstand the change in environmental conditions which occurs when plants are transferred from a greenhouse or home to the garden
Groups of plants that are identical to their one parent and that can only be propagated asexually
A vegetative plant part which is severed from the parent plant in order to regenerate itself, thereby forming a whole new plant
In grafting, the piece of shoot with dormant buds that will produce the stem and branches on the upper portion of the graft
In grafting, the piece of shoot that provides the new plant’s root system and sometimes the lower part of the stem, the lower portion of the graft
In woody plants, the layer of cells located between the wood and bark of a stem from which new tissues originate
The union of one bud and a small piece of bark from the scion with a rootstock
