Chapter 14: Pruning
Chapter Contents:
- Reasons for Pruning
- Pruning Tools
- Pruning Techniques
- Controlling Size
- Maintaining or Improving Plant Health
- Reducing the Risk of Personal Injury or Property Damage
- Training the Plant
- Improving the Quality of Plants, Flowers, and Ornamental Features
- Pruning for Fruit
- Training and Pruning Small Fruit
- Additional Resources
To prune or not to prune? This is a question that gardeners often face. Most feel they ought to, but are not sure why or how. Pruning is a routine and necessary practice for the orchard, is regularly done in the rose garden, but is often rather haphazard elsewhere in the landscape. Landscape pruning for some species is sometimes only brought to mind when a shrub or tree begins to encroach on neighboring property, a path, or a building. However, proper pruning should be a regular part of woody plant maintenance.
This chapter explains the reasons for pruning, the proper techniques and tools to use, and when various types of plants should be pruned.
Pruning is the deliberate removal of plant tissue, living and dead, to achieve specific objectives in plant care and landscape management. Training of young woody plants to avoid future structural issues is a subset of this topic, though again with specific reasons related to the plants in question. Many plants do not need pruning often or even at all, especially if they are well chosen for their planting sites. There are specialized tools and techniques which are meant to reduce the stress on the pruned plant and improve the chance of achieving the desired result.
Reasons for Pruning
Before pruning any plant, the wise gardener will first ask several questions: What is the plant? How does it fit into its setting? Why am I considering pruning this plant? Generally, the reasons for pruning can be organized into these categories:
- Controlling the plant size
- Maintaining or improving plant structure and health
- Reducing the risk of personal injury and property damage
- Training the plant
- Improving the quality of flowers and ornamental features
- Managing fruit production
Pruning Tools
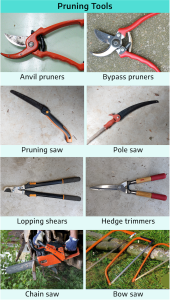
Pruning shears are good for branches up to 3/4-inch in diameter. Attempting to cut larger branches risks making a poor cut and/or ruining the shears. There are two blade or cut styles of hand shears: bypass pruners (with two blades that cut like scissors) and anvil cut. In the anvil style, a sharpened blade cuts against a broad, flat plate. In the scissor style, a thin, sharp blade slides closely past a thicker blade. Bypass pruners generally make cleaner, closer cuts. When buying pruners, test the pruners in your hand to make sure you can hold them comfortably. If they are too large or small, too heavy or too hard to squeeze, try another style or brand – there is a wide variety of pruning tools available. If you have trouble using pruning tools, there may be special equipment available to suit you. For example, ratchet pruners are useful if your grip is not strong because they can be closed easily with very little pressure.
Lopping shears have long handles and are operated with both hands. Even the cheapest can cut 1/2-inch diameter material. The better ones can slice through branches of 2 inches or more, depending on species and condition (e.g., pin oak is tougher than linden, and dead wood is tougher – until decay sets in – than live wood). Lopping shears are also available with telescoping handles (to extend reach) and ratchet mechanisms.
Pole pruners have a cutter with a hooked blade above and a cutting blade beneath. The cutter is on a pole and is operated by a cord or chain pulled downward. Fully extended, they can be used to reach branches 12 feet or more above the ground. The poles can either be in sections that fit together or telescoping. Wooden poles are heavy. Aluminum poles are light but can conduct electricity if they touch an overhead wire. Fiberglass or some type of plastic compound is probably the best option. Use of pole pruners can be dangerous, as material cut overhead can fall on the operator (unless it hangs up in other branches); exercise caution and wear head and eye protection. Poles can be fitted with saws. Obtaining an accurate pruning cut with a pole saw is very difficult. Consider employing a professional to make those cuts that you cannot easily reach with from the ground.
Hedge shears have long, flat blades and relatively short handles, one for each hand. Heavy-duty shears, with one blade serrated, are good for difficult jobs. Power hedge shears are also available. The most common for home use are electric models. Although these are less physically demanding, they often result in ragged and improperly placed cuts that are entry points for insects and disease, especially if they are kept sharp.
There are many makes and models of pruning saws. Fineness of cutting edge is measured in points (teeth per inch). An 8-point saw is for delicate, close work on small shrubs and trees. Average saws are about 6 points, while 4-1/2-point saws are for fairly thick cuts. A fixed-blade saw with a protective scabbard is safe and easy to use. Look for a folding saw with a locking mechanism. Blades can be either straight or curved. Many prefer a curved blade that cuts on the draw stroke. A double‑edged saw has fine teeth on one side, coarse on the other; these can do significant damage to surrounding branches and may be difficult to use in densely branched plants. Bow saws are good where no obstruction exists for a foot or more above the area to be cut.
Chain saws come in a variety of sizes, both gas and electric. Chain saws are used to remove large limbs or entire trees and cannot make fine, close cuts. Chain saws should be used only with appropriate safety gear by people who fully understand their operation and handling for pruning. Improper or careless handling can do significant damage to trees and people in a very short time. Therefore, the use of chain saws is best left to professionals.
Care of Tools
Clean and oil tools regularly. Thoroughly remove all plant residue, disinfect if needed, and wipe an oily cloth on blades and other surfaces after each use. Keep cutting edges sharp and don’t use them to cut wire. Several passes with a good file or oil-stone will usually suffice for hand pruners, loppers, and shears. Saws probably need to be sharpened by a professional or have the blades replaced. Wooden handles should be painted, varnished, or regularly treated with linseed oil. Don’t twist or strain pruners or loppers. Keep the branch to be cut as deeply in the jaws and near the pivot as possible.
Pruning Techniques
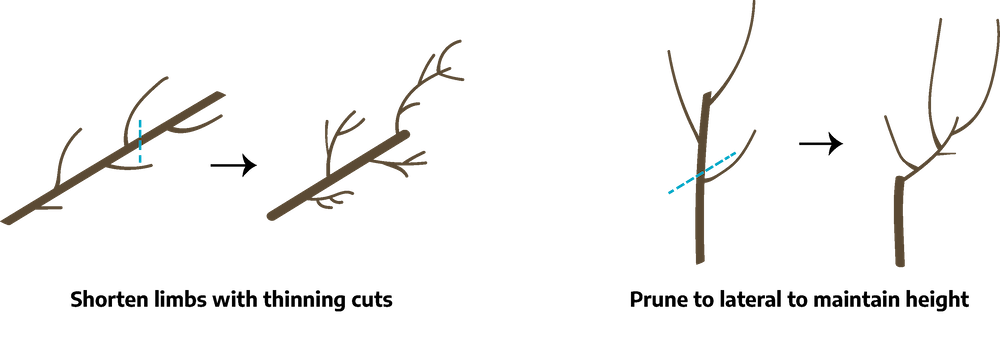
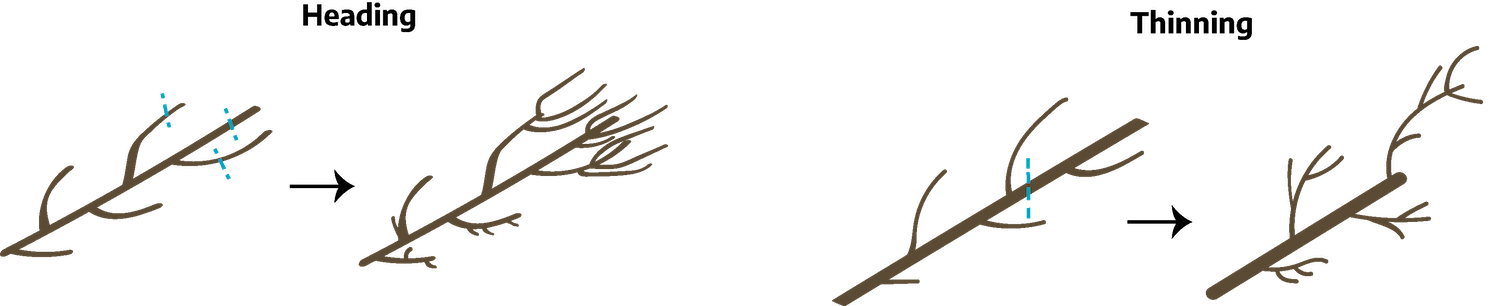
There are two basic types of pruning cuts: heading cuts and thinning cuts. Heading cuts reduce the height or width of a plant by cutting back lateral branches and removing terminal buds. Heading cuts may stimulate growth of buds closest to the cut. Heading cuts are not the same as topping cuts. Topping cuts are made indiscriminately in internode areas; heading cuts are made at nodal areas either above side branches or buds.
Thinning cuts, also called reduction cuts, remove branches at their points of origin or attachment. When you prune a branch back to another branch or prune a branch from the trunk, you are thinning. Thinning cuts stimulate growth throughout the tree, rather than in single branches as do heading cuts.
Twigs and Small Branches
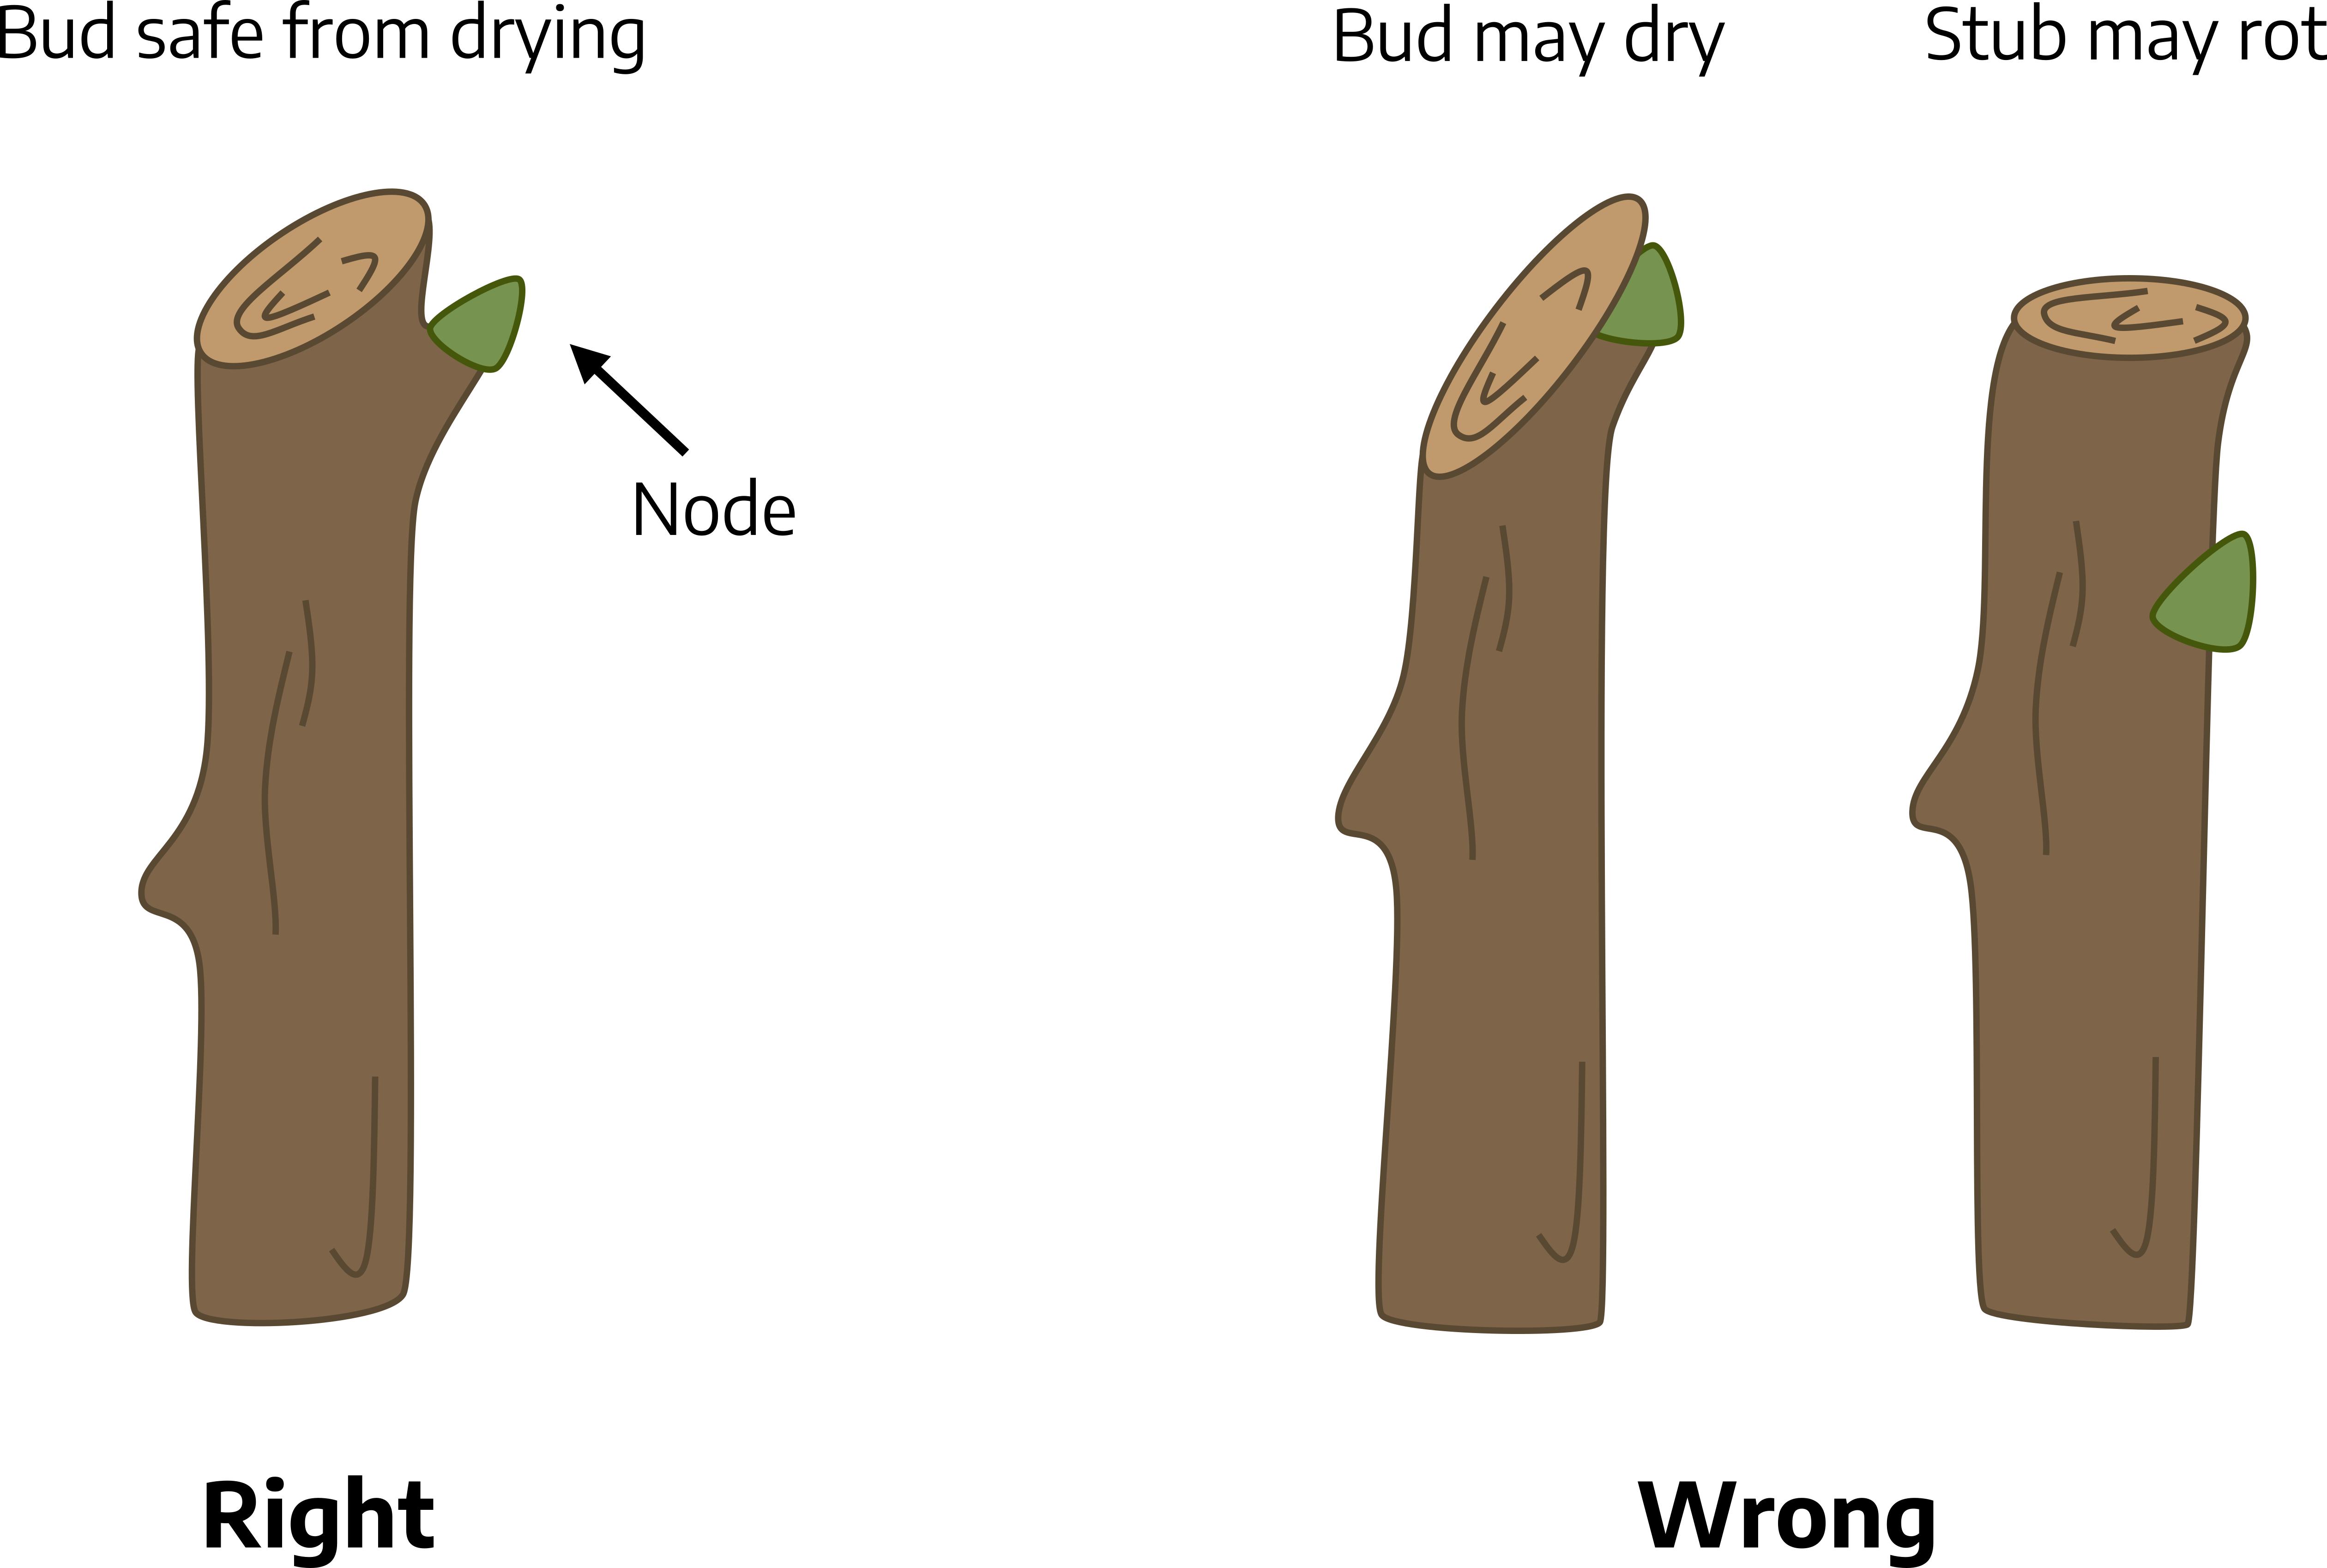
When pruning twigs and small branches, always cut back to a vigorous bud or an intersecting branch. This location is called a node, and there is a concentration of meristem cells here that will help to seal the pruning wound faster. When cutting back to a bud, choose a bud that is pointing in the direction you wish the new growth to take. Be sure not to leave a stub over the bud or cut too close to the bud. Be sure to make branch collar cuts as described under “Branch Removal” later in this chapter.
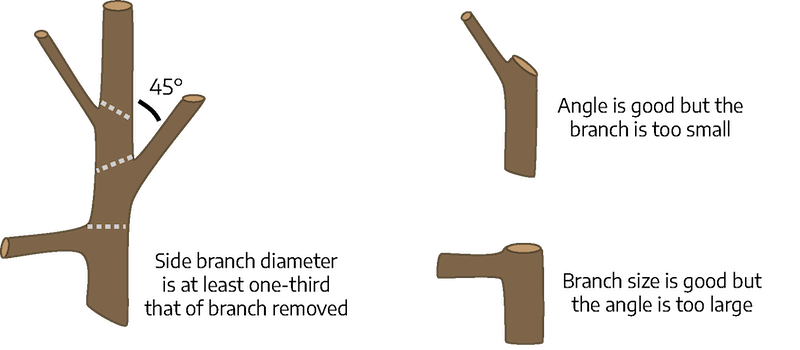
When cutting back to a side (lateral) branch, choose a branch that forms an angle of no more than 45 degrees with the branch to be removed. Also, the branch that you cut back to should have a diameter at least a third that of the branch to be removed.
Branch Removal
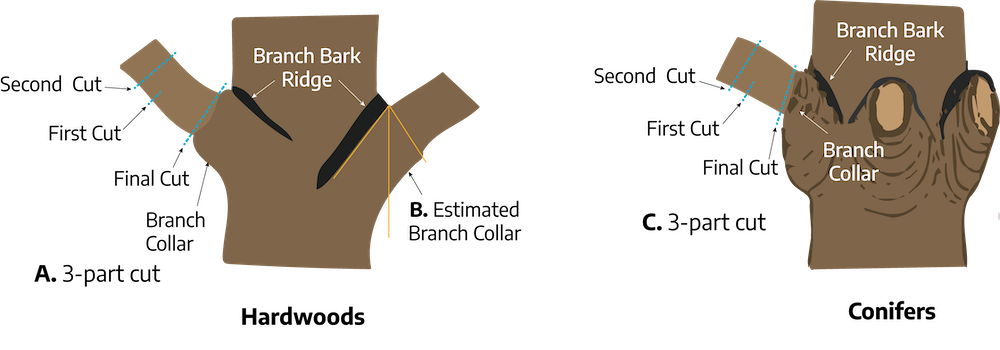
All branches with discernible “branch collars” should be removed outside the collar, not flush with the trunk. The branch collar is the swollen area that forms around the base of a branch, often appearing a bit swollen. If you wound the branch collar, you compromise the zone protecting the rest of the tree (the trunk and roots) from decay. The collar area contains a chemically protective zone. In the natural decay of a dead branch, when the decay advancing downward meets the internal protected zone, an area of very strong wood meets an area of very weak wood. The branch then falls away at this point, leaving a small zone of decayed wood within the collar. The decay is designed to stop in the collar. When the collar is removed or compromised, the protective zone is removed or compromised, causing a serious trunk wound. Wood-decay fungi can then easily infest the trunk. Even if the pruned branch is living, removal of the collar at the base still causes injury to the tree. If the collar is not evident, find the branch bark ridge (a prominent ridge of raised bark that forms within the branch crotch) extending down the trunk on both sides at an angle. The angle formed by this ridge and the trunk can be used to estimate the location of the branch collar (labeled B in Figure 14-4).
The total amount of live plant tissue removed in one pruning season should generally be limited to one quarter the mass of the tree or shrub. This practice allows the plant to support its recovery from the stress of pruning. It should be noted that different species and individual plants will vary in their tolerance for pruning. This is one of the reasons why it is important to know the plant to be pruned before starting. A significant exception to the one-quarter guideline is rejuvenation pruning, when the objective is to give a plant in poor condition a chance to start over.
When cutting branches too large or too heavy to support with one hand while removing with pruners, use a 3‑part cut to prevent the limb from falling before it’s fully cut and tearing bark away from the tree. A 3‑part cut is accomplished by first making an undercut; that is, sawing the bottom of the branch 6 to 12 inches out from the trunk and about 1/3 of the way through the branch. Next, make a second cut from the top, about 3 inches further out from the undercut, until the branch falls away. The resulting stub can then be cut back at the collar of the branch, labeled A and C in Figure 14-4. If there is danger of the branch damaging other limbs below or objects on the ground, it must be properly roped and supported, then carefully lowered to the ground after the second cut by a professional arborist.
Don’t coat pruning cuts with tree paint or wound dressing; these products actually inhibit the tree’s ability to seal the pruning wound. Some tests have suggested that wound dressings are beneficial when pruning trees that are susceptible to canker or systemic disease (oak wilt and Dutch elm disease). Tree paint won’t prevent decay, promote wound closure, or prevent disease-carrying insects from entering tree wounds. The best way to prevent oak wilt and Dutch elm disease is to avoid pruning oaks and elms in May and June when insects are more active.
Controlling Size
This is often the worst reason for pruning and unfortunately one of the most common. Generally it is hard on the plant and creates unnecessary yard waste. Over time, poor planning results in trees and shrubs which grow to sizes that exceed the space allowed for them. Where space is limited, regular pruning becomes necessary to keep plants in bounds and may impact survival. It is best to reduce labor, select plants that will not exceed the allotted space when mature. Regular pruning is necessary on formal hedges to maintain a uniform growth rate. For hedges, labor and yard waste can be reduced by choosing small or slow-growing plants and allowing them to grow in a more natural form, rather than keeping them tightly pruned. If a formal garden design relies on clipped shrubs or trees, plant selection should focus on those that will tolerate frequent pruning, such as boxwood or yew.
Maintaining or Improving Plant Health
Pruning can be a useful tool in maintaining plant health. For example, diseased tissue and the reproductive structures of pathogens can be removed from a plant to minimize spread of disease. Pruning can improve light and air circulation which can suppress certain diseases and insects. Pruning low-growing branches from a plant can reduce plant/soil contact which can affect the spread of some soil-borne diseases.
When pruning to maintain plant health, first consider sanitation, which includes the elimination of dead, dying, or diseased wood. Any dying branch or stub can be the entry point or build‑up chamber for insects or disease that could spread to other parts of the tree. When removing diseased wood such as a fungal canker or fire blight, it is important that the cut be made in healthy wood beyond the point of infection. Do not prune during wet weather as disease inoculum is easily spread by water. Carefully dispose of diseased wood in the trash or by burning. Do not put it in a household compost pile or place by the curb for municipal recycle pick up as both of these processes lead to spread of inoculum. Disinfect your tools between plants, or between cuts on the same plant when disease is present. Tools should either be sprayed with the sanitizer and allowed to air dry or dipped in the sanitizer for the recommended length of time. Some readily available sanitizers include ethanol (70% or greater), sodium hypochlorite (a 1:14 solution of 8.25% household bleach), and Lysol Brand Concentrate Disinfectant.
The development of a sound framework through proper thinning will help prevent disease and loss of vigor while maintaining or improving form. To avoid future problems, remove crossing branches that rub or interfere with each other. Even evergreen shrubs usually will benefit from an occasional thinning of foliage. This thinning will allow penetration of light and air throughout the shrub.
Broadleaf Trees
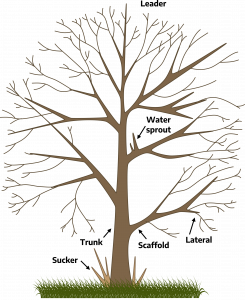
Maintenance pruning of broadleaf trees is intended to preserve or improve the structure of the trees, enabling them to withstand stresses from wind and weather. Pruning should be looked at as a planned program over time rather than a one-time intervention. Maintenance pruning includes removing dead or diseased branches as soon as they are noticed. Water sprouts and suckers are two types of vigorous shoot growth generally considered undesirable and should be removed except on over mature trees which may form water sprouts for photosynthesis reserves (extra food production). Water sprouts occur along branches, often at pruning sites. Suckers grow from the trunk or roots. Both are rapid vegetative growths with weak attachments to the root of the tree, some trees are prone to such growths; in others they can be an indication of decline or stress.
Corrective pruning may also be required. Corrective pruning removes damaged wood and eliminates rubbing branches. When a tree’s leader is lost due to storm damage or disease, replace it by splinting an upper lateral on the highest scaffold to a vertical position. Prune all laterals immediately below the new leader. Use wood or flexible wire splints, removing them after one growing season.
Pruning at different seasons triggers different responses. Late winter or early spring, before bud break, is a good time to prune many species because callus tissue forms rapidly and food production is unaffected. However, sap from the tree may be cosmetically undesirable. When pruning flowering trees, try not to cut off flower buds. Some trees, such as cherry, plum, and crab apple, form buds on old wood. Others, such as crape myrtle, bloom on new wood. Summer pruning tends to suppress growth of both suckers and foliage. Late summer or early fall pruning causes vigorous regrowth, which in some species may not harden off by winter, leading to possible cold damage. Whenever unexpected damage from vandalism or bad weather occurs, prune immediately.
Rejuvenation of broadleaf trees
Some broadleaf trees will regrow from fresh stumps with healthy roots. Hollies and crape myrtles are two examples. If such trees are damaged in storms or otherwise lose major trunks, then they can be regrown from new shoots, with training as for young trees. Rejuvenation can also be a useful tactic when a large shrub or small tree is in decline due to neglect. Once the underlying cause of the neglect is corrected (more light, more water, improving the soil with compost, etc.), then the tree or shrub can be cut back drastically to shock the plant into new growth. Typically this is done by cutting out a third of the plant each year over a period of three years. However, if the alternative is to remove the plant now, then a complete cut to the ground may be worth trying.
Conifers
Conifers generally need less pruning than broadleaf trees. Because conifers have dominant leaders, young trees rarely require training-type pruning. If a young tree has two leaders, prune one out to prevent multiple leader development. Selective branch removal is generally unnecessary as evergreens tend to have wide angles of attachment to the trunk.
Conifers are grouped on the basis of their branch arrangement. Spruces, firs, and some pines (white pine) have whorled branches that form a circular pattern around the growing tip. The annual growth of a whorl-branched conifer is determined by the number of shoots that are pre-formed in the buds. Whorl-branched conifers usually have only one flush of growth each year in which these preformed shoots expand into stems that form the next whorl. The second group of evergreens are those with a random branching habit. Yew, arborvitae, cedar, false cypress, and juniper are all random-branched species.
Corrective pruning for conifers consists mainly of removal of dead, diseased, or damaged branches. Allow evergreen trees to grow in their natural form. Don’t prune into the inactive center (where no needles or leaves are attached) of whorl-branched conifers because new branches won’t form to conceal the stub, in most conifers. When a tree’s leader is lost due to storm damage, train a replacement leader as described for broadleaf trees.
Most conifer pruning is done for corrective reasons, so seasonal timing is usually not as important as it is for deciduous species. Pruning during dormancy is the most common practice and will result in a vigorous burst of spring growth. Pines and other whorl-branched conifers become denser if new growing tips (“candles”) are pinched in half as they expand in the spring. Use your fingers or shears to remove part of the candle. Prune random-branched conifers in early spring when new growth will cover the pruning wounds. Maintenance pruning of random-branched conifers is done in summer to keep plants within a desired size range. Whenever possible, avoid pruning conifers in late summer and early fall. Pruning at this time can stimulate new growth that may not harden off before winter, and thus may be damaged or killed by the cold.
Norfolk Master Gardener Crape Myrtle Pruning
By Paulette Crawford, Extension Master Gardener, Norfolk
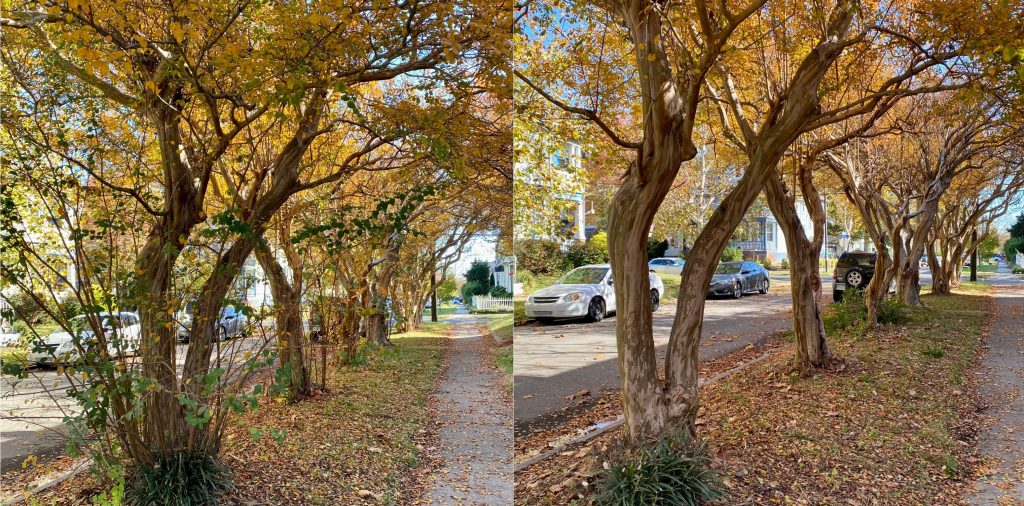
There are about 48,000 Crape Myrtle trees along the city streets in Norfolk, Virginia. These are city trees, mostly planted on the verge throughout the entire city. Crape myrtles thrive in the Norfolk area. They are heat and drought tolerant and are known as the tree of 100-day blooms. Crape myrtles are resilient and require little maintenance, however, crape myrtles are prone to producing canes or suckers. These suckers can be a nuisance, but they pose no problem for the tree. Suckers can grow quite large when not pruned, and this can be unsightly and even become an obstruction.
In 2015 Norfolk Extension Master Gardeners launched the Crape Myrtle Pruning (CMP) project, a partnership with the Norfolk City Forester’s office. Together, EMGs and the City Forester identify areas that have a concentration of crape myrtles with significant sucker growth. The City Forester provides tools, safety equipment and initial training to Master Gardeners to ensure they are taught the proper way to prune and the limited pruning allowed for city trees as well as proper safety precautions. This has provided an opportunity for Master Gardeners to work within their community alongside volunteers teaching them proper pruning techniques. EMGs host community prune events throughout the year because minor pruning can be performed at any time.
Master Gardeners lead small groups of community volunteers during each CMP event and educate the volunteers on proper pruning methods and the importance of proper tree pruning. They also cover Norfolk’s rules regarding care and maintenance of trees on city property and appropriate tree pruning safety precautions. While most of their minor pruning focuses on suckers, they also remove small branches. EMG volunteers are restricted by Norfolk rules, which require them to have both feet on the ground, only prune what can easily be reached, and use only hand tools. Volunteers learn the importance of using appropriate tools (hand pruners, lopping shears, and hand saws) and the proper way to use each tool.
While it is ideal to prune in winter when plants are dormant and branch structure is visible, suckers can be removed any time. Corrective pruning can be performed when problems are detected such as crossing, dead or damaged branches, as well as low hanging branches overhead. Community volunteers learn by hands-on pruning lessons. Then they take what they have learned and apply it to trees in their own landscape, and they understand the limited pruning they can perform on city trees adjacent to their property. In the process, this improves the city and residential landscapes.
From time to time EMGs encounter trees which offer on-the-spot learning in the field. For example, crape myrtle bark scale is identified and discussed with the volunteers and then reported to the City Forester. A frequent topic of interest is the practice of “topping” or severely cutting back branches also known as “crape murder.” Volunteers take the time to discuss why this is improper and the risks and problems it can create for the tree.
EMGs are also invited to civic leagues and other groups to discuss their project and the care and maintenance of crape myrtles.
Pruning Shrubs: Growth Habit
Understanding the natural ‘habit’ or shape of shrubs should guide pruning decisions. All shoots grow outward from their tips. Whenever tips are removed, lower buds are stimulated to grow. Buds are located at nodes, where leaves are attached to twigs and branches. Buds may occur singly or in groups.
Shrubs have mounding, cane, or tree-like growth habits. Those with mounding habits, such as evergreen azalea and spirea, generally have soft, flexible stems, small leaves, and are often used in mass plantings. Shrubs with cane habits include forsythia and nandina. These shrubs spread by sending up erect new branches, called canes, from their base. Tree-like shrubs have woodier, finely divided branches and can be pruned as a single-trunk or multi-stemmed trees. Witch hazel is an example.
Pruning mounding shrubs
The pruning recommended for most mounding shrubs consists of maintenance pruning, gradual rejuvenation, and extensive rejuvenation pruning. This is required to keep them healthy and in scale with their surroundings. Older shrubs often grow out of proportion with their surroundings, and may have large amounts of unproductive wood. Two rejuvenation techniques are used to restore old shrubs, provided they still have sufficient vigor and are growing in a favorable location. Maintenance pruning practices should begin at the time of planting or after rejuvenation of older shrubs. Always remove dead, diseased, or broken branches first.

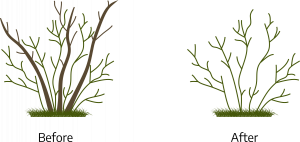
Pruning cane-like shrubs
To reduce height of shrubs with a cane habit, first remove the tallest canes by cutting or sawing them out near ground level. Then, thin out any canes crowding the center, as well as those growing in an unwanted or unruly direction. For height maintenance of mounding-type shrubs, prune only the longest branches. Make thinning cuts well inside the shrub mass where they won’t be visible. This method reduces mounding shrubs by up to 1/3 their size without sacrificing their shape.
Pruning tree-like shrubs
Shrubs with a tree-like habit are the most difficult to shorten. After removing any rubbing branches, prune to open up the center of the shrub. Keep the crown open and maximize light penetration by careful use of thinning cuts. Prune branches that touch the ground and suckers originating from the roots. Wait until the very end of the job to make any heading cuts. Tree-like shrubs can usually tolerate removal of 1/8 to 1/4 of their branches.
Rejuvenation Pruning of Shrubs
Some older shrubs will recover and regain beauty if rejuvenated by removal of old wood by one of the following methods.
Gradual rejuvenation removes growth gradually. The first year, remove 1/3 of the oldest, unproductive branches. New, productive stems should quickly replace the old wood. The next year, take 1/2 of the lingering old stems. Finally, in the third year, prune out the remainder of the old branches. Thus, all the branches should be less than 4 years old. This method takes longer to complete, but the shrub stays more attractive throughout the rejuvenation period. Renewal pruning is the term used for a continual maintenance system of annually removing 1/3 of the oldest growth throughout the life of the shrub. Forsythia will respond to this type of renewal pruning as an ongoing procedure to maintain its health and vigor.
Extensive rejuvenation involves complete removal of the entire plant 6-10 inches above the ground. Use heavy lopping shears and a pruning saw. Remove half of the new canes that develop by mid-summer, and head back some of the remaining canes. When using a heading cut, be sure to prune to outward-pointing buds so that the inner portion does not become too dense. Shrubs that tolerate extensive rejuvenation are abelia, honeysuckle, hydrangea, lilac, mallow, rose-of-sharon, spirea, and St. John’s wort (hypericum).
Pruning Evergreen Shrubs
For most evergreen shrubs, thinning is the most desirable procedure. Some evergreens can be sheared when a stiff, formal appearance is desired; however, they will still need to be thinned occasionally. Late season shearing can stimulate new growth that may not be properly acclimated for cold winter temperatures, resulting in plant injury. Both evergreen and deciduous shrubs grown for foliage should be pruned in late winter before new growth starts. Minor corrective pruning can be done at any time.
Pruning Hedges
Hedges consist of plants set in a row so as to merge into a solid, linear mass. They have served gardeners for centuries as screens, fences, walls, and edgings.
A well‑shaped hedge is no accident. It must be trained from the beginning. The establishment of a deciduous hedge begins with the selection of nursery stock. Choose young trees or shrubs that are 1 to 2 feet high, preferably multiple‑stemmed. When planting, cut the plants back to 6 or 8 inches. This will induce low branching. Late in the first season or before bud‑break in the next season, prune off half of the new growth. In the following year, again trim off half the new growth to encourage branching.
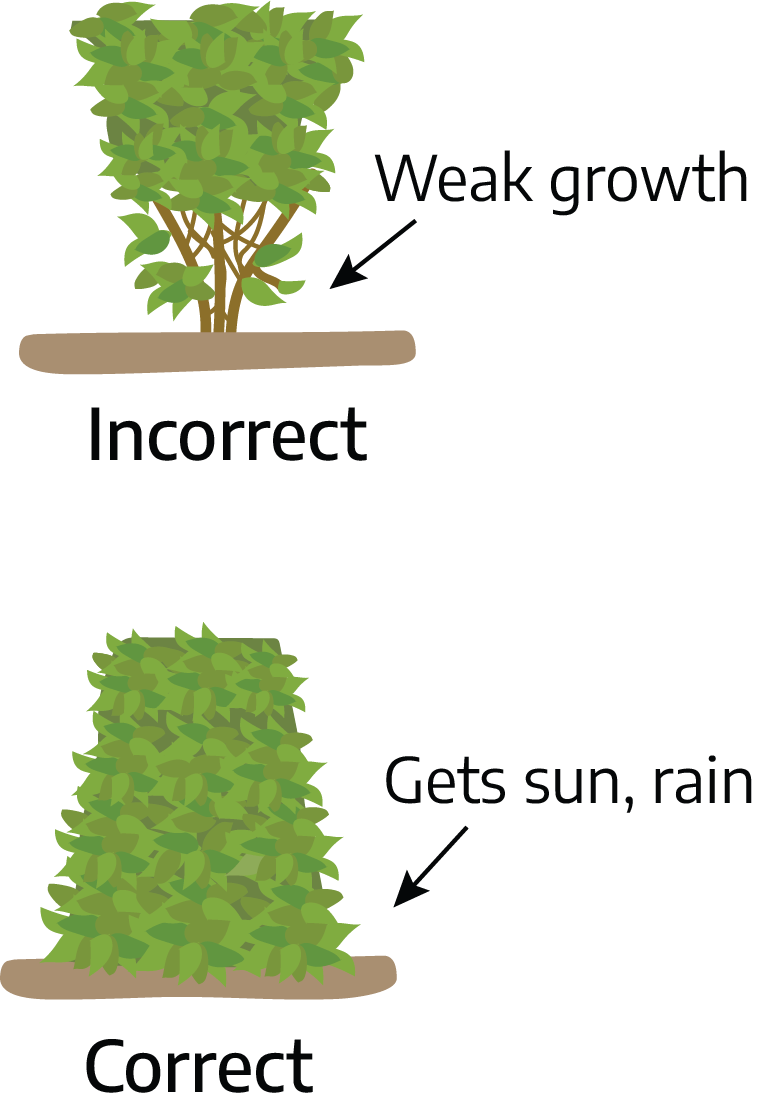
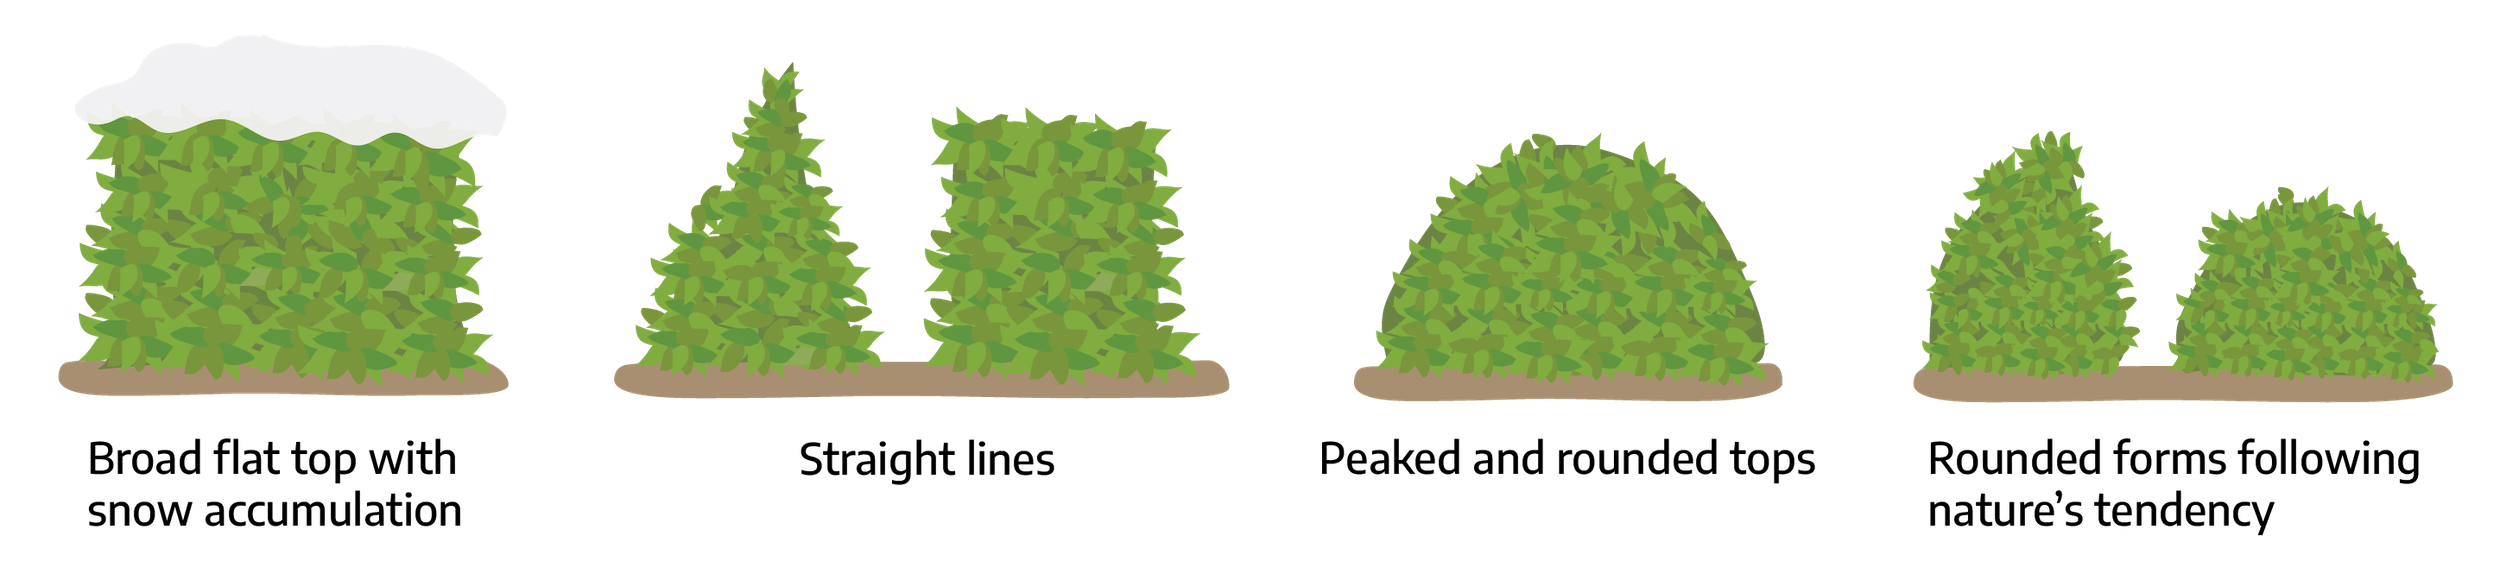
In the third year, start shaping. Hedges are often shaped with flat tops and vertical sides. This unnatural shaping is seldom successful. The best shape, as far as the plant is concerned, is a natural form – rounded or slightly pointed top with sides slanting to a wide base. After plants have been pruned initially to induce low branching, the low branching will be maintained by trimming the top narrower than the bottom, so that sunlight can reach all of the leaves on the plant.
Rounded or peaked tops aid shedding snow, which may break branches if not removed. Before shaping, some thought should be given to the shape of the untrimmed plant. For example, naturally conical arborvitae does particularly well in a Gothic arch shape. Common buckthorn, a spreading plant, is more easily shaped to a Roman arch.
Trim to the desired shape before the hedge grows to the desired size. Never allow the plants to grow untrimmed to the final height before shearing; by that time it will be too late to get maximum branching at the base. After the hedge has reached the dimensions desired, trim closely in order to keep it within bounds.
Evergreen nursery stock for hedging need not be as small as deciduous material, and should not be cut back when planted. Trim lightly after a year or two. Start shaping as the individual plants merge into a continuous hedge. Do not trim too closely, because many needle‑bearing evergreens do not easily generate new growth from old wood.
These questions often arise: “How often should this hedge be trimmed?” and “When should I trim?” Answers depend to some extent on how formal an appearance is desired. In general, trim before the growth exceeds 1 foot. Hedges of slow‑growing plants, such as boxwood, need trimming sooner. Excessive untrimmed growth will kill leaves beneath and also pull the hedge out of shape. This is especially true with weak‑stemmed shrubs. In the mountain areas of Virginia, yews and other evergreens may need shearing only once annually, and then not before July; in milder areas, two or even three shearings may be necessary. Deciduous material should be trimmed earlier than July, but after the spring flush of new growth, and will often need to be trimmed once or twice more. Frequency depends on the kind of shrub, season, and degree of neatness desired.
What can be done with a large, overgrown, bare‑bottomed, and misshapen hedge? If it is deciduous, the answer is fairly simple. In the spring, before leaves appear, prune to one foot below the desired height. Then trim carefully for the next few years to give it the shape and fullness desired. Occasionally, hedge plants may have declined too much to recover from this treatment; replacing them may be necessary.
Rejuvenating evergreen hedges is more difficult. As a rule, evergreens cannot stand the severe pruning described above. Arborvitae and yew are exceptions; other evergreen hedges may have to be replaced.
What tools should be used to trim hedges? The traditional pair of scissor‑action hedge shears is still the best all‑round tool. It will cut cleaner and more closely than electric trimmers, which often break and tear twigs. Hand shears can be used on any type of hedge, while electric trimmers do poorly on large‑leaved and wiry‑twigged varieties, and sometimes jam on thick twigs. Hand shears are also quieter and safer, less likely to gouge the hedge or the operator. Hand pruners are useful for removing a few stray branches. Larger branches can be removed with loppers and/or a pruning saw.
It should be pointed out that shearing of hedges consists of cuts which stimulate a dense canopy or shell of foliage that encourages diseases in the interior of the hedge and increases the amount of yard waste produced. Where possible, natural unsheared hedges should be used.
Root Pruning
A tree growing in the woods or landscape for several years develops a wide-spreading root system. The area in a 3‑foot radius of the trunk of the tree more than five to ten years old contains very few of the small feeding roots essential to gathering nourishment for the tree. As a consequence, if the tree were to be dug and moved, as much as 90-95% of the necessary feeding roots would be cut off in the balling operation. This is the reason many nurseries root‑prune trees and shrubs: to force them to grow a large number of small feeding roots near the base of the plant which are moved in the balling operation and aid in establishment after transplanting.
To make it possible to safely dig and move small trees or shrubs, such trees should be root‑pruned a year or so before they are moved. In the spring, sever half the roots by forcing a sharp spade into the soil around the plant alternately leaving a shovel width of untouched soil between cuts. The circle of cuts should be smaller than the size of the ball that will eventually be dug. In the fall, sever the other half of the roots, thus cutting all the roots that are at a depth of a foot or less. The tree can then be moved the following spring. Recent research indicates that most of the new roots grow from the cut root end. Therefore, a root ball 4 to 6 inches larger than the root-pruned area must be dug to get the newly developed roots.
Root pruning is also used to force a vigorously growing fruit tree or wisteria vine into bloom. Using a spade to cut the roots early in the spring, as explained above, is all that is sometimes necessary to force a tree, shrub, or vine into bloom the following year. This takes advantage of a plant’s natural reaction to stress or wounding: propagation beginning with flowering.
Pruning Vines and Ground Covers
Pruning ornamental vines is similar to pruning shrubs. Flowering vines are pruned according to flower production; those that flower on new wood are pruned before new growth begins, those that flower on previous season’s growth are pruned immediately after flowering. Vines that are grown for foliage are pruned to control growth and direction. Timing is less critical than for flowering vines. Keep flowering vines from setting seed that will be spread by birds.
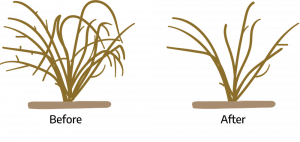
Ground cover plants require very little pruning. Dead or damaged stems should be removed whenever observed. Some trailing ground covers, such as English ivy, may need pruning to prevent encroachment to natural areas, on lawn areas, or other plants. With liriope, a grass‑like ground cover, appearance is improved by annual pruning. Before new leaves are an inch tall, remove the dead leaves from the previous year. For large liriope plantings, a lawn mower set to cut above the new leaf tips will speed this early spring job.
Invasive plant cuttings, such as English Ivy should be burned or discarded as trash. Do not compost or otherwise discard.
Reducing the Risk of Personal Injury or Property Damage
One of the more important reasons for pruning is to keep landscape plants from injuring the people and structures in those landscapes. Often, the problem is trees overhanging houses, paths, playgrounds, and roads. Utility line pruning is a professional specialty of its own, reflecting the importance of managing trees around power lines. People who have a responsibility for trees should consider the possibility that those trees could drop limbs or obstruct traffic. Proper pruning can prevent such situations if undertaken early enough. Even better, informed selection and training of trees can avoid this discussion altogether.
Shrubs can also crowd paths or whip into walkers’ faces. Often such shrubs are of the mounding variety, such as beautyberry. If relocation is not feasible, then a regular pruning schedule may be necessary to reduce risk.
Certified arborists with special training can identify the level of risk posed by tree condition, situation, and potential for harm. For example, a large diseased branch hanging over a playground generally warrants immediate attention, while a distressed tree in an open field with no traffic under it may best be allowed to stand as a habitat for wildlife.
Training the Plant
Training Trees
The first pruning of young trees and shrubs consists of removing broken, crossing, and pest-infested branches. This is best done at the time of transplanting. Additional pruning should not be done until the next year.
The old rule of pruning away 1/3 of the top growth at transplanting to compensate for root loss is not recommended. Research proves that excessive pruning at transplanting is detrimental to plant establishment.
It is easier to shape branches with hand pruners when trees are young than to prune larger branches later. As a rule, the central leader of a tree should not be pruned unless a leader is not wanted, as is the case with some naturally low‑branched trees or where multiple‑stemmed plants are desired. Trees with a central leader such as linden, sweet gum, or pin oak may need little or no pruning except to eliminate branches competing with the central leader; these should be shortened or removed. Train main scaffold branches (those that form the structure of the canopy) to produce stronger and more vigorous trees.
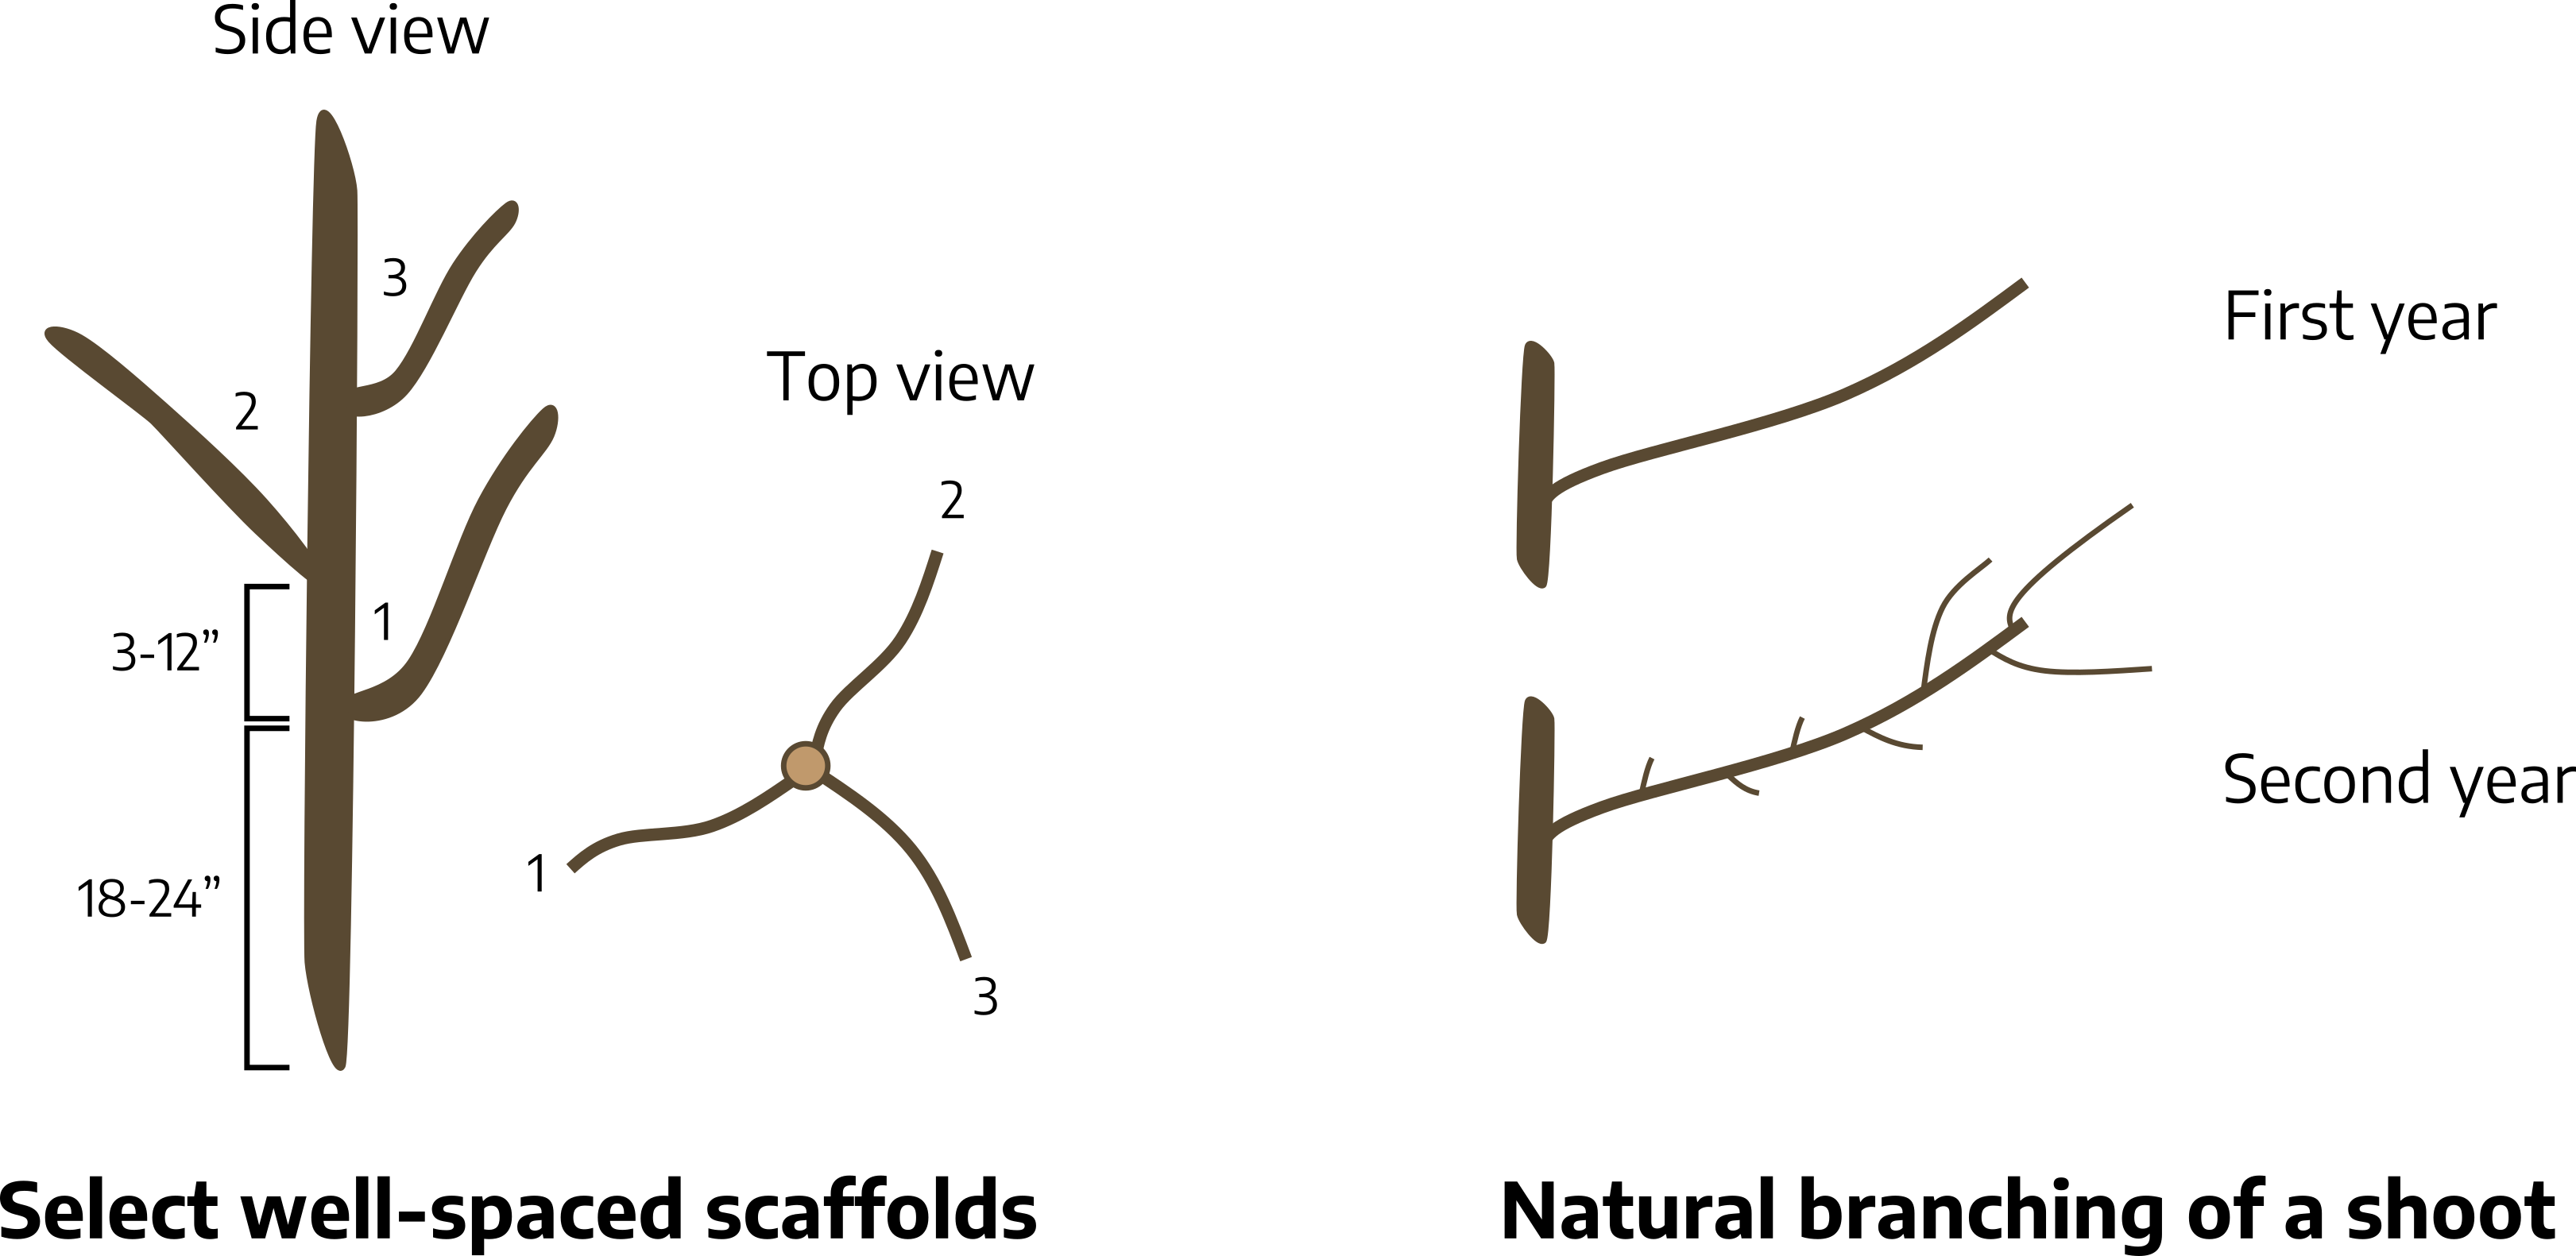
The height of the lowest branch can be from a few inches above the ground (for screening or windbreaks) to 8+ feet above the ground near a path or patio and 14 feet or more beside a street. Some branches below the lowest permanent scaffold branches should be left for three to four years after planting, then removed over the next two to three years. These temporary branches protect young bark from sun scald, add strength to the trunk, and help produce food for the growing tree.
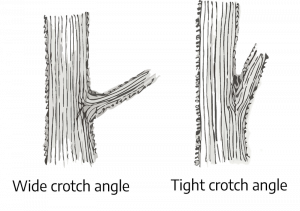
For greatest strength, branches selected for permanent scaffolds should have a wide angle of attachment with the trunk. Branch angles of less than 30 degrees from the main trunk (“V” shaped crotch) result in a higher percentage of breakage, while those between 60 and 70 degrees have a very small breakage rate. The breakage on “V” crotches is caused by the inclusions of bark within the crotch as the tree grows. This prevents the development of strong connective tissue.
Vertical branch spacing and radial branch distribution are important. Major scaffold branches of trees that will grow to large shade trees should be spaced at least 10 to 12 inches apart vertically. Closely spaced scaffolds will have fewer lateral branches. The result will be long, thin branches with poor structural strength. Good radial spacing prevents one limb from overshadowing another and, therefore, reduces competition for light and nutrients. Over several years, remove or prune shoots that are too low, too close, or too vigorous in relation to the leader and scaffold branches. Total amount of foliage removed in any one year should be limited to about one-quarter, not including dead tissue and suckers. Suckers are vigorous shoots growing from the trunk or roots.
Training Shrubs
Shrubs require little, if any, pruning at transplanting. Occasionally, branches may have been damaged in transit, and these should be removed at the time of planting.
Training for Special Effects
Specialized training techniques such as bonsai, topiary, and espalier require special pruning techniques. Bonsai is an art form that stems from ancient oriental culture, originating in China and developed by the Japanese. Bonsai techniques severely dwarf trees through careful pruning of both roots and shoots over many years. Bonsai strives to create a miniature tree that is shaped to create the illusion of age. Topiary uses special pruning and training techniques to create unusually shaped shrubs, vines, and trees. Typical topiary forms include spiral, turret and tiered globe shapes. Animals are also popular topiary forms. Topiary requires a long-term commitment to gradual pruning to achieve and maintain the desired shape and a suitable pruning-tolerant plant choice. Espalier is a technique that trains a tree to a flat surface in a decorative pattern. It is commonly used for fruit trees as it allows the production of high quality fruit in a relatively small space.
Improving the Quality of Plants, Flowers, and Ornamental Features
The more flowers and fruit a plant produces, the smaller they become, as can be seen on an unpruned rose bush or fruit tree. Pruning reduces the amount of wood and so diverts energy into the production of larger, though possibly fewer, flowers and/or fruit. Most flowering shrubs will bloom either on 1-year old growth or on new growth. Properly timed pruning will increase the production of wood that will bear flowers.
Some deciduous shrubs have colored barks which are especially delightful in winter. The best color is produced on young stems; the greatest stem length and most intense color result from hard pruning
When the shrub to be pruned is grown for its flowers, the pruning must be timed to minimize disruption of the blooming. Spring flowering shrubs bloom on last season’s growth and should be pruned soon after they bloom. This allows for vigorous growth during the summer, which will provide flower buds for the following year.
Flowering and Pruning of “Old Wood” and “New Wood” Species
A bud is a small package of partially preformed tissue which becomes leaves/stems or flowers. In some cases, buds contain partially preformed flower tissue (flower bud), and usually have a different appearance than a vegetative bud, a bud that contains partially preformed leaf and stem tissue. Some buds contain both floral and vegetative tissues. The time of year that flower buds are produced on woody plants will dictate the time of pruning, thus it is important to know whether a species flowers on “old wood” or “new wood.”
The majority of woody plants flower on “old wood” during the spring or early summer. This means that the flower buds of spring or early summer-flowering species were produced on stems in the year prior to flowering. For example, rhododendrons (Rhododendron spp.) that flower in spring produced their flower buds about 10 months earlier in the summer of the prior year. Therefore, prune spring-flowering shrubs right after they finish flowering; pruning spring flowering shrubs in the summer, fall, winter, or early spring removes flower buds and results in a poor or lack of flower display the following spring.
In general, spring-flowering and early summer species flower on one-year-old stems; thus, flowering occurs on the outermost portions of the plant. Some shrub species, such as lilacs (Syringa vulgaris) and forsythia (Forsythia ×intermedia), require the removal of the larger, older stems on an annual basis to encourage the production of younger, flowering wood. Removing older branches results in the growth of new stems that produce more flowers compared to the amount of flowers produced on large, old stems.
Summer-flowering species produce their flower buds on “new wood”. This means that the flower buds of summer-flowering species were produced on stems during the spring/summer in the same year that the plant bears flowers. For example, crape myrtles (Lagerstroemia spp.) that flower in the summer produced their flower buds a month or two prior to flowering. Plants that flower on new wood can be pruned late in the growing season (after they finish flowering, during the fall, winter, and early spring since the stems removed during these times will not have any preformed flower buds on them).
Table 14-1: Examples of shrubs and small trees that bloom on last season’s growth
| Scientific Name | Common Name |
|---|---|
| Cercis chinensis | Chinese redbud |
| Chaenomeles japonica | Japanese Quince |
| Chionathus virginicus | Fringe tree |
| Deutzia species | Spring-Flowering deutzias |
| Exochorda racemosa | Pearlbush |
| Forsythia species | Forsythia |
| Kerria japonica | Kerria |
| Lonicera species | Honeysuckle |
| Magnolia stellata | Star magnolia |
| Philadelphus species | Mockorange species |
| Pieris species | Pieris species |
| Rhondodendron species | Azaleas and Rhododendron |
| Rosa species | Rambling rose species |
| Spiraea species | Early white spirea species |
| Syringa species | Lilac species |
| Tamarix parviflora | Small-flowred tamarix |
| Viburnum species | Viburnums |
| Weigela florida | Old-fashioned weigela |
Most shrubs that bloom after June usually do so from buds which are formed the same spring. Such shrubs should be pruned in late winter to promote vigorous growth in the spring.
Table 14-2: Examples of shrubs and small trees that bloom on current season’s growth
| Scientific Name | Common Name |
|---|---|
| Abelia x grandiflora | Glossy abelia |
| Buddleia davidii or globosa | Butterfly bush |
| Callicarpa japonica | Japanese beauty bush |
| Clethra alnifolia | Summer sweet |
| Hibiscus syriacus | Shrubs althea |
| Hydrangea arborescens | Hills of Snow |
| Hydrangea paniculata | Pegee Hydrangea |
| Hypericum species | Saint John’s wort |
| Lagerstroemia indica | Crape Myrtle |
| Rosa species | Bush rose |
| Spiraea bumalda | Anthony Waterer Spirea |
| Spirea japonica | Mikado Spirea |
| Symphoricarpos species | Snowberry |
| Tamarix hispida | Kashgar |
| Tamarix odessana | Odessa |
| Vitex agnus-castus | Chaste tree |
The general pruning procedure, illustrated above for crape myrtle, applies to many other large shrubs and small trees of similar structure.
Pruning Roses
All roses need some type of pruning. If roses are not pruned for a number of years, plants deteriorate in appearance, often develop more than the usual disease and insect problems, and the flowers become smaller and smaller.
Hybrid Tea, Grandiflora, and Floribunda roses require annual pruning in the spring, after winter protection has been removed. As a guideline, follow the old saying that roses are pruned when the forsythia blooms. If rosebushes are pruned too early, injury from repeated frost may make a second pruning necessary.
The only tools necessary are sharp hand pruners and gloves. If the rose collection is large, a small saw and loppers will also help. Loppers are used to cut out large dead canes.
Remove branches that are dead, damaged, diseased, thin, weak, growing inward, and branches that cross or interfere with other branches. Proper pruning encourages new growth from the base, making the plant healthy and attractive and resulting in larger blossoms. Cut at least 1 inch below damaged areas. Remove all weak shoots. If two branches rub or are close enough that they will do so soon, remove one. On old, heavy bushes, cut out one or two of the oldest canes each year.
Cut back the remaining canes. The height to which a rose should be cut will vary depending upon the normal habit of the particular cultivar. The average pruning height for Floribundas and Hybrid Teas is between 12 and 18 inches, but taller growing Hybrids and most Grandifloras may be left at 2 feet. Make cuts at 45-degree angles above a strong outer bud. Aim the cut upward from the inner side of the bush to push growth outward and promote healthy shoots and quality flowers.
Other types of roses have special pruning needs:
A rose standard, or tree rose, is a Hybrid Tea, Grandiflora, or Floribunda budded at the top of a tall trunk. Prune tree roses as you do Hybrid Teas, cutting the branches to within 6 to 10 inches of the base of the crown in order to encourage rounded, compact, vigorous new growth.
Miniature roses are 6 to 12 inches high with tiny blooms and foliage. Miniature roses do not need special pruning. Just cut out dead growth and remove the hips.
Old‑fashioned rambler roses have clusters of flowers, each usually less than 2 inches across. They often produce canes 10 to 15 feet long in one season. Ramblers produce best on year‑old wood, so that this year’s choice blooms come on last year’s growth. Prune immediately after flowering. Remove some of the large, old canes. Tie new canes to a support for the next year.
Large-flowering climbing roses have flowers more than 2 inches across, borne on wood that is 2 or more years old. Canes are larger and sturdier than those of ramblers. Many flower just once in June, but some, called ever‑blooming climbers, flower more or less continuously. This group should be pruned in autumn, any time before cold weather sets in. First cut out dead and diseased canes. After this, remove 1 or 2 of the oldest canes each season to make room for new canes. The laterals, or side shoots, are shortened 3 to 6 inches after flowering. If the plant is strong, keep 5 to 8 main canes, which should be tied to the trellis, fence, wall, or other support. If it is not strong, leave fewer canes.
Pruning for Fruit
The general purpose of pruning fruit trees is to regulate growth, improve fruit size and quality, and reduce production costs. Pruning is necessary to shape trees for convenience of culture and repair of damage.
Most pruning is done during the dormant season, preferably just before active growth begins in the spring. At this time, pruning wounds heal quickly, flower buds can be easily recognized, and injury from low winter temperature is avoided. Summer pruning may be done to help train trees to the desired form and maintain small tree size. It should be remembered, however, that all pruning has a dwarfing effect. For maximum yield of high quality fruit, prune only as necessary to establish a tree with a strong framework capable of supporting heavy crops annually without damage and to maintain a tree sufficiently open to allow penetration of sunlight, air, and spray material for good fruit development and pest control.
Apple Trees
The objectives of training, directing, or modifying growth into a desired form include early fruit production, development of an optimum tree structure for supporting future crops, and producing quality fruit. These objectives can be met by maintaining a proper balance between vegetative and potential fruiting wood. Excess shoot growth will delay the onset of fruiting. However, excess pruning of young, nonbearing trees will also delay the beginning of fruit production in the life of that tree. Training should be emphasized in the development of trees, with pruning used as a tool in the training process to redirect limbs, stimulate branching when desired, or to remove growth that is in an undesirable location. Pruning should not be used to invigorate growth in an attempt to compensate for poor fertilization, poor weed control, or drought conditions.
Future pruning of an apple tree is greatly affected by early training. Much of the pruning of young, bearing trees is the result of errors made in training in the early life of the tree. Thus, it is imperative that training begin early.
A delay for the first 3 to 4 years will result in a poorly-developed, weak tree. Correction of such a problem, usually with heavy pruning, will only further delay and decrease fruit production.
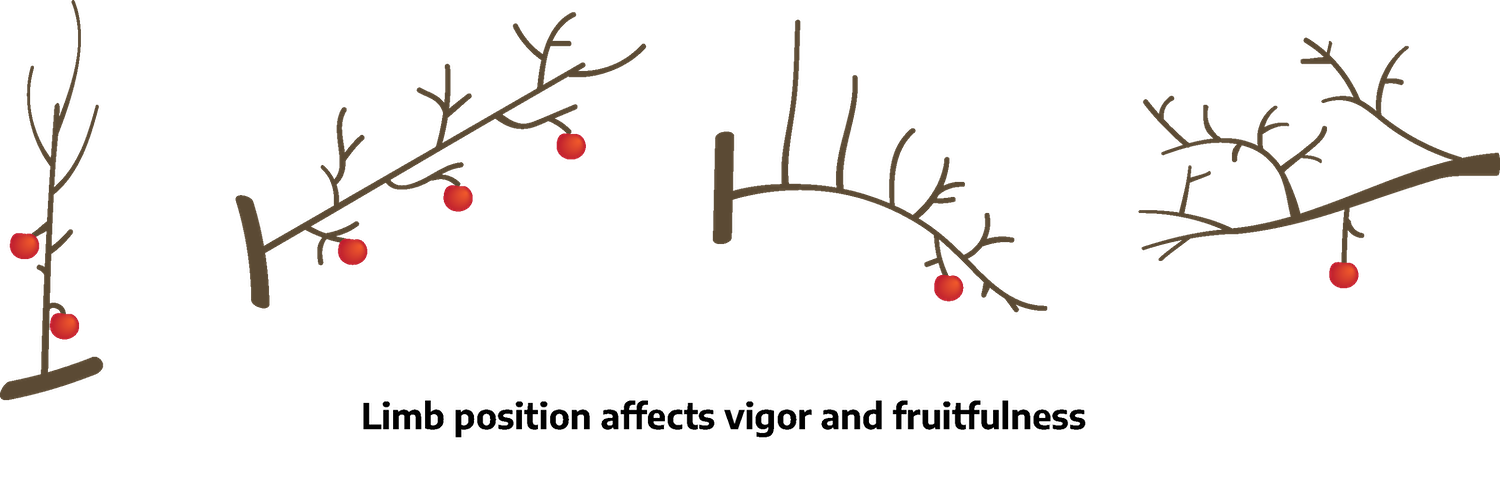
Limb spreading

An integral part of a tree-training program is limb-spreading. Limb orientation affects vigor in various ways. An upright or vertical limb produces the longest shoots near the apex and tends to exhibit high vegetative vigor. As limbs are oriented away from vertical, they exhibit reduced vigor of shoots near the apex, more uniform branching along the shoot, and favor development of fruiting spurs. Fruits hang along the limb and are less prone to rub. A limb orientation around 60 degrees from vertical is desired.
Horizontal orientation of limbs results in the development of vigorous watersprouts along the upper surface of the limb, at the expense of potential fruiting spurs.
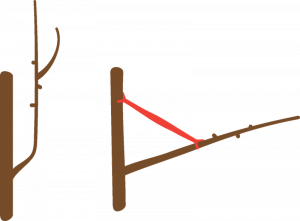
Thus, correct limb-spreading (near 60 degrees from vertical) can be used to develop a proper balance between vegetative and fruiting growth. Steel wire about 1/8” thick or wooden strips with finishing nails in each end are inserted between the selected scaffold limb and the main trunk of the tree. Limb-spreading should begin early, as many cultivars, such as Red Delicious (particularly spur-types), naturally develop narrow crotch angles. If these narrow crotch angles are not widened (greater than 35 degrees), a situation can quickly develop in which bark is trapped between the trunk and scaffold (bark inclusion). This bark inclusion prevents layers of annual wood from growing together and creates the potential for splitting. If these narrow crotch angles with bark inclusions are allowed to develop, later attempts at limb-spreading may result in splitting of the crotch. Two objectives exist for limb-spreading: 1) development of a strong, wide crotch angle (greater than 35 degrees) free of bark inclusion and 2) limb orientation at 60 degrees from vertical to balance vegetative and fruiting growth. To derive the benefits of limb-spreading, the crotch must be physically strong, to undergo spreading without splitting.
Poor pruning practices are not a wise substitute for proper limb-spreading in the training of upright scaffolds. Improper pruning cuts will not change the crotch angle, improve limb position, or aid in the control of vegetative vigor. Scaffolds should be spread and lower laterals removed if necessary.
Pruning schedule for apple trees
Scaffold selection for spacing
Scaffold selection can begin in the early summer, especially on cultivars developing narrow crotch angles. Shoots developing below the lowest desired scaffold should be removed. Generally, in the first year, 4 to 6 good scaffolds can be selected that are evenly distributed and not directly above one another.
The vertical spacing between scaffolds can vary from 3 inches to 12 inches depending on the ultimate size of the tree. Limbs with crotch angles less than 35 degrees should be spread or removed. Hardwood toothpicks and clothespins can be used if training is done in early summer while shoots are soft. Short pieces of #9 wire can also be used. Shoots undesirably located can be completely removed at this time.
At planting
Trees must be pruned at planting. Pruning forces the growth of laterals from which future scaffolds will be selected. Head trees to a height of 30 to 35 inches. If feathered (branched) trees are planted, they should be headed to a strong bud to stimulate growth of the central leader. Feathers desirably located can be retained as scaffolds and should be headed by a third. Undesirable feathers should be removed.
First year dormant season
Select shoots to be retained as scaffolds if this was not done earlier. Spread selected scaffolds before any pruning is done. Spreading changes the shape of the tree and may influence pruning decisions. Remove only branches with narrow crotches or branches that are too low. The central leader should be headed to maintain dominance and induce branching. This is done 3 to 5 inches above the point where the next tier of scaffolds is desired. Refrain from heading scaffolds unless they need to be shortened or stiffened. Generally a year-old shoot naturally branches in the season after development. Spreading that scaffold will encourage uniform branching. However, a scaffold will often exhibit excess vigor and upset the balance of the tree.
Second growing season
Limbs not previously trained can be easily spread early in the growing season when wood is flexible. Fruit developing on the central leader should be removed to prevent the leader from bending. Retain all branches with wide crotch angles.
Second year dormant season
Some of the scaffolds that were selected and spread in the first year may turn up and resume vertical growth. Longer spreaders can be used to spread the limbs back to the desired orientation. The smaller spreaders can be moved further up into the tree. Again, scaffolds should be spread before pruning. The central leader should be headed again to maintain vigor and stimulate branching. Typically, only one or two pruning cuts are required the second winter.
Succeeding years
Continue training and pruning following the previously discussed principles of central leader dominance and proper scaffold selection and training. Scaffolds should be maintained in a 60 degree orientation. A conical tree shape should be maintained. Thus, the upper scaffold should be shorter than the scaffold below it. After the third year, upper scaffolds can be shortened with the use of thinning cuts to remove shoots at the junction with a lateral scaffold or trunk. Thinning cuts are less invigorating than heading cuts, improve light penetration, and can redirect the limb. Remove crossing branches and vigorous watersprouts. Shoots growing up into the tree should be removed. Weak water sprouts can be spread to induce fruiting.
Once the desired tree height is reached, the tree can be maintained by annually cutting back to a weak lateral on the central leader. This will maintain vigor in the top center of the tree while maintaining desired tree height. In the top half of the tree, remove branches with a diameter half the diameter of the trunk at the point of attachment.
Bearing apple trees
When pruning is underway, older, bearing trees should be pruned first. Young, nonbearing apple trees and stone fruits should not be pruned until after February 1 to minimize chances of winter injury.
The balance between vegetative and fruiting growth is influenced by the crop load, fertilization, and pruning. Fruiting may be poor because vigor is too high or too low. Low vigor can be the result of inadequate fertilization, no pruning, excessive cropping, or shading of fruiting wood. Good fruiting wood requires moderate vigor and exposure to good light levels.
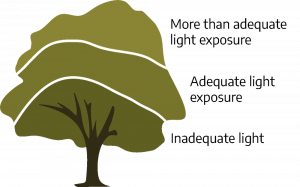
Light is the source of energy that produces the crop. Bearing wood that is shaded is low in vigor and produces small, poorly colored fruits. Good light exposure is necessary for the development of flower buds as well as optimum size, color, and sugar content of the fruit. Studies have shown that a typical tree canopy is composed of different layers or zones in respect to light exposure. As shown below, an outside zone of leaves and fruit receives a high proportion of direct light and light levels above those required for good growth and fruiting; a second zone receives adequate light exposure; and a third, inner zone receives inadequate light exposure and is unproductive.
The relative proportion of these zones in a tree is influenced by tree size and shape. As tree size increases, the percentage of the tree that is shaded and unproductive (third zone) increases. Trees that have wide tops and narrow bottoms also have a high percentage of shaded areas in the tree canopy. Trees should be cone-shaped, or larger at the bottom than the top, to maximize adequate light exposure.

Good light exposure in the tree canopy can also be maintained by a good pruning program. Ideally, pruning should remove unproductive wood and develop a uniform distribution of vigor and light exposure throughout the tree. Proper pruning can also help to maintain desired tree size and shape.
Pruning should be done on a regular basis, and consists of moderate cuts made throughout the tree to distribute vigor and provide good light penetration. Heading cuts should only be used where branching is desired or in areas where vigor is low. Drooping or low-hanging branches should be removed or pruned to a lateral that is positioned above horizontal. Remove crossing, dead, or damaged limbs. Watersprouts should be removed unless one is needed for the development of new bearing surface. Watersprouts can be easily removed by hand as they develop in the summer.
Without regular annual pruning, trees often become overly thick, and irregular bearing may occur. Spray penetration is reduced, and problems such as scale may develop in the dense areas of the tree. With this type of tree, make many thinning cuts throughout the tree with emphasis on the upper, outer portions of the tree. This will open up areas into the tree canopy as well as reestablish good tree shape.
Avoid heading cuts to outward-growing limbs unless necessary. Such cuts result in weak limbs and an umbrella shape that creates a sucker problem. Remove no more than 2 large limbs per year. If large amounts of pruning are required, it should be spread over a 2 to 3 year period. In addition, such pruning should be preceded and followed for 1 to 2 years by a reduction or elimination of nitrogen application depending on soil type, variety, and grower experience.
The excess vigor that can result from severe pruning can decrease fruit quality. The effect is much the same as from excessive nitrogen application and may include excessively large, poorly colored, soft apples which will not store well. Vegetative growth competes with fruit for calcium; thus, under conditions of excessive vigor, cork spot may develop.
Hedging and topping should only be used to maintain tree size when trees are at or near desired size. Such pruning is often used in an attempt to reduce tree size. Misuse can result in a disruption of vigor and loss of yield which may take several years to control. Hedging and topping (mainly heading cuts), especially of one-year shoots, induce masses of shoots close to the plane where cutting takes place. This localized invigoration of shoots can shade and weaken inner areas of the tree.
Pruning Other Fruit Trees
Pear
Pear trees are trained along the same general lines as those recommended for apples. Heading back is undesirable because of the tendency of the tree to throw out soft terminal shoots, which are highly susceptible to fire blight. It is best to limit pruning to thinning-out cuts.
Cherry
Sweet cherry trees are trained to the modified leader system recommended for the apple. Special attention should be given to the selection of scaffold limbs because sweet cherry is subject to winter injury and splitting at the point where the limbs join the main stem of the tree. It is essential that the crotch angles be as wide as possible to ensure a strong framework.
A sour cherry tree with no strong branches at the time of planting should be headed to about 24 inches above the ground. Selection of laterals can be made at the beginning of the second year’s growth. If it has some good laterals when planted, remove branches lower than 16 inches from the ground. Select about three permanent lateral or scaffold limbs along the leader, 4 to 6 inches apart and not directly over one another. Do not head them back, since this tends to stunt terminal growth.
In the following years, select side branches from the leader until there is a total of 5 or 6 scaffold limbs well distributed above the lowest branch along 3 or 4 feet of the main stem. The leader is then usually modified by cutting to an outward-growing lateral. After fruiting begins, pruning consists mainly of thinning out excessive and crowded growth each year to allow sunlight to filter through the tree.
Plum
The plum may also be pruned in a manner similar to the apple. European and prune types generally develop into well-shaped trees, even if little pruning is done. Thinning out excessive growth constitutes the bulk of pruning after heading back to 30 to 36 inches at the time of planting. Varieties of the Japanese type are usually a little more vigorous, and may need some heading back as well as thinning of excessive growth after they come into bearing.
Peach
Peach trees are usually trained to the open-center system. Newly planted trees should be headed to about 30 inches in height, just above a lateral branch or bud. If the tree is branched when it comes from the nursery, select 3 or 4 laterals that are well-spaced up and around the trunk for the permanent scaffold limbs. The lowest limb should be about 15 inches and the highest about 30 inches from the ground. Cut these back to two buds each, and remove all other laterals.
If no desirable laterals are available, head the tree to the desired height and cut out all side branches to one bud. A number of shoots will develop during the season, from which you can select scaffold limbs. Selection can be made during the summer or delayed until just before growth begins the second season.
Once the scaffold system of the young peach tree is established, fairly heavy pruning is required to develop a low spreading tree. Remove all strong, upright shoots growing in the center of the tree, and lightly head back terminal growth on the scaffold limbs to outward-growing laterals. This aids in the development of an open-center tree.
As fruit is borne on wood of the previous year’s growth, it is necessary that the peach be pruned annually to stimulate new growth and maintain production near the main body of the tree. Pruning of the mature peach tree consists mainly of moderate thinning and heading back to outward-growing laterals to keep the tree low and spreading. A height of 8 or 9 feet is usually preferred.
Pruning Fruit Trees Summary
When pruning fruit trees for best production, remember these basic concepts:
Pruning invigorates and results in rapid growth close to the pruning cut. Pruning reduces the number of shoots, so remaining shoots are stimulated. However, total shoot growth and size of the limb is reduced. Pruning always reduces yield.
Two types of pruning cuts are heading back and thinning out. Heading is cutting off part of a shoot or branch to stimulate branching and stiffen the limb. Thinning cuts remove the entire shoot or branch at its junction with a lateral, scaffold, or trunk. Thinning cuts are less invigorating, improve light penetration, and can redirect the limb.
Limb position affects vigor and fruitfulness. Vertical or upright branches, typical in the tops of trees, produce the longest shoots near the end of the limb and tend to be excessively vigorous and not very fruitful. Fruit are often of poor quality and subject to limb rub. Limbs growing slightly above horizontal are more apt to develop a uniform distribution of vigor and fruitfulness. Light distribution tends to be even, and because fruit hang along the branch, they are less prone to limb rub. Limbs growing below horizontal tend to develop suckers along the upper surface. Excess sucker growth will result in shading. Hangers, or limbs developing on the underside of branches or scaffolds, are heavily shaded and low in vigor. Fruit developing on such wood is of poor size and color.
Invigoration from pruning is, in part, a nitrogen response. Pruning alters the balance between the tree top and root system. Removal of part of the top increases the amount of nitrogen available for the remaining growing points. Thus, a pruning program should be developed along with a good fertilization program. Severe pruning and/or excess fertilization can disrupt the vigor of the tree and decrease fruiting.
Special Training Systems for Fruit Trees
Numerous training systems, based on the art of espalier, which originated in France and Italy about 400 years ago, have been devised. Some are quite elaborate, requiring considerable time and patience as well as detailed knowledge of the plant’s growth characteristics. The easiest espalier system is the horizontal cordon. Apples, pears, and plums adapt well to this system. The trees are usually supported by a wall, fence, or wire trellis. Training to the four-tier cordon or four-wire trellis is relatively easy.
An espalier system can serve to separate yard areas and to provide an effective way of producing a large volume of high quality fruit in a limited area. Trees trained in this fashion should be grafted on dwarfing rootstock. Otherwise, they tend to grow too large and are difficult to hold within bounds.
A simple, four-wire trellis may be constructed by setting 8-foot posts 2 feet in the ground, spacing them 12 feet apart, and running wires through the posts at heights of 18, 36, 54, and 72 inches. Plant two unbranched whips of the desired variety 6 feet apart between each two posts.
Before growth begins in the spring, cut off the whip just above the first bud, below the point where the whip crosses the lowest wire. Usually three or more shoots will develop near the point of the cut. Retain the uppermost shoot and develop it as the central leader. The other two can be developed into main scaffold branches to be trained along the lower wire, one on each side of the central stem. Remove all other growth. The two shoots selected for scaffold limbs should be loosely tied to the wire as soon as they are 10-12 inches long. Twine, plastic chain link ties, or other suitable material may be used. Tie the shoots so that they are nearly horizontal. This reduces vegetative vigor and induces flower bud formation. If the end of the shoot is tied below the horizontal, however, new growth at the end will stop, and vigorous shoots will develop along the upper side. At the end of the first season, the lateral branches on the lower wire should be established and the central leader should have grown above the second wire.
During the dormant pruning at the end of the first winter, cut the central leader off at a bud just below the second wire. Repeat the process of the previous spring by developing two scaffold branches to tie to the second wire and allow the central leader to grow above the third wire.
This process is repeated during the next two seasons, at which time a total of eight scaffolds, four on each side of the tree, should be firmly established. The leaders should be bent to form one of the scaffolds, rather than being cut off at the top wire.
By the end of the fourth season, the trees should be in heavy production. All pruning is then done during the spring and summer months. After new growth in the spring is about 2 inches long, cut it off, and remove about 1/4 of the previous season’s growth. Terminals of the scaffold are left untouched.
About the first of August, or as soon as new growth reaches 10-12 inches in length, cut it back to two or three buds. Repeat about a month later, if necessary. This encourages fruit bud formation and prevents excessive vigorous growth.
Training and Pruning Small Fruit
Grapes
For grapes to be most productive, they must be trained to a definite system and pruned rather severely. There are several training systems used. The two most common are the vertical trellis and the overhead arbor. Both of these are satisfactory in the home planting if kept well-pruned.
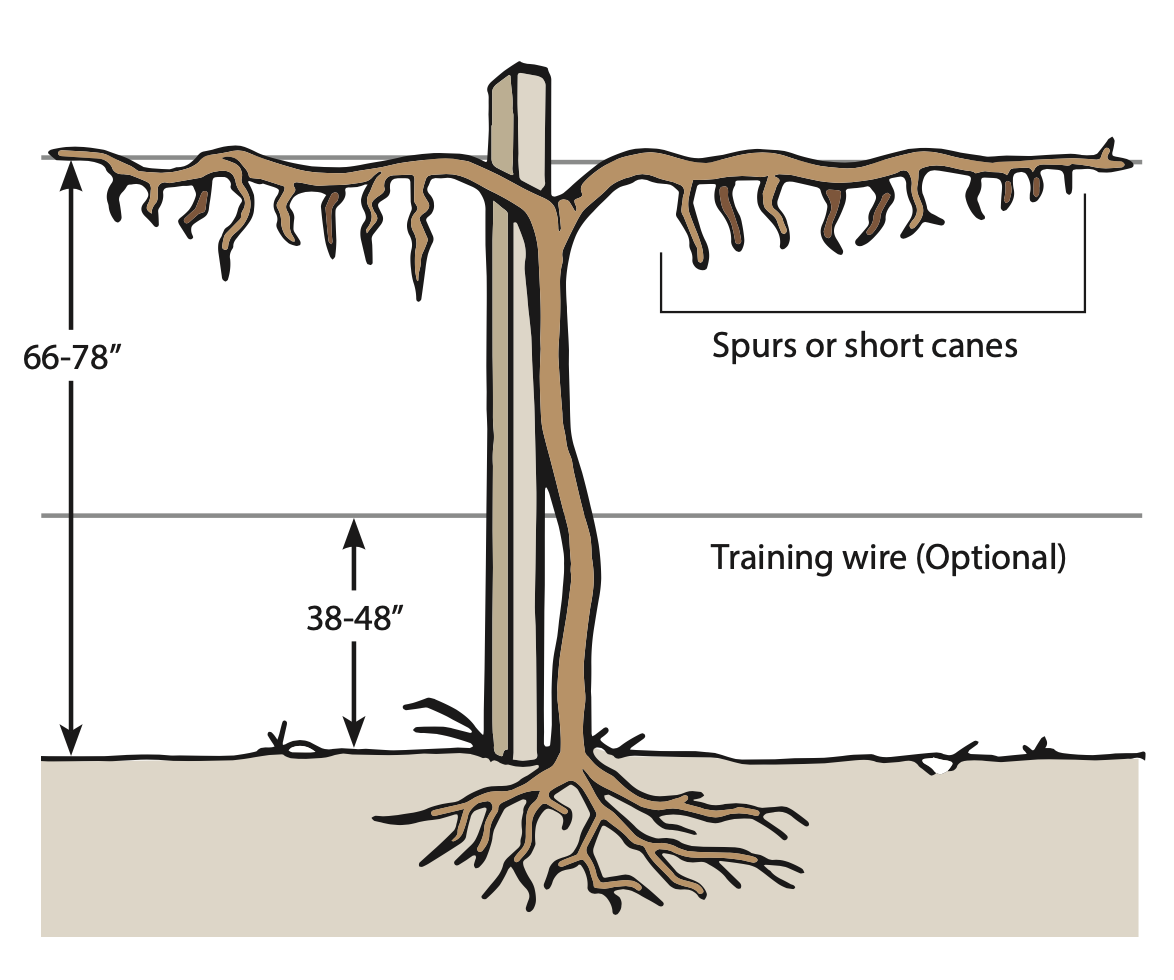
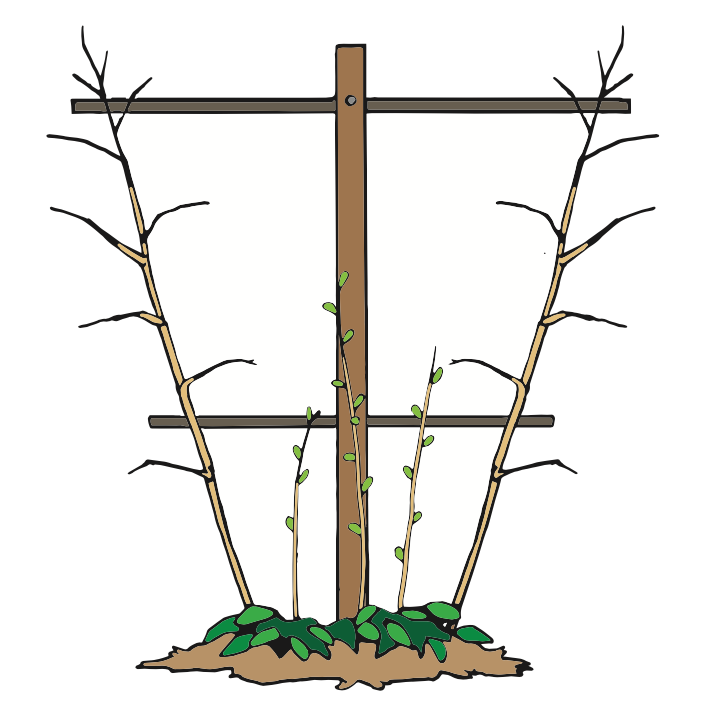
Of the many variations of the vertical trellis, the single-trunk, four-arm, Kniffin system is the most popular. Posts are set 15 to 20 feet apart and extend 5 feet above the ground. Two wires are stretched between the posts, the lower being about 2 1/2 feet above the ground, and the upper at the top of the posts. The vine is set between the posts and trained to a single trunk with four semi-permanent arms, each cut back to 6 to 10 inches in length. One arm is trained in each direction on the lower wire.
During annual winter pruning, one cane is saved from those that grew from near the base of each arm the previous summer. This cane is cut back to about ten buds. The fruit in the coming season is borne on shoots developing from those buds. Select another cane from each arm, preferably one that grew near the trunk, and cut it back to a short stub having two buds. This is a renewal spur. It should grow vigorously in the spring and be the new fruiting cane selected the following winter. All other growth on the vine should be removed. This leaves four fruiting canes, one on each arm, with eight to ten buds each, and four renewal spurs, one on each arm, cut back to two buds each.
The same training and pruning techniques may be effectively used in training grapes to the arbor system. The only difference is that the wires supporting the arms are placed overhead and parallel with each other instead of in a horizontal position. Overhead wires are usually placed 6 to 7 feet above the ground.
If an arm dies or for any reason needs to be replaced, choose the largest cane that has grown from the trunk near the base of the dead arm and train it to the trellis wire. To renew the trunk, train a strong shoot from the base of the old trunk to the trellis as though it were the cane of a new vine. Establish the arms in the same manner as for a new vine, and cut off the old trunk.
Pruning may be done anytime after the vines become dormant. In areas and on varieties where there is danger of winter injury, pruning should be delayed until late winter or early spring. Vines pruned very late may bleed excessively, but there is no evidence that this is permanently injurious.
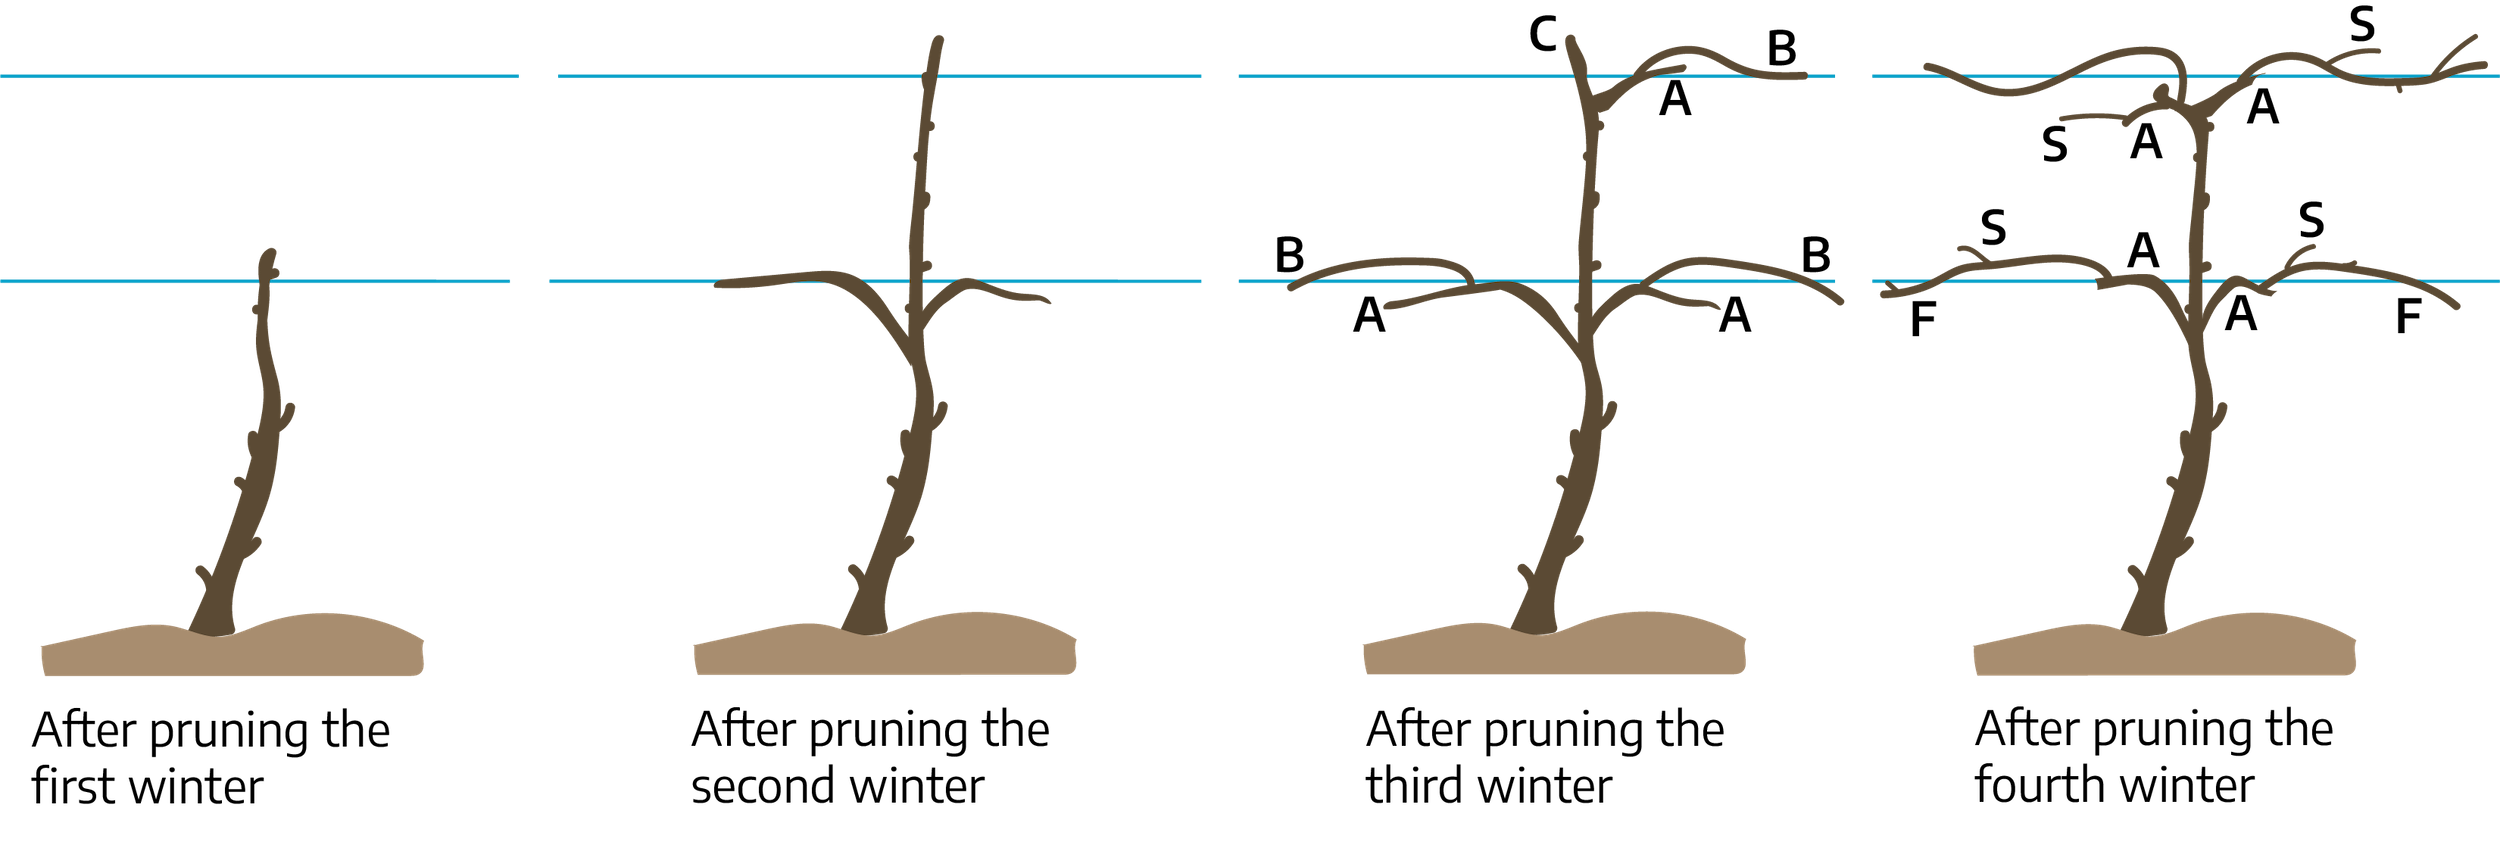
Stages in training the young vine to the single trunk, four-arm Kniffin system:
- After pruning the first winter. The single cane is cut back and tied to the lower wire. If the cane has grown less than 3’ during the first summer, it should be cut back to two buds.
- After pruning the second winter. Two new canes of four or five buds each are tied on the bottom wire. A third new cane is tied up to the top of the wire and cut off.
- After pruning the third winter. Three of the arms (A) and fruiting canes (B) have been formed. A cane (C) with four or five buds is left to establish the fourth arm.
- A fully formed vine after pruning the fourth winter. The arms (A) should be shorter than those shown. The vine consists of a single, permanent trunk, four semi-permanent fruiting arms (F), and four renewal spurs (S), with two new buds on each.
Blueberries
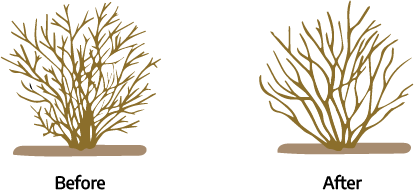
Until the end of the third growing season, pruning consists mainly of removing low spreading canes and dead and broken branches. As the bushes come into bearing, regular annual pruning will be necessary. This may be done any time from leaf fall until growth begins in the spring. Select six to eight of the most vigorous, upright-growing canes for fruiting wood and remove all others.
After about 5 or 6 years, the canes begin to lose vigor and fruit production is reduced. At the dormant pruning, remove the older canes of declining vigor and replace with strong, vigorous new shoots that grew from the base of the bush the previous season. Keep the number of fruiting canes to six or eight and remove the rest. Head back excessive terminal growth to a convenient berry-picking height.
Brambles
Trailing blackberries need some form of support. They may be grown on a trellis, trained along a fence, or tied to stakes. Other brambles may either be trained to supports or, with more severe pruning, grown as upright, self-supporting plants. Red raspberries and erect-growing blackberries are frequently grown in hedgerows.
A simple trellis, used in many home gardens, consists of two wires stretched at 3 and 5 foot levels between posts set 15 to 20 feet apart. Fruiting canes are tied to these wires in the spring. The erect varieties are tied where the canes cross the wires. Canes of trailing varieties are tied horizontally along the wires or fanned out from the ground and tied where they cross each wire.
Where stakes are used for support, they are driven into the ground about 1 foot from each plant and allowed to extend 4 or 5 feet above the ground. Canes are tied to the stake at a point about midway between the ground and the tips of the canes, and again near the ends of the canes.
Canes of bramble fruits are biennial in nature; the crowns and roots are perennial. New shoots grow from buds at the crown each year. Late in the summer, the new canes develop lateral branches with fruit buds on them. Early in the second season, fruit-bearing shoots grow from these buds. After fruiting, the old canes wither and die, and new shoots spring up from the crowns.

These fruiting canes may be removed any time after harvest. They should be cut off close to the base of the plant, removed from the planting, and destroyed. As a sanitation practice, some growers do this immediately after harvest. Most, however, wait until the dormant pruning.
The dormant pruning is usually delayed until danger of severe cold is past and accomplished before the buds begin to swell. It consists of the removal of all dead, weak, and severely damaged canes, and the selection and pruning of the fruiting canes for the coming season. Where possible, fruiting canes 1/2-inch or more in diameter are selected.
Black raspberries should be topped in the summer when the young shoots are about 24 inches high; purple raspberries, when about 30 inches high. Summer-topping consists of removing the top 3 to 4 inches of the new shoots by snapping them off with the fingers or cutting them with shears or a knife. Where trained to supports, let them grow 6 to 8 inches taller before topping.
At the dormant pruning, thin each plant until only four or five of the best canes remain. Cut the lateral branches of the black raspberry to 9 to 12 inches long; those of the purple raspberry to 12 to 15 inches long.
The following comments concerning red raspberries do not apply to the Heritage variety, which is an everbearing type.
Red raspberries should not be summer-topped. Canes of everbearing varieties are handled in the same manner as those of ordinary varieties. At the dormant pruning, where the hill system of culture is used, thin until only seven or eight of the best canes remain per hill.
If the plants are grown in hedgerows, keep the width of the rows to 18 inches or less, and remove all plants outside the row areas. Thin the canes within the hedgerows to 6 to 8 inches apart, saving the best canes.
Where the canes are supported either by a trellis or stakes, cut the canes back to a convenient height for berry-picking, usually 4 or 5 feet. Grown as upright, self-supporting plants, whether in hills or in hedgerows, the canes should be cut back to about 3 feet in height. Any lateral branches should be cut to about 10 inches in length.
New shoots of erect blackberries should be summer-topped when they are 30 to 36 inches high. To prevent the planting from becoming too thick and reducing yields, it may be necessary to remove excess sucker plants as they appear. This can be done either with a hoe or by hand. In the hedgerow type of culture, leave only three or four shoots per running foot of row. When grown in hills, four to five new shoots may be allowed to develop in each hill.
At the dormant pruning, where supports are used, head the canes to 4 to 5 feet in height. Canes grown without support should be headed to 3 feet. Cut lateral branches back to 15 or 18 inches long.
Trailing blackberries require little pruning. All dead and weak canes should be removed after harvest or at the dormant pruning. They should be thinned to seven or eight of the best canes per hill, cut to about 5 feet in length, and tied to either a stake or trellis.
Currants and Gooseberries
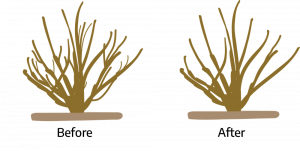
Currants and gooseberries typically form bushes with many branches arising near the ground level. Pruning may be done any time during the dormant period and consists primarily of thinning out excess stems.
Except for the removal of weak, broken, or prostrate stems, very little pruning is done until the plants are 4 years old. The mature bush should have three or four stems each of 1-, 2-, and 3-year-old wood. The actual number should be determined by the vigor of the bush. Heading back is done only to reduce the height of extra long, 1-year-old shoots.
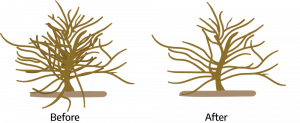
Remove all wood over 3 years old. Cut off the damaged and low prostrate stems, retaining only the most vigorous of the 2- and 3-year-old shoots. Head back young shoots that are too long.
In Virginia, European black currants are prohibited (see Administrative Code 2VAC5-450-40. European black currant plants). European black currants may harbor white pine blister rust, a non-native fungus that affects white pines. The fungus needs two hosts to complete its lifecycle: white pine and most commonly, a currant or gooseberry plant (Ribes ssp.).
Additional Resources
Attributions
- Carol King, Hampton Extension Master Gardener (2021 reviser)
- John Freeborn, Assistant State Master Gardener Coordinator (2015 reviser)
- Dan Nortman, Extension Agent, Agriculture and Natural Resources (2015 reviser)
- Stuart Sutphin, Extension Agent, Agriculture and Natural Resources (2015 reviser)
- Susan Day, Associate Professor, Department of Horticulture (2015 reviewer)
- Adam K. Downing, Extension Agent, Natural Resources, Certified Arborist (2009 reviser)
Image Attributions
- Figure 14-1: Pruning tools. Johnson, Devon. 2022. CC BY-NC-SA 4.0. Includes: Bypass secateurs by KoS on Wikimedia. 2006. Public domain; Bypass pruners and hardwood cuttings.jpg by Gmihail at Serbian Wikipedia. 2006. CC BY-SA 3.0 RS; A chainsaw being used on a small board bykalleerna on Wikimedia. 2009. CC BY-SA 3.0; Trois scies à bûches by Taveneaux, transferred from fr.wikipedia to Commons. 2006. Public domain. Pruning saw, pole saw, lopping shears, and hedge trimmers by Johnson, Devon. 2022. CC BY-NC-SA 4.0.
- Figure 14-2: Proper pruning angle. Grey, Kindred. 2022. CC BY-NC-SA 4.0.
- Figure 14-3: Pruning angle diagrams. Grey, Kindred. 2022. CC BY-NC-SA 4.0.
- Figure 14-4: Pruning larger branches. Johnson, Devon. 2022. CC BY-NC-SA 4.0.
- Figure 14-5: Tree diagram. Grey, Kindred. 2022. CC BY-NC-SA 4.0. Includes grass by Milena Zanotelli from Noun Project (Noun Project license).
- Figure 14-6: Crape myrtle before (left) and after Norfolk EMGs pruned (right). Gowen, Marilyn. 2021. CC BY-NC-SA 4.0.
- Figure 14-7: Proper (left) and improper (right) methods of pruning. Grey, Kindred. 2022. CC BY-NC-SA 4.0. Includes grass by Milena Zanotelli from Noun Project (Noun Project license).
- Figure 14-8: Gradual rejuvenation. Grey, Kindred. 2022. CC BY-NC-SA 4.0. Includes grass by Milena Zanotelli from Noun Project (Noun Project license).
- Figure 14-9: Pruning hedges. Johnson, Devon. 2022. CC BY-NC-SA 4.0.
- Figure 14-10: Hedge shapes. Johnson, Devon. 2022. CC BY-NC-SA 4.0.
- Figure 14-11: Vertical and radial arrangement of scaffold branches. Grey, Kindred. 2022. CC BY-NC-SA 4.0.
- Figure 14-12: Limb orientation. Grey, Kindred. 2022. CC BY-NC-SA 4.0.
- Figure 14-13: Limb angles. Carol King. Extension Master Gardener Tree Steward Handbook. 2021. CC BY-NC-SA 4.0.
- Figure 14-14: Using a spreader to widen crotch angle. Johnson, Devon. 2022. CC BY-NC-SA 4.0.
- Figure 14-15: Training of apple trees. Grey, Kindred. 2022. CC BY-NC-SA 4.0.
- Figure 14-16: Reducing length. Johnson, Devon. 2022. CC BY-NC-SA 4.0.
- Figure 14-17: Sources of light. Johnson, Devon. 2022. CC BY-NC-SA 4.0.
- Figure 14-18: Tree shape and light exposure. Johnson, Devon. 2022. CC BY-NC-SA 4.0.
- Figure 14-19: Heading and thinning. Johnson, Devon. 2022. CC BY-NC-SA 4.0.
- Figure 14-20: Limb positions affects vigor and fruitfulness. Johnson, Devon. 2022. CC BY-NC-SA 4.0.
- Figure 14-21: High-wire, cordon-trained system for grapevines. Virginia Cooperative Extension. Small Fruit in the Home Garden. 2022. CC BY-NC-SA 4.0.
- Figure 14-22: Single trunk, four-arm Kniffin training system. Johnson, Devon. 2022. CC BY-NC-SA 4.0. Adapted from four-arm Kniffin training in Virginia Cooperative Extension. Small Fruit in the Home Garden. 2022. CC BY-NC-SA 4.0.
- Figure 14-23: Left, unpruned blueberry plant. Right, after pruning, a mature blueberry bush should have 10 to 15 canes. Johnson, Devon. 2022. CC BY-NC-SA 4.0.
- Figure 14-24: Left, an unpruned blackberry plant. Right, once plants are dormant, only retain four to five of the best canes. Johnson, Devon. 2022. CC BY-NC-SA 4.0.
- Figure 14-25: For plants grown in hedgerows, thin canes to 6 to 8 inches. The figure shows, left, before thinning, and right, after thinning. Johnson, Devon. 2022. CC BY-NC-SA 4.0.
- Figure 14-26: Primocane-fruiting raspberry with second-year canes and new canes. High-wire, cordon-trained system for grapevines. Virginia Cooperative Extension. Small Fruit in the Home Garden. 2022. CC BY-NC-SA 4.0.
- Figure 14-27: Pruning currants. Johnson, Devon. 2022. CC BY-NC-SA 4.0.
- Figure 14-28: Pruning gooseberries. Johnson, Devon. 2022. CC BY-NC-SA 4.0.
Pruning shears with two blades that cut like scissors
Pruning shears with a sharpened blade that cuts against a broad, flat plate
Long handled shears that are operated with both hands
Shears with a hooked blade above and a cutting blade beneath. The cutter is on a pole and is operated by a cord or chain pulled downward
Shears with long, flat blades and relatively short handles, one for each hand
Pruning cuts that reduce the height or width of a plant by cutting back lateral branches and removing terminal buds; made at nodal areas either above side branches or buds
Also called reduction cuts, pruning cuts that remove branches at their points of origin or attachment
Height-reducing pruning cuts made indiscriminately in internode areas
The swollen area that forms around the base of a branch, often appearing a bit swollen
Prominent ridge of raised bark that forms within the branch crotch
Shrub growth habit in which plants often have soft, flexible stems, small leaves, and are often used in mass plantings
Shrub growth habit in which plants spread by sending up erect new branches, called canes, from their base
Shrubs that have woodier, finely divided branches and can be pruned as a single-trunk or multi-stemmed trees
Pruning technique that removes growth gradually
Pruning technique that involves complete removal of the entire plant 6-10 inches above the ground
Vigorous shoots growing from the trunk or roots
Small package of partially preformed tissue which becomes leaves/stems or flowers
Tree rose, a Hybrid Tea, Grandiflora, or Floribunda budded at the top of a tall trunk
Rose bush 6 to 12 inches high with tiny blooms and foliage
Rose bushes that have clusters of flowers, each usually less than 2 inches across
Rose bushes that have flowers more than 2 inches across, borne on wood that is 2 or more years old. Canes are larger and sturdier than those of ramblers
Vigorous, usually-upright shoots that grow from the trunk or branches
Small dimples on the surface of apples, likely caused by lack of calcium availability in the developing fruit
