Chapter 9: Tree Health Care and Pruning
“To exist as a nation, to prosper as a state, and to live as a people, we must have trees.” – President Theodore Roosevelt
Chapter Contents:
Introduction
This chapter discusses the care of trees during their lifetime, with a focus on objectives for pruning trees from the time of initial planting through the mature years of a tree.
The section on “Tree Health Care Best Practices” discusses current practices for mulching, staking, irrigating, fertilizing, and protecting trees.
The sections on “Developing a Preventive Pruning Program for Young Trees” and “Developing a Preventive Pruning Program for Mature Trees” are external publications by Edward F. Gilman, PhD, who graciously gave permission to include these publications in this manual. Dr. Gilman is a researcher and professor of Urban Trees & Landscape Plants in the Department of Environmental Horticulture at the University of Florida. He recently retired from his university position, but continues to give presentations at conferences throughout the country. His research papers and articles are available on the University of Florida website, and he is the author of An Illustrated Guide to Pruning.
The section on “Arborist Tree Care” is a brief but important discussion about arborist services and advanced treatments for trees. Tree stewards need to have basic knowledge of arborist tree care in order to properly recommend professional arborist services for homeowners when the need occurs.
Learning Objectives
- To learn best practices for maintaining tree health.
- To distinguish priorities and differences in pruning young trees and mature trees.
- To be able to incorporate preventative pruning programs for trees.
- To acquire information about advanced arborist tree care and techniques.
REVIEW: VCE Master Gardener Handbook 2015 (9/18 update)
- Chapter 11 – Pruning
- Chapter 16 – Woody Plants
Tree Health Best Practices
Tree health care involves activities to preserve and protect tree health by avoiding damage to tree roots, trunk and crown. Best management practices are outlined in this section.
Remove grass and ground covers
Removing the grass from under the tree canopy is a valid method to support the health of trees. This step eliminates the need to mow under the canopy and reduces injury to tree trunk. Soil compaction is also reduced by eliminating mowing, resulting in greater air and moisture exchange in the soil. Grass removal eliminates competition of grass roots for water and nutrients, resulting in more tree root growth in the top soil layers. If a tree is in decline, it is recommended that all ground covers and grass be removed and replace with a thin mulch layer (2 to 3 inches maximum). In certain situations, turf removal beneath trees may not be practical or desirable, such as in some public or commercial spaces and sites.
Mulching
Ideally, apply mulch out to the drip line of the tree canopy, no more than 2-3” deep. For mature landscape trees, mulching out to the drip line may not be feasible, particularly when trees are close to buildings, sidewalks or roads. Instead, cover a 4-5 foot diameter area around the tree with mulch if possible. The larger the mulched area, the more beneficial it is for the tree. It is important to keep the mulch away from the trunk and root collar of trees. For established trees, keep the mulch 6 to 12 inches away from the tree trunk.
For a newly planted tree, do not apply mulch over the root ball. Apply the mulch beyond the root ball out to the canopy drip line. Mulching over the root ball of a new tree will interfere with the tree roots obtaining the water and moisture it needs. Excessive amounts of mulch cut off the oxygen supply, immobilizes nutrients to the tree, and can cause mulch fermentation. If the mulch is spread too thick, the tree roots will grow up above the soil surface into the thick layer of mulch which retains moisture and the roots are likewise seeking out more oxygen.
Drought and Irrigation
Periods of extended drought can cause decline and death in both young and mature trees. Drought effects seen in trees will appear as thinning and loss of foliage starting in the top center of the canopy.
Tree decline during drought can be prevented by timely irrigation and proper soil management. Applying water preventively before foliage stress occurs is important, rather than waiting until symptoms become advanced. In young trees, wilted, dropped or dead leaves or branches in the top of the canopy indicate that the tree roots are dry. The mulch should be removed from the top of the root ball since it can prevent water from infiltrating to the roots.
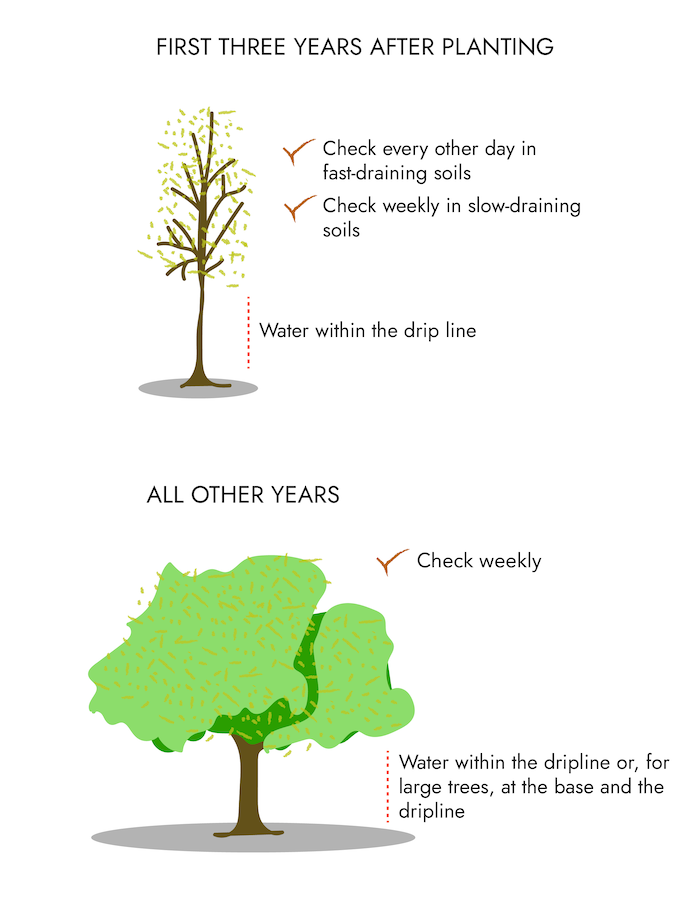
The frequency of watering depends on how quickly the soil around the tree drains. Soil that drains quickly (sandy soil) will need more frequent watering than soil that drains slowly (clay soil). Too much water will decrease the available oxygen in the soil and prevent the tree roots from obtaining needed oxygen for survival. It also creates favorable conditions for root rot pathogens. Watering too much can be as dangerous as watering too little.
A good way to check soil moisture is to dig a small hole 6 to 9 inches deep to see if the soil is moist or dry. If the soil is dry, watering is indicated. Water at least out to the dripline (or to the estimated root zone) long enough to provide one inch of water, and then check the soil for moisture 6 to 9” below the surface. If the soil is still dry, repeat as needed. Check the soil moisture periodically to determine how many days before the soil dries out again.
Recently transplanted trees require 6 months (in Zones 7 to 8) per inch of trunk diameter to fully establish roots during the first growing season. The roots of trees that are under-irrigated during the establishment period will grow more slowly, and will require regular irrigation during the next growing season. Newly planted trees need 2 to 3 gallons per inch trunk caliper at each watering session. These new trees may need watering daily for the first 2 to 6 weeks, then weekly watering for the next 3 to 6 months until established.
Root Spread
Tree roots extend beyond the drip line of trees. The trunk diameter of a tree is a better predictor of root spread than the height or canopy width of the tree. A young tree with a diameter of 6 inches at breast height (4.5 feet), can have roots that extend out in a radius of 19.7 feet from the trunk. The relationship in studies of root radius in young trees to trunk diameter was 38 to 1. There is less data on the relationship for older trees. Studies of more mature trees suggest that root spread levels off to some extent as trees age. For example, a tree with a 35 inch diameter trunk will probably not have a root system three times larger than a tree with a 12 inch diameter trunk. Studies indicate that older trees put more resources in the production of fine absorbing roots and fewer into large structural roots, thus minimizing the distance that resources need to be transported to the roots.1 Root zones should be considered when watering, mulching and when determining root protection zones of trees.
Disease and Pests
Monitor for pest problems on a regular basis and treat only as necessary. Not all insects and disease organism are significant threats to the tree or require treatment. Identify the problem first, then determine if any treatment is necessary. Refer to Chapter Ten, Biotic and Abiotic Problems of Trees, in this manual.
Girdling Roots
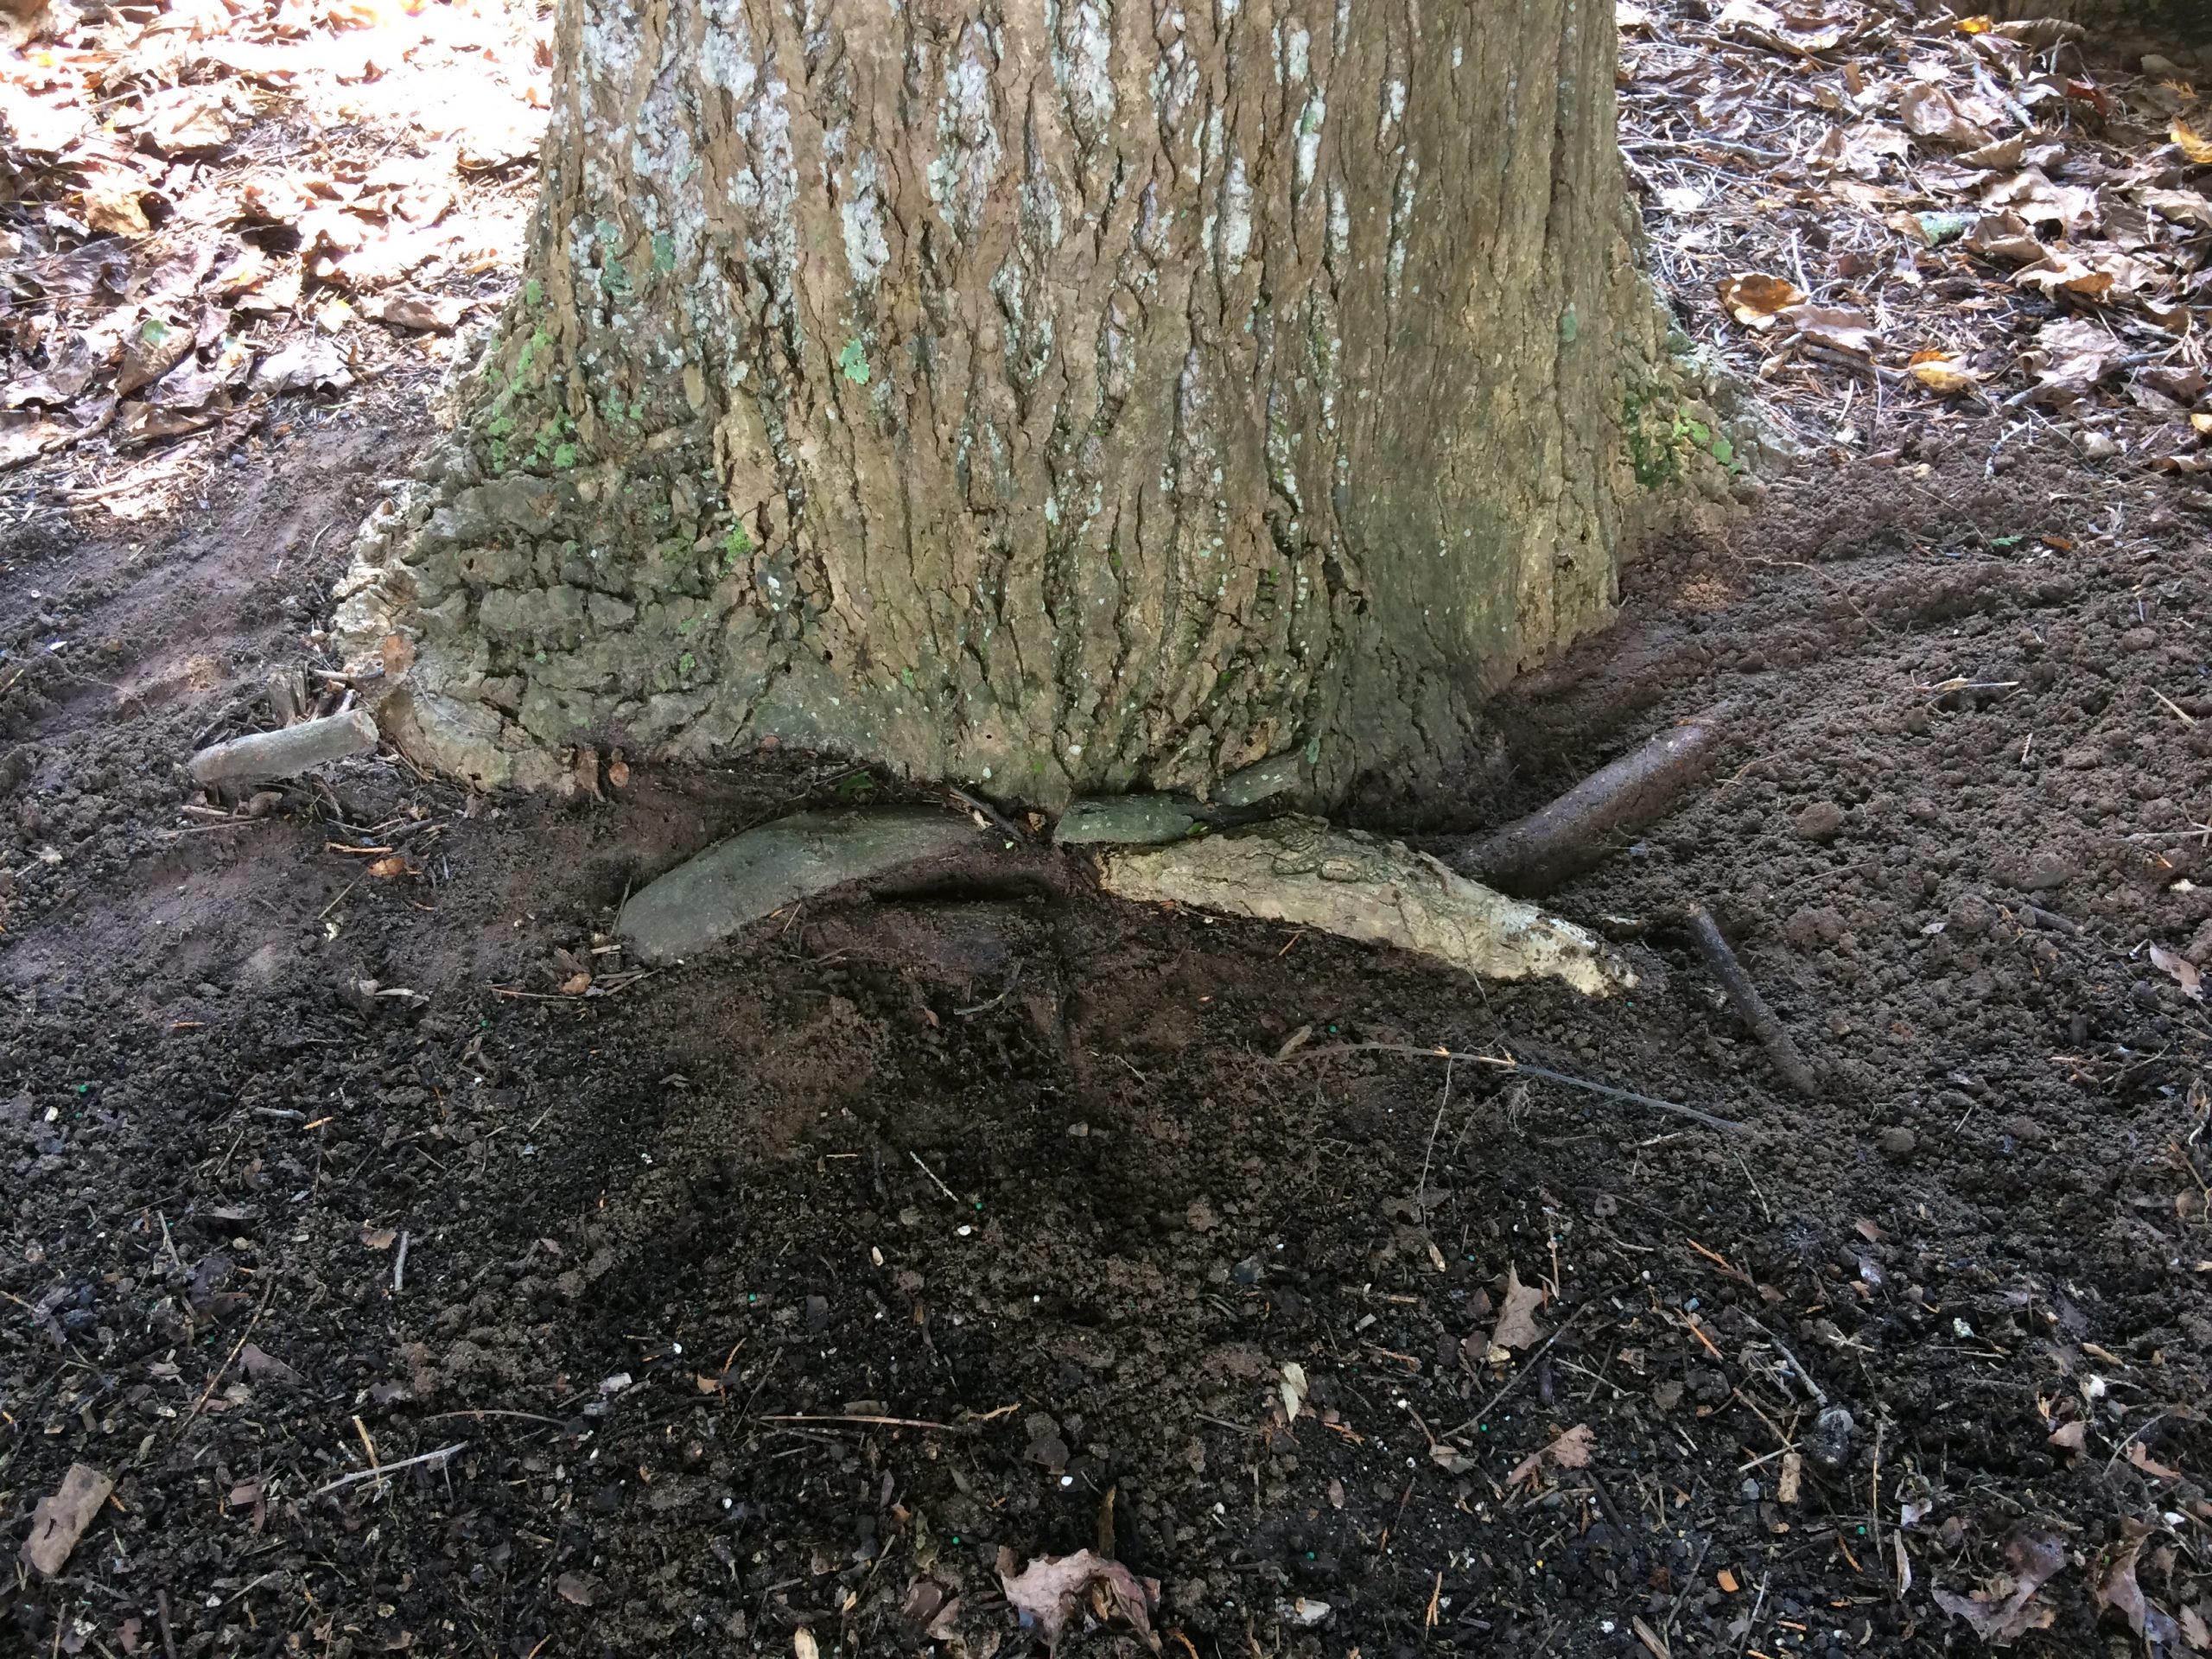
Stem girdling roots choke off the flow of water and nutrients in the tree. They can compress and weaken the tree trunk at or above the root collar flare, causing the tree to lean and lose stability, ultimately resulting in slow decline and premature death of the tree.
Research indicates that roots that girdle the trunk can be removed, as long as the tree trunk is not damaged during the process. If the girdling root can be cut by power saws, hand saws or chisels and removed easily, then the girdling root should be removed. If removal of the root is difficult, then it is advised to simply cut the girdling root without removing it. The main roots of the tree should be exposed after removing the girdling root. Girdling roots, if left to grow, can cause trunk cracks in the lower trunk, restricted growth of the tree, and/or cause possible tree failure. Circling and girdling roots can occur naturally but may also be associated with nursery practices, or occur as a result of transplanting when roots are cut and lateral roots begin to grow at right angles to their primary root. If the tree has been planted too deeply, the roots will grow upwards toward the surface of the soil and encircle the trunk. For existing trees, it is important to inspect the root collar on a yearly basis.
Tree Root Protection
Trees need to be monitored and protected throughout their lives to maintain maximal health, safety, function and benefits to the site and environment. Trees particularly need to be protected prior to construction and during major landscape installation, utility trenching or changes to the existing soil grade.
Tree roots spread out over a large area and are concentrated at the soil surface.
Every tree has a critical root zone (CRZ), also called the Root Protection Zone (RPZ), which varies by species, age of the tree, soil, and water table. The International Society of Arboriculture defines CRZ as an area (circle) equal to a 1 foot radius from the base of the tree’s trunk for each 1 inch of the tree’s diameter at 4.5 feet above grade (referred to as diameter at breast height). For example, a tree trunk of 2 inch diameter has a critical root zone of 2 ft; a tree trunk of 20 inch diameter has a CRZ of 20 ft. In some documents, the tree’s drip line is used to estimate the CRZ (within green box in diagram). About 85% of the root mass is in this area.
The protection area that extends to the outer edges of the tree roots is referred to as the Total Root Protection Zone (TRPZ) or, the Root Protection Zone (RPZ) in some publications. This area extends out 2 to 3 times beyond the Critical Root Zone.
The tree roots that are most important for survival are in the structural root plate (red area on diagram). These large strong roots extend up to 11 feet from the trunk in large trees. Damage to the feeder and transport roots in this area will reduce tree health and survival. Damaging these structural roots is usually fatal to the tree.

Ideally, all grade changes (raising or lowering the soil level) should be done outside of the critical root zone. Grade changes can cause serious damage or death to a tree. Fill added over existing soils can smother and kill roots. A pile of fill or mulch temporarily placed in the CRZ of a tree for several days can cause long-term negative effects to the roots, though symptoms may not be evident for a few years. Less damage to tree roots is likely when a grade is lowered, unless a great deal of the root mass is exposed or removed. Avoid any grade change that alters the water drainage around the tree or alters the water table.
Staking
Do not stake trees unless absolutely necessary. If the root ball is solid enough, stakes may not be necessary. Some container grown trees may need staking if their root balls are light in weight. Even heavy balled-and-burlapped trees may display very loose stems and roots and be in need of support. Stake trees if they cannot stand up straight, or if the trunk bends over.
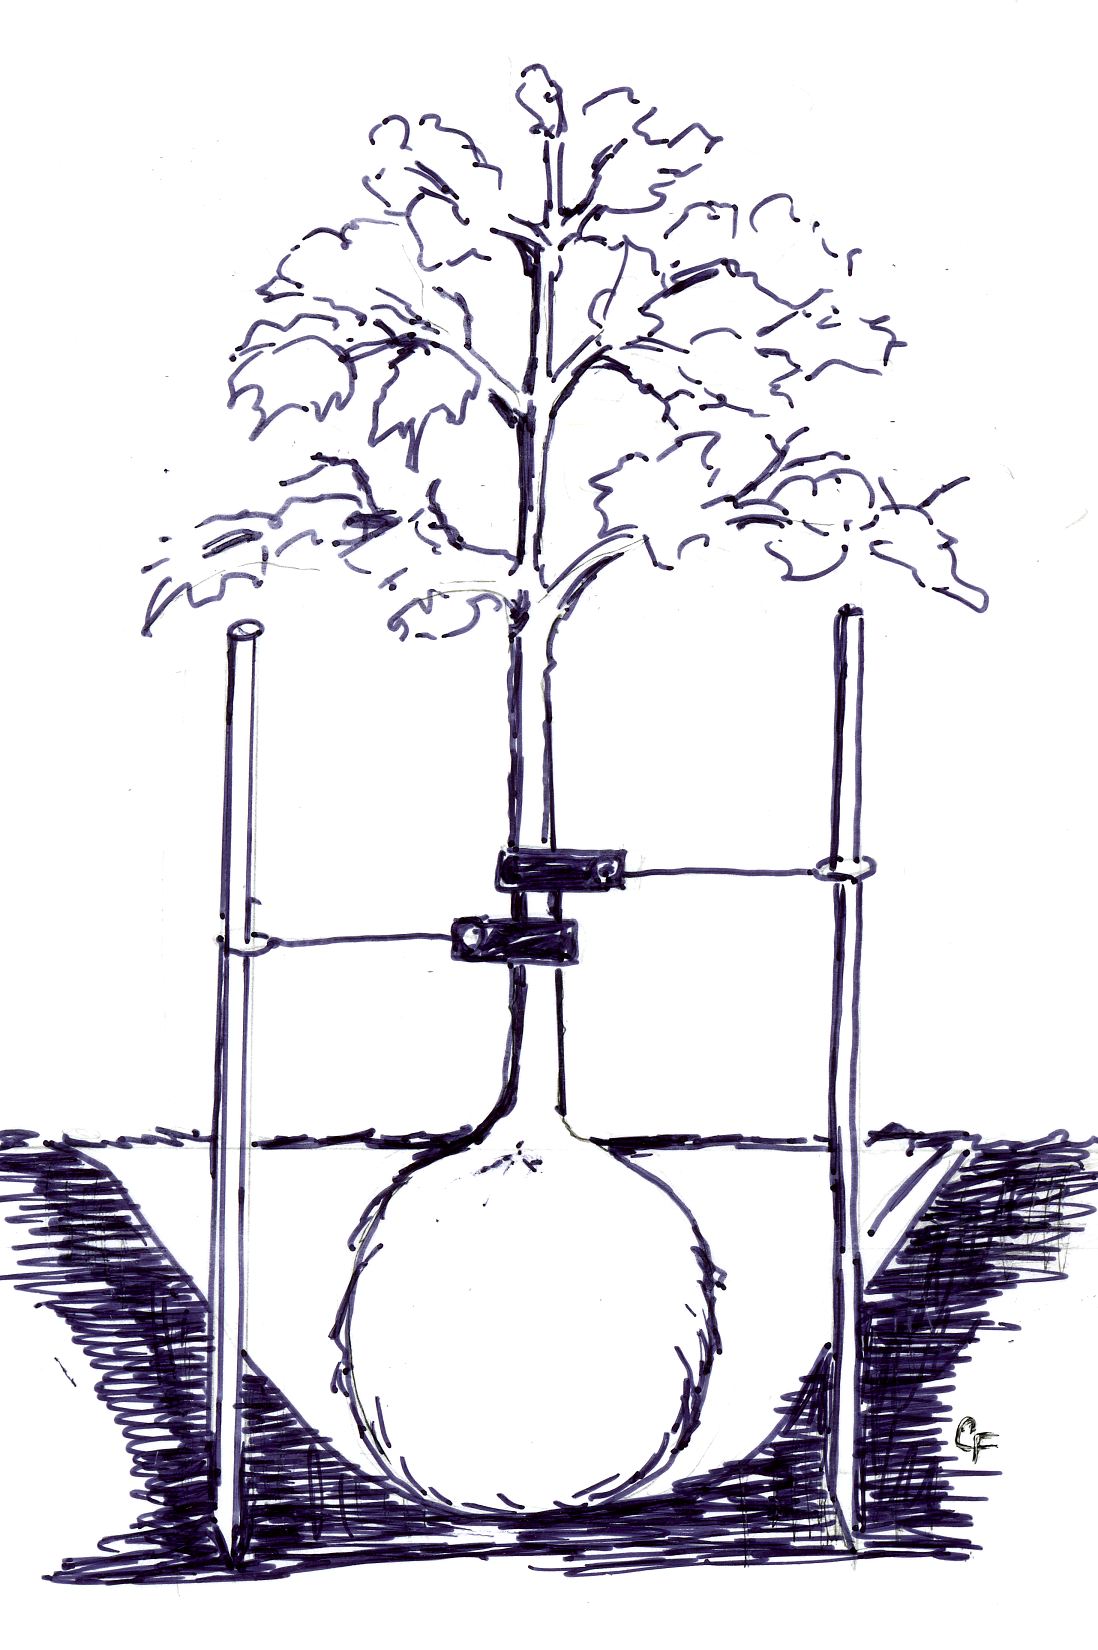
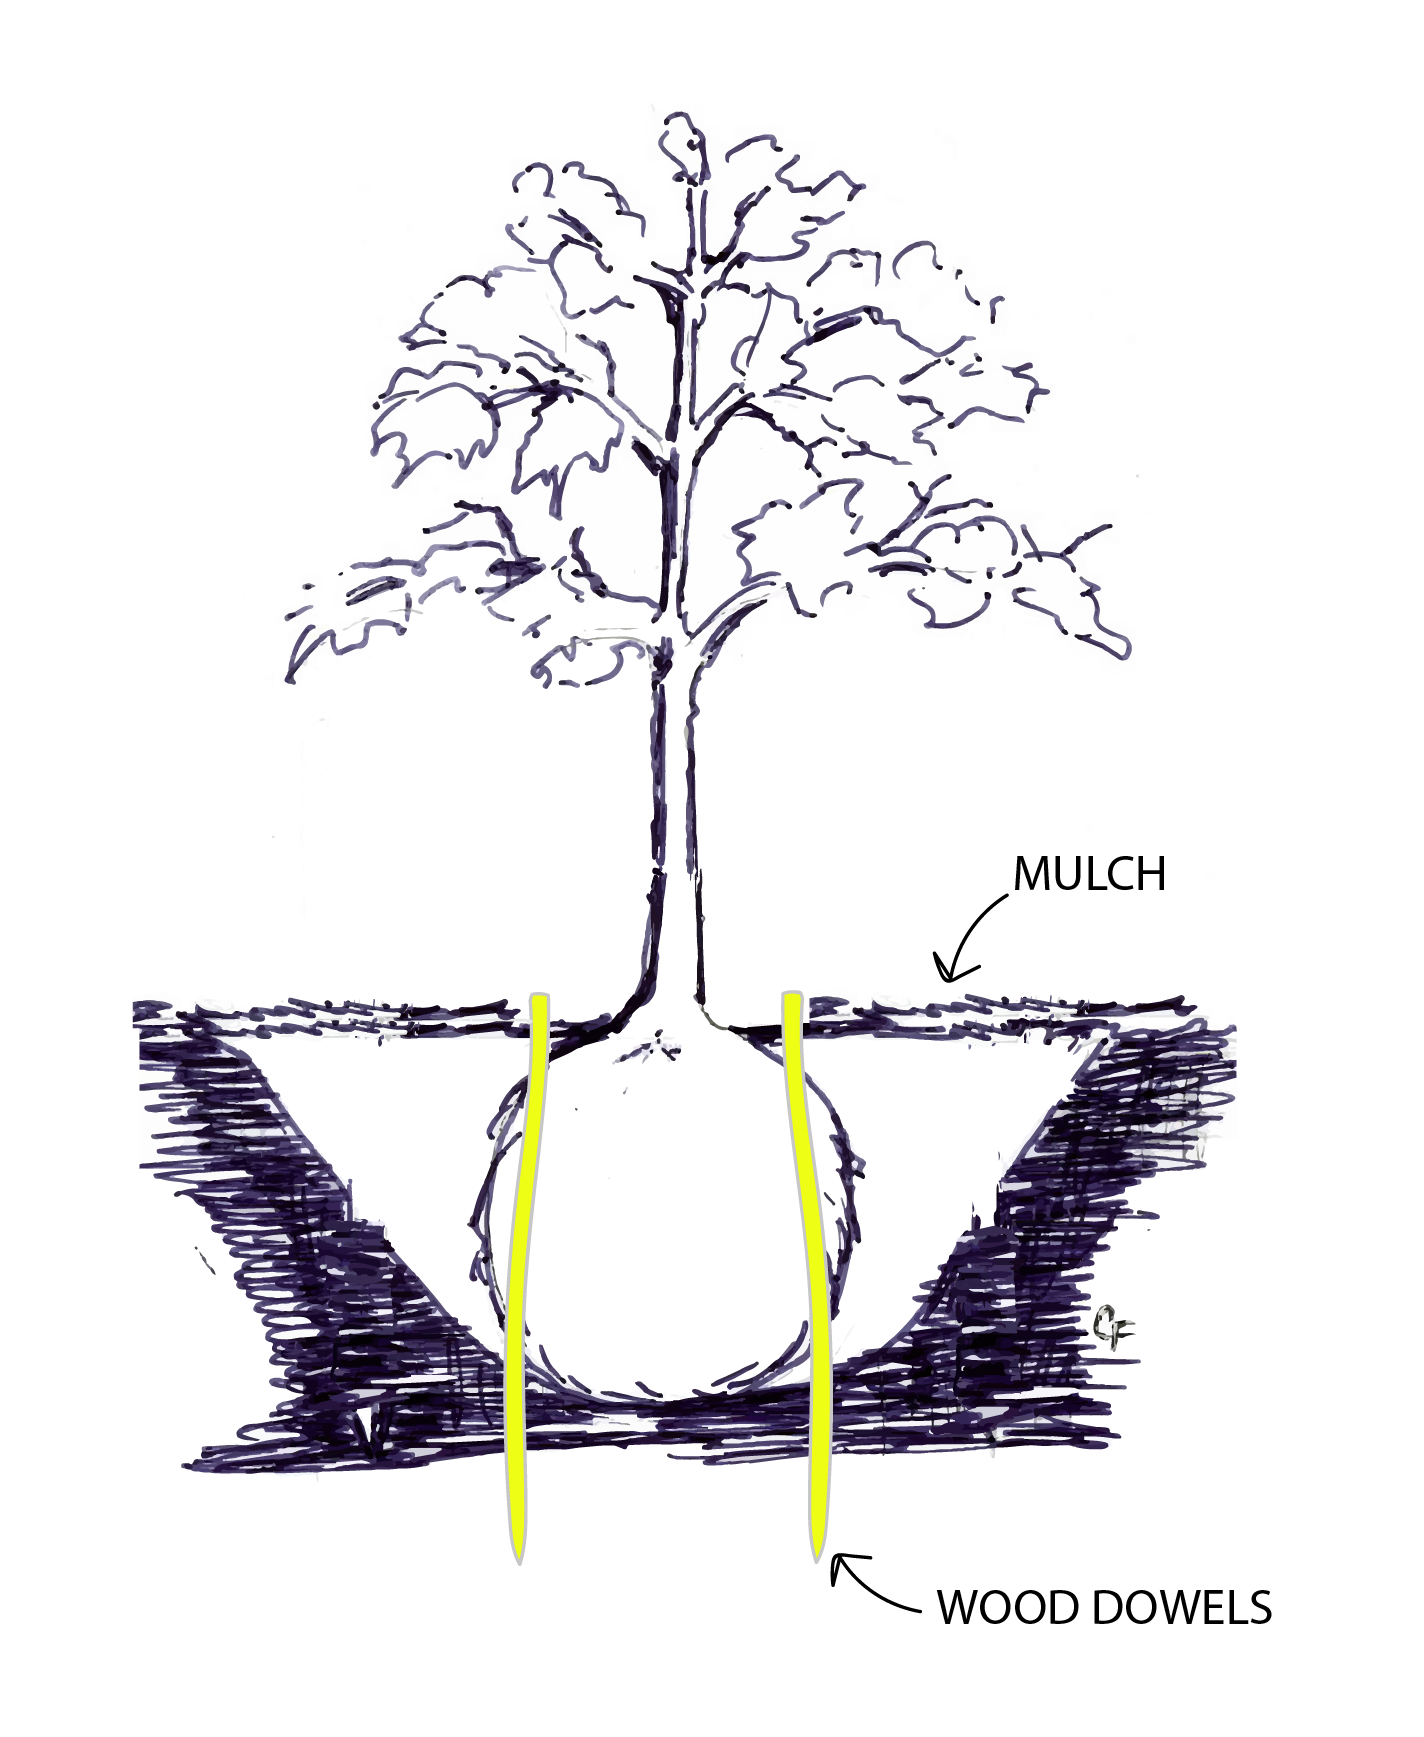
One method of staking (Fig 9-4) utilizes two to three wooden dowels that are driven through the edge of the root ball and into the soil to stabilize the root ball without causing any damage to the trunk. The dowels do not need to be removed since they will eventually decompose into the soil.
Another method of staking (Fig 9-5) uses 1 to 3 stakes that are driven into the native soil outside of the root ball, with commercial strapping to hold the tree loosely between the stakes. Rope or bare wire should not be in contact with the trunk since it easily damages the tree bark. Bicycle inner tube, burlap or strips of carpeting can be wrapped around the trunk then secured to the stakes with ropes or wire. The tree trunk should be able to move slightly with the wind to build up tissue that strengthens the trunk stability and provides structure. If the root ball is unstable use 1-3 stakes attached low on the trunk. If the trunk is bending, use 1 stake attached higher – 6” or more below the first set of branches. The staking should be removed after one growing season, once the tree is checked for stability. If the root ball still moves in the soil or the trunk bends excessively, reattach the staking system and leave in place for one more growing season. Staking should not be left in place for more than two years.
A third method of staking trees (Fig 9-6) involves the use of 2×2 wood stakes. Stake lengths depend on the size of the root ball. One horizontal stake is attached at each end with screws to two vertical stakes. The support is inserted against the side of the root ball. A second support unit is used on the opposite if needed. Ideally, the stake system is set in place when the tree is planted. If later, the stakes are pushed or hammered into the soil until the horizontal stake rests at ground level. The stakes do not need to be removed since they will eventually decompose into the soil.
Trunk Guards
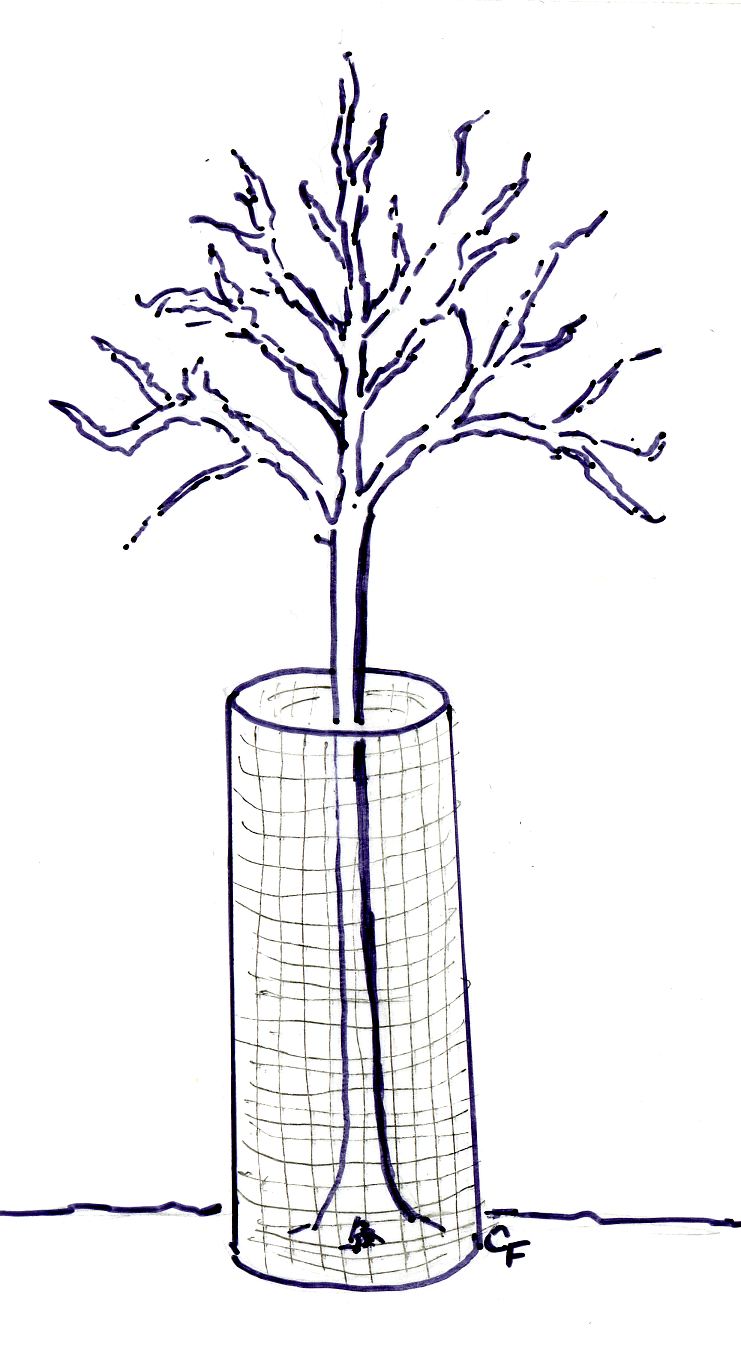
Animal damage to bark of young trees can be prevented by installing a cage around the tree trunk with 1 to 4 inches of space between the trunk and cage. Cages (or tubes) can be constructed from hardware cloth and stakes, or stiff wire fencing with ¼” to ½” mesh squares. The wire mesh tube can be anchored with metal anchoring pins, attached to one or two stakes or pushed into the ground. As the tree grows, the tube will need to be enlarged, and it should be removed when the tree is more established. The cage should not be in contact with the tree bark at any time.
Signs and Wires
Damage occurs when anything is attached to a tree using nails, screws or spikes. Wounds create opportunities for disease and pests. Wires, cables, conduit, mailboxes or signs should not be attached to trees. Bird feeders, swings or other objects hung from wires, ropes or chains around a tree limb can cause girdling of the limb resulting in eventual death of the tree limb. Independent structures for mounting bird houses and feeders are available in most local communities and they provide benign alternatives to trees.
Fertilization
Fertilizers are not recommended for newly planted trees. It is recommended that fertilizers be applied to established trees ONLY if a soil test shows that nutrients are lacking. A tree that has incurred damage to the root system may need nutrients to promote root and plant growth, but waiting two years after damaged before applying fertilizer is recommended. Urban trees may be under stress conditions due to low moisture, construction damage, and competition from grass and shrubs. Again, a soil test is the best indicator of whether fertilization is needed. Refer to Chapter Six in this manual for more information on soil and fertilization.
Herbicides and Unintended Consequences
Weed-and-feed type lawn compounds, designed to kill broad-leaved weeds, can also harm broad leaved trees. Pre-emergent herbicides are generally safe to use near most trees, but it is necessary to read the label whenever applying any chemical to be sure. Refer to Chapter Ten for additional information on chemical agents.
De-icing salts
Sodium chloride, usually mixed with sand or other gritty materials, is widely used during winter weather to improve traction on roads and paths and allow for rapid, even distribution. Salt on paths or roadways usually ends up in the nearby soil or on plants via roadway splashing and/or melting snow piles. In regions of with persistent winter snow, plants as much as 15 feet from the roadway can be damaged by the salt. Calcium chloride used on gravel roads is less toxic than sodium chloride but can cause similar injury to plants. Salt deposits on leaves and twigs can be washed off with a garden hose in late winter/early spring. Severely injured twigs or branches should be pruned off. Salt can be leached from soil that drains adequately by applying large amounts of water. Frequent watering during the summer will help keep the salt at a lower level in the soil.
If you have the choice, use sand or decomposed granite on walkways adjacent to tree and planting beds. If you are dealing with municipal de-icing, then select trees and plants that are more salt tolerant for conditions of road salt, just as you would for plantings in areas with coastal salt spray.
Pollutants
Pollutants in the air are an important contributor to the decline of urban trees. Air pollution may cause short-term or long-term damage and stress, which can open the door for other pests and disorders, hastening the trees’ demise. Diagnosing air pollution damage is difficult since the symptoms are similar to those of insect, disease and environmental damage .The major air pollutants in decreasing order of toxicity are ozone and peroxyacetyl (PAN); sulfur dioxide; and particulates (dust). Ozone and sulfur dioxide inhibit photosynthesis in leaf tissue and can cause sudden tissue damage and death with high level of the toxic gases. Low levels of the toxins inhibit leaf function. Acute ozone damage to deciduous trees cause marginal leaf burn, spots spreading over the entire leaves, or bleaching of the upper surface. Conifer acute damage results in browning at the same point on all needles in a bundle. Acute sulfuric acid damage causes severe leaf scorch, spotting and defoliation and can lead to tree death over a large geographic area. Chronic damage of these gases cause leaf chlorosis and tree decline.
Particulates (dusts) are produced by industrial sites such as cement plants, rock-crushing plants and quarries. Particulates can reduce photosynthesis by blocked the stomates of tree leaves. Rain or Irrigation usually wash the dusts away, but dry periods of weather can make this problem more serious. Air currents and temperature influence the concentration of pollutants, the duration of tree exposure, and chemical reaction rate of the oxidants. The oxidants cause more severe damage when the weather is sunny and hot, and less damage during cool and cloudy weather.
The Virginia Tech Publication 430-022, Air Pollution, by Bonnie Appleton and others, is available online and provides more complete information and tables of tree with a range of ozone and sulfur dioxide tolerance and sensitivity.
Maintenance Schedule
A schedule, such as the one shown below, will provide you with an on-going plan to care for your trees in the landscape.
Table 9-1 Tree maintenance schedule
| Type of care | At planting | 1-3 Years | 4-10 Years | After 10 Years |
|---|---|---|---|---|
| Water | 2-3 gallons per inch of trunk caliper | As needed – spring thru autumn | As needed – spring thru autumnAs needed – spring thru autumn | As needed – spring thru autumn |
| Mulch | 2-3” deep, outside root ball to drip line | 6-12” away from trunk to drip line | 6-12” away from trunk to drip line | 6-12” away from trunk to drip line |
| Clean Root Collar | Clean root collar yearly | Clean root collar yearly | Clean root collar yearly | |
| Check for Girdling Roots | Check before planting | Check yearly | Check every 4-5 yrs. | Check every 4-5 yrs. |
| Check Health | Select healthy tree | Inspect leaves, branches, crown and trunk yearly | Inspect leaves, branches, crown and trunk yearly | Inspect leaves, branches, crown and trunk yearly |
| Check Safety | Inspect in summer, winter, after storms | Inspect in summer, winter, after storms | Inspect in summer, winter, after storms | |
| Prune | Remove or reduce extra leaders; remove damaged or broken branches | Lightly in yr 2 or 3 Prune for good structure |
Every 3 yrs. | Every 5 yrs. Evergreen as needed |
| Stake | Only if needed | Check in spring & autumn. Remove after 1-2 yrs. | – | – |
| Protect Trunk | As needed | Check in spring | – | – |
Developing a Preventive Pruning Program: Young Trees
Please read this PDF from the University of Florida IFAS Extension titled “Developing a Preventative Pruning Program in Your Community: Young Trees”
Developing a Preventive Pruning Program in Your Community: Mature Trees
Please read this PDF from the University of Florida IFAS Extension titled “Developing a Preventative Pruning Program in Your Community: Mature Trees”
Arborist Tree Care
Certified Arborists are specialists in the art and science of planting, caring for, and maintaining trees. They are trained to follow all applicable ANSI (American National Standards Institute) standards. The standards cover safety, soil, planting, construction, pruning and risk management and ensure that the client receives clear and complete information about the work to be performed for the homeowner. There are several procedures that require the services of a professional certified arborist and trained staff.

Tree Risk Assessment – An arborist with Tree Risk Assessment Qualification can assess the factors affecting a tree that may cause risk to people or structures within the area surrounding a tree under normal loading. Note that exceptional wind strength or weight of ice may overcome even healthy trees. Defects causing risk in normal conditions include large dead or dying branches, cracks or splits in the trunk, leaning of the tree, root damage, cavities or rotted wood, proximity to power lines and/or recent changes in grade or soil level.
Pruning – An arborist can prune to improve tree structure, appearance, and health and to prevent storm damage by thinning and/or reducing the tree canopy. Specialized training and tools allow them to access tall trees safely.
Root and soil treatments and trenching – Non-damaging procedures are available to install irrigation, to diagnose root system problems, or to loosen and enrich compacted soil. Soil aeration and vertical mulching is performed to improve compacted soil, and to promote root growth. An Air Spade treatment uses high speed air to move or loosen the soil around a tree without damaging the roots. Compost and nutrients can be integrated into the soil with an air spade.
Cabling or bracing trees – is performed for damaged or at-risk trees to prevent crotch splitting or branch breakage, and to provide trunk support for tree with significant cavities. Pruning to reduce the size of the canopy is considered prior to installing a support system. Bracing with rods is installed close to the union of trunk/limbs with included bark. Cables are installed at a distance of about two thirds up from the union.
Tree Lightning Protection Systems (TLPS) – A safe ground for lightning can be provided by an advance protection system, installed to divert lighting from the tree top to the ground. Such a system prevents damage to a protected tree that might otherwise cause significant damage to a residence and significant damage to the tree from a lightning strike.
Tree removal – of a dying, or dead tree or removal of a tree planted in an inappropriate or dangerous site.
Emergency Tree Care – following tree damage and/or storm damage.
Review Questions
- What are the main objectives for pruning trees?
- What are the possible tree problems if a regular pruning program is not established?
- What maintenance practices help keep trees healthy?
- What are the services provided by certified arborists?
