8 Delivering Content with Technology
OP McCubbins and Annie Specht
Setting the Stage
It’s mid-March, and your students are preparing for spring break. As you send them out the door on Friday, backpacks laden with homework and textbooks, the local news is abuzz with stories about a deadly virus currently spreading throughout the United States. Within twenty-four hours, the superintendent has announced that your school has been closed for the remainder of the term. You can’t hold any in-person classes or club activities. The spring musical is canceled, and sports are delayed indefinitely.
Your students don’t return from their break, and you’re left with no option but to teach online with only a few days’ notice.
This scenario sounds like a horror film written by a high school science teacher, but it’s the reality that many K-12 educators experienced in the spring of 2020. When the COVID-19 pandemic hit, instructors from preschool to postgraduate were forced to pivot to online instruction. Even in a time when flipped, hybrid, and entirely online classes aren’t novel, teaching with technology presented new challenges—and opportunities—for educators across the globe.
Objectives
By the end of this chapter, learners will be able to:
- Understand how technology can be used for content delivery, classroom management, and student assessment.
- Evaluate platforms and their suitability for different instructional situations.
- Design learning opportunities that utilize technology for content delivery, classroom management, and assessment.
Introduction
In this chapter, we’ll discuss some of the basic tenets of content delivery and incorporating technology in your classroom. According to the Council for the Accreditation of Educator Preparation (CAEP), preservice teachers should be able to use technology in content delivery, classroom management, and student assessment. We’ll explore how to apply those three goals to a variety of technologies and platforms.
Overview
Using technology for the sake of using technology is no longer an option. Educators must routinely evaluate how technology can assist them in delivering content, engaging diverse learners, supporting and assessing student learning, and empowering students to connect and collaborate in a hyperconnected world. While many frameworks for technology integration exist, TPACK (see Koehler & Mishra, 2009) is a robust framework that focuses on the types of knowledge a teacher must possess to integrate technology efficiently and effectively.
Technological Pedagogical Content Knowledge
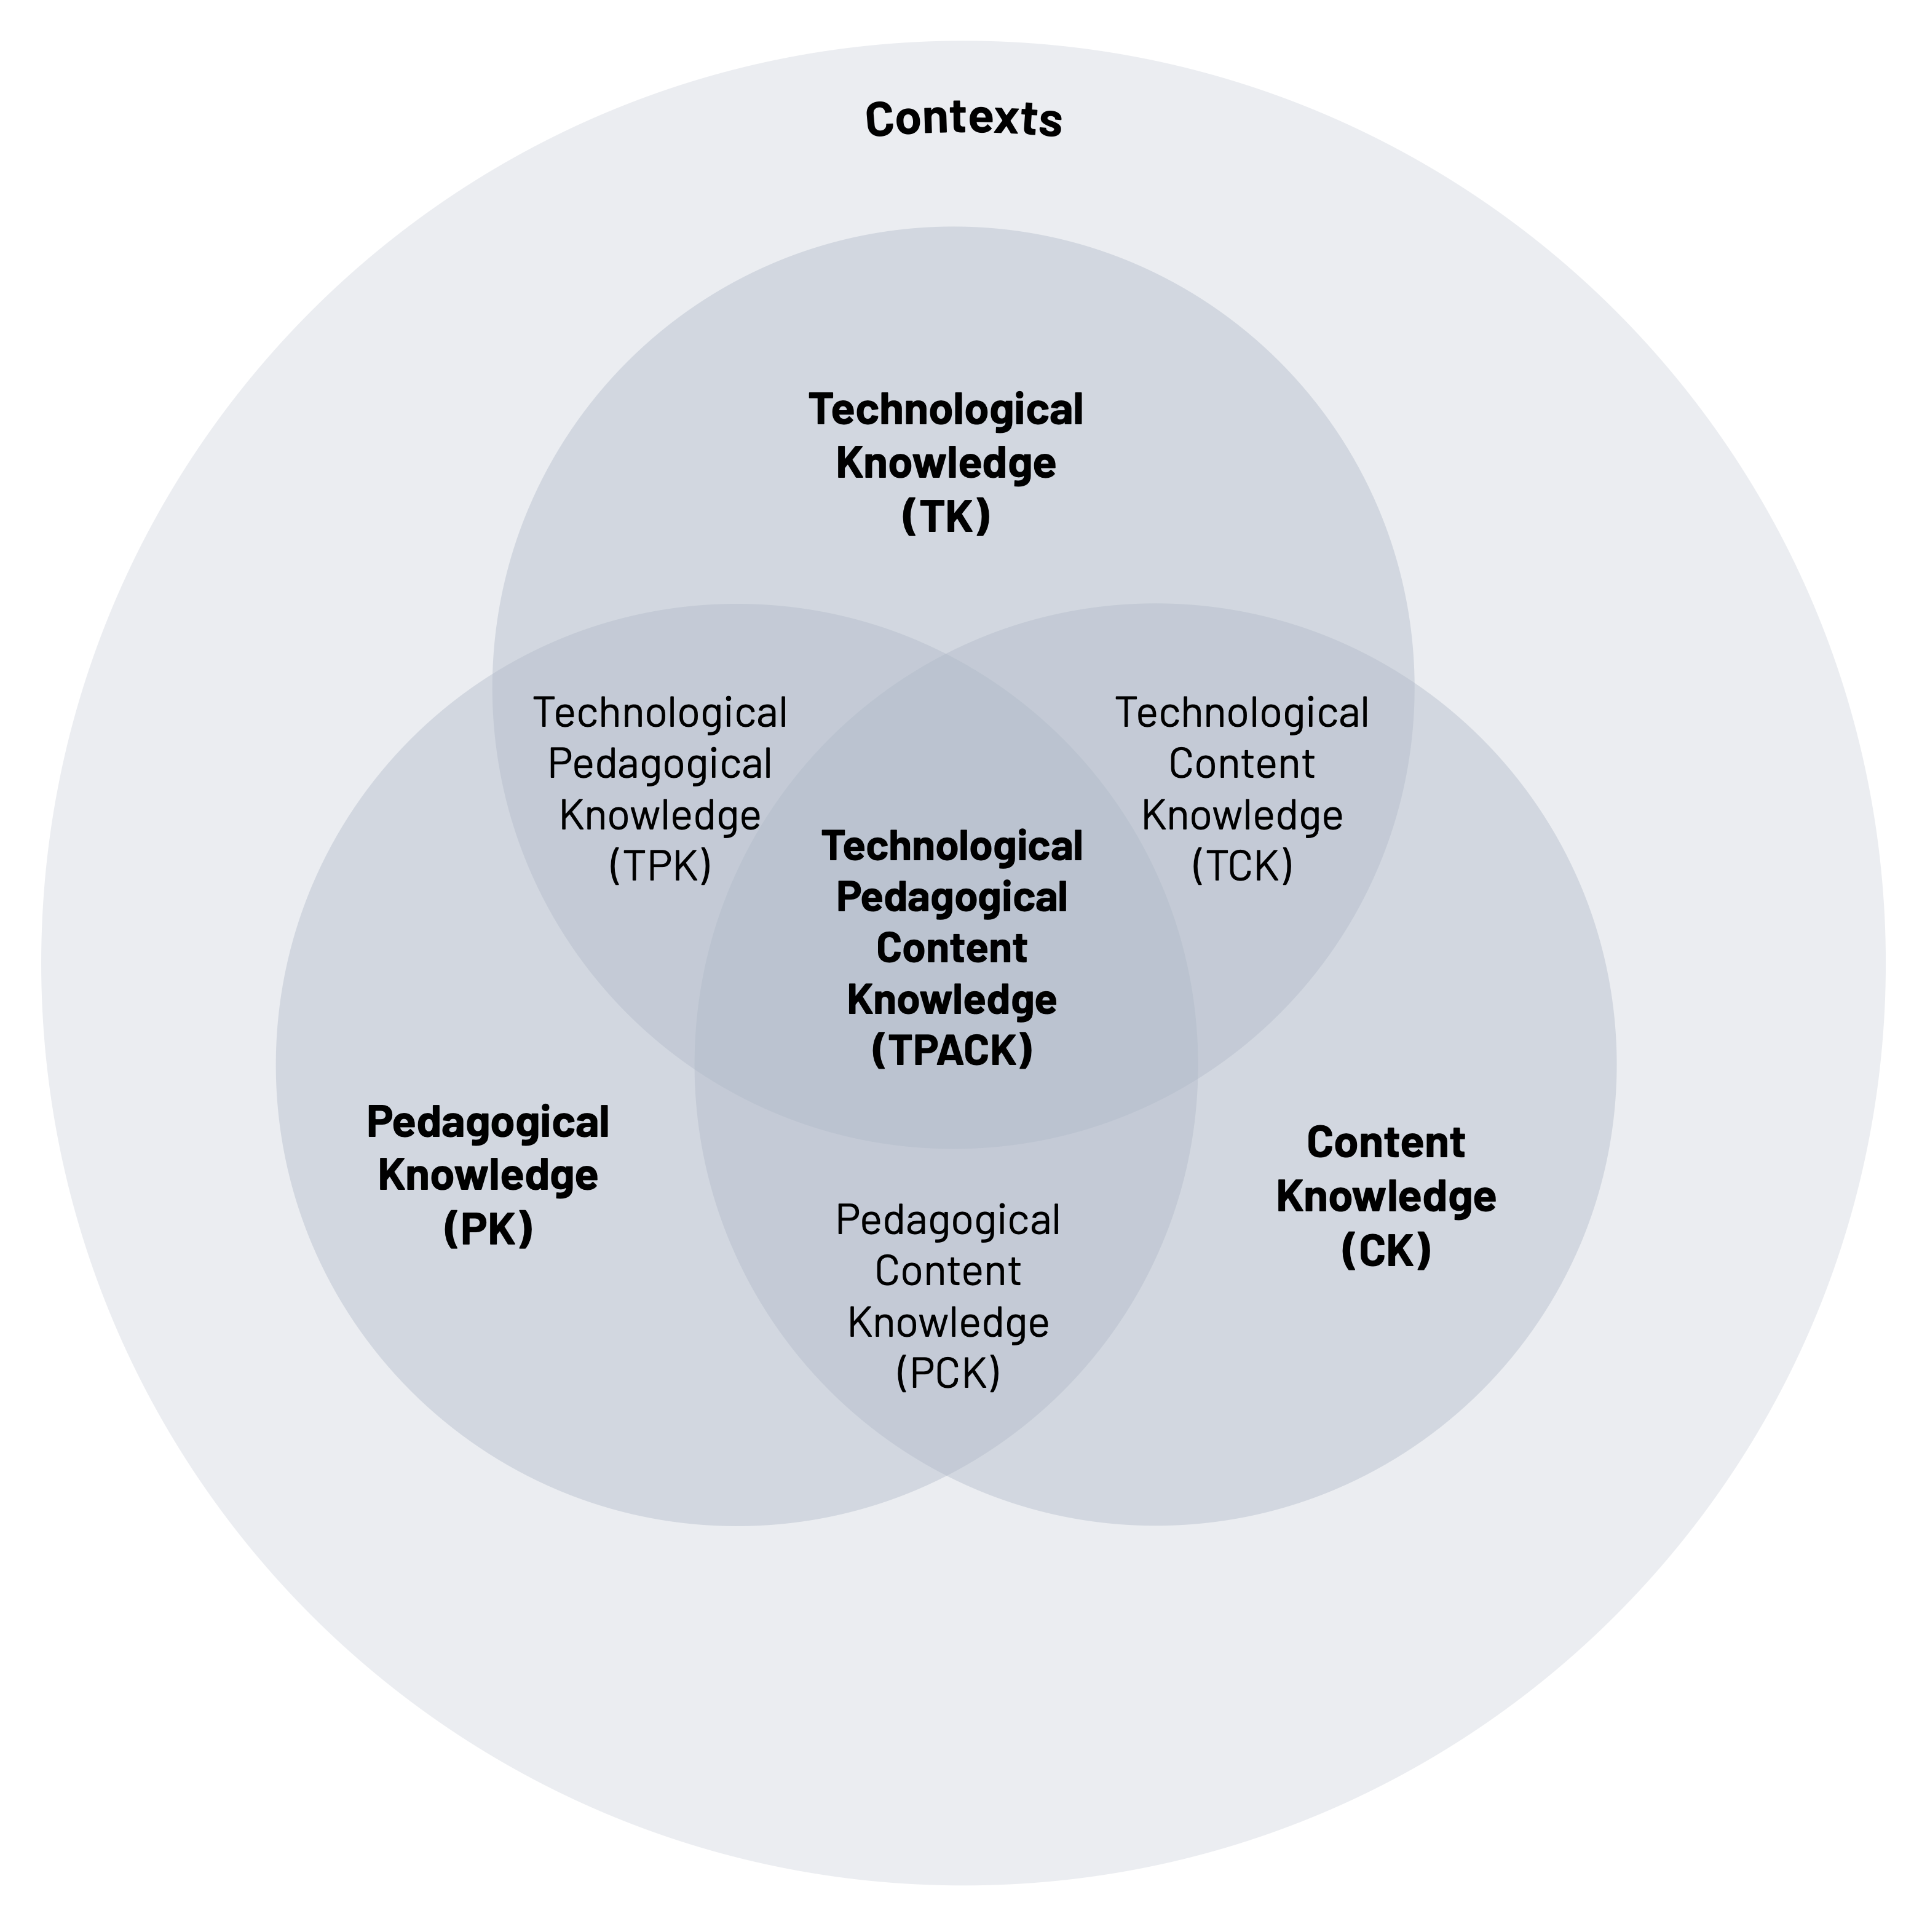
Technological Pedagogical Content Knowledge (TPACK) is a conceptual model that seeks to identify the complexities of knowledge required by teachers integrating technology. The three primary forms of knowledge include Content Knowledge (CK), Pedagogical Knowledge (PK), and Technological Knowledge (TK). The types of knowledge where each of those forms intersect include Pedagogical Content Knowledge (PCK), Technological Content Knowledge (TCK), Technological Pedagogical Knowledge (TPK), and Technological Pedagogical Content Knowledge (TPACK) (see figure 8.1). These relationships are complex, dynamic, and transactional. “Individual teachers, grade-level, school-specific factors, demographics, culture, and other factors ensure that every situation is unique, and no single combination of content, technology, and pedagogy will apply for every teacher, every course, or every view of teaching” (Koehler, 2012, para. 3).
Content Delivery
Teaching Techniques/Instructional Methods
After establishing learning objectives, educators must determine the teaching technique(s)—essentially, how we choose to deliver the planned content (as discussed in the previous chapter)—that will be most appropriate for ensuring students achieve the objectives.
There are many factors to consider when selecting the teaching techniques, materials, and resources that you will need to teach effectively and efficiently. This chapter focuses on specific teaching techniques and provides an overview of the types of technology that you should be familiar with to plan and deliver content. We also recommend reviewing the chapters in this textbook on diversity, equity, and inclusion and inclusive teaching before you continue!
When selecting teaching techniques and technologies to be integrated into your learning environment, it is important to consider the context in which you will be teaching as well as student preferences and capacities. Will you be teaching in the classroom or in an applied learning laboratory (i.e., greenhouse, land lab, ag mech shop)? What type of access do you have in each of the contexts that you may teach in as an agriculture instructor? What resources can our learners access where we teach?
When we choose instructional methods, we have to consider a number of factors, including our learners’ characteristics.
- Learner characteristics
- Gender, ethnicity, age, motivations, interests
- Cognitive development readiness
- Teacher-centered or student-centered instructional strategies
- Selection of materials and resources
- Technology and media
- Access to technology in specific teaching contexts
Teaching Techniques
As your instructional circumstances vary, so too must your teaching techniques. There are two broad categories of teaching techniques that we will discuss in this chapter: group teaching techniques and individual teaching techniques. As an educator, it will be important for you to choose the appropriate technique(s) for a given lesson. You must consider the subject matter to be taught, the objectives to be achieved, learner preferences, teacher preferences, and resources available. As you ponder each of these, there will likely be obvious teaching techniques that best fit your situation. We will explore each of the categories and define specific techniques within each in more detail below.
Group Teaching Techniques
Group teaching techniques are useful when providing instruction to learners in the same setting. If your learning environment is conducive for group teaching techniques, you can maximize your efforts in instructing students that have common needs. Group teaching techniques are appropriate when considering the limited time educators have with learners and when considering that often in educational settings, learners should all have some common factual information for progressing through a lesson. Group teaching techniques are also useful in managing the potential lack of resources available. For example, if a learning environment is short on student reference materials or electronic devices, group teaching may be the most efficient method for educators to teach learners the information needed for a given lesson.
Basic Group Teaching Techniques
Seven commonly used group teaching techniques are:
- Lecture
- Discussion
- Demonstrations
- Field trips
- Role-play
- Resource people
- Cooperative learning
Each technique will be explained in further detail. Table 8.1 provides a brief description of each technique and how an educator may incorporate technology.
Lecture
The lecture is the most used group teaching technique and is useful for sharing factual information. It may often have negative connotations as teachers often fail to plan for lectures that adequately engage learners. Organized lectures with appropriate summaries and clear conclusions are vital for student learning. Visuals are also a useful tool to help learners develop mental images that help provide important frames of reference. Lack of enthusiasm is a major hurdle that educators must overcome when using lectures. How can you effectively use lectures with your learners? Planning is crucial. You should develop a thorough outline of the content to be taught and important concepts to highlight. The organization should be clear and concise and make use of appropriate visuals to help students create mental images. You may choose to organize your lecture outline in any of several orders, such as
- Chronological
- Spatial
- Cause to effect or effect to cause
- Problems and solutions (problems, possible solutions to each, conclusions for each)
- Topical
As you present your lecture, you should be enthusiastic and avoid distracting mannerisms. Leverage visuals to aid in illustrating the major points and provide summaries throughout the lecture and again at the end. The end of the lecture should often present very clear and specific conclusions.
Discussion
Discussions are often used when the educator wishes to serve as a facilitator while learners develop critical thinking and argumentation skills. Discussions require careful planning as leading questions are often the driver of this teaching technique. The important categories of information to include in a discussion plan are:
- Sequence
- Important subject matter and key points to highlight
- Leading questions
- Teacher directions
As you prepare your discussion plan, the sequence of events is critical to ensure it has a logical flow, thereby making it easier for students to follow. Failure to include the important subject matter or key points to highlight will likely result in the omission of that information. Having the important points documented in your plan serves as a reminder to emphasize the information during the discussion. For new and beginning educators, questioning can be a difficult teaching skill. You will want to spend time developing questions to help your learners think critically about the subject matter being learned. Teacher directions serve as a guide for specific examples that you want to share with your learners during the discussion. For example, you may include a note to share a specific example to help clarify a point during the discussion. Altogether, these four categories of information can help ensure you facilitate an effective and engaging discussion.
Another important aspect to consider when planning discussions is the specific format you will use. Common formats include whole class, brainstorming, buzz groups, and pair-share.
Whole Class
Leading questions are posed, and learners offer answers. This process continues until the major points to be covered are clearly explained. The educator serves as the facilitator of the discussion to ensure it stays on track and progresses appropriately.
Brainstorming
You can also provide the whole class or small groups of learners with a specific problem or topic and ask them to develop as many ideas, answers, or solutions as they are able to. Quantity versus quality is usually desired when utilizing the brainstorming discussion method. As such, it is important to not hamper creativity or judge student responses. Once the list of responses has been gathered, they can be evaluated and pared down as needed to meet the objectives of the lesson.
Buzz Groups
Buzz groups are small groups of three to seven learners that discuss a specific problem or topic and develop the best possible solution or answers. In contrast to brainstorming, which is concerned with quantity, buzz groups are more focused and purposeful. After the individual groups have finished the discussion, the educator facilitates reporting out to the whole class.
Pair-Share
Pair-Share is a quick and effective discussion method that tasks learners with developing their own idea or opinion to a question or problem before pairing with another learning and sharing. The two learners discuss and try to formulate the best solution collaboratively.
Discussion can be intimidating to learners for myriad reasons. Topic selection, fear of ridicule, or ambiguous questions are just a few examples. A skillful educator will plan discussions in such a way that learners feel comfortable engaging with their peers.
Demonstrations
The psychomotor domain is developed through hands-on application. Agriculture, with its many psychomotor skills that need to be practiced, is bursting with opportunities for demonstrations. Simply talking about a skill will not translate to the learner acquiring the ability. Learners need to see and practice to gain specific psychomotor skills. As the teacher, it is your responsibility to produce a step-by-step procedure that learners can follow. You must be prepared with explanations, illustrations, and provide the learners with an opportunity to practice. When planning to use demonstration, you must determine what you wish to accomplish, which must align with what is possible. This means the teaching objective must be able to be demonstrated, have an appropriate scope, and be appropriately challenging.
While spontaneous demonstrations can arise in a learning situation, most should be planned. Once you have selected a skill that would be best taught via demonstration, develop the step-by-step instructions to follow. Be sure to indicate the key points to share for each step. Then you should create a list of the necessary materials for each step in the demonstration. This is crucial and helps avoid oversight during the initial and succeeding demonstrations. As you prepare to teach the selected skill, following these simple steps will ensure a successful demonstration:
- Assemble materials
- Establish the “What’s in it for me?” on the part of the learner
- Provide an overview of the process you will be demonstrating
- Present each step
- Repeat challenging steps as necessary
- Repeat the entire process
- Allow learners to practice
The range of skills that an agricultural educator may want to demonstrate is vast. To ensure a successful demonstration, you must possess a certain level of mastery for the skill being demonstrated. This may require practice on your part or the selection of a different teaching technique. Total mastery on your part may cause you to omit certain steps that a novice may need to be successful. You must think about where your learners are at and plan accordingly. Another concern is class size. Large class sizes can be a hindering factor in demonstrations as some learners may not be able to see or hear you walking them through the steps. Supervision of learners practicing is also a factor you need to plan for. You may need to develop a rotation procedure to allow learners an opportunity to practice the skill. Safety should always be considered.
Field Trips
A field trip is a great way to provide students with opportunities to observe and participate in real-world situations. While your program may not have the facilities or resources to accompany instruction in agriculture subject matter, you can make use of field trips to provide concrete frames of reference for students. Field trips are a great way to vary your instruction and provide an enriching learning experience for students. Field trips can be used to create interest at the beginning of a unit, to provide closure and reinforce the relevance of the content at the end of a unit, and for deeper exploration of what is being learned anytime in between.
Effective field trips require careful planning. Failure to plan will certainly lead to a less than desirable experience for all involved. Follow these steps to ensure your field trip is successful.
- Establish the goals for the field trip.
- Determine the specific learning objectives that the trip will address.
- Select an appropriate site for the field trip.
- Consider the quality of the experience to be seen, a site’s willingness to host learners, the distance to the site, and the cost.
- Secure approval from your administrator
- Follow your local policies and procedures for requesting field trips. Some school districts may require advance notice of a month or more.
- Make specific arrangements for the field trip.
- Select a date and time, create an outline of what the learners need to see and do to align with the goals and objectives of the trip, and always check on the parking situation (especially if you are traveling by bus).
- Prepare students for the field trip.
- Work with your learners to develop a set of questions to be answered by the field trip. Communicate the objectives of the experience to the learners so they know what to expect when they return. Discuss proper conduct, expectations for attire, eating arrangements, and any money needed for the trip.
- Conduct the field trip.
- Ensure you have all the necessary documentation based on local policy and procedures. Provide the host site with a courtesy reminder about your arrival time. Manage student behavior.
- Summarize and reflect on the field trip experience.
- The field trip should not end upon departure from the field trip site. You should facilitate a summary and reflection exercise with the learners to develop conclusions to be drawn from the experience. Challenge your learners to develop plans for applying what they have learned.
Role-play
Providing learners an opportunity to practice specific skills or abilities in an approximated real-world scenario can be a powerful experience. As you consider the skills that learners need for competing in society, using the role-playing teaching technique may provide them with an edge. Role-playing involves having those in the learning environment play or portray a given role. The experience of playing the role and the analysis of the situation help learners develop the skills or information needed for the subject being learned. Do you want your learners to master basic agricultural sales skills? Should they know how to properly introduce strangers or conduct a phone conversation with important stakeholders? This is where role-playing shines. It is most effective for topics relating to human relations, leadership, and sales skills.
When deciding to use role-playing, ensure the situation and assessment are aligned to the objectives. Meaningful closure should be provided to capture the key learnings to be gleaned from the role-play. Since the role-play experience will involve lots of student-student interaction, you should be explicit in laying out your expectations. Communicate the purpose of the role-play with your learners and the importance of supporting each other. Being teased or ridiculed often becomes a barrier to learning.
Resource People
Resource people are incredibly useful in teaching agriculture. You are likely not an expert in all subjects you may teach, but as an effective educator, you know how to ensure your learners are getting the knowledge they need to be successful. Resource people are often experts and can help deliver needed information or provide a different perspective on a topic. Using resource people helps build connections between your learners and key individuals in the community—those that may help your learners make decisions in the future. To be most effective, resource people should be more than guest speakers. Resource people may supplement what is being learned, help add relevance to the topic, or endorse a specific process or practice.
Resource people are akin to consultants to the agricultural educator. As such, you should ensure that you provide the individual with information about your learners and the specific objectives for what is being taught. Work with your learners prior to introducing the resource person to develop questions to maximize the effectiveness of this teaching technique. You should be actively involved in any interaction between the resource people and your learners. For example, you may need to promote the raising of questions from learners or provide clarity on the information presented by the resource person. You want resource people to have a positive experience with your learners, so you need to communicate expectations and encourage appropriate behavior for interaction.
Cooperative Learning
Cooperative learning is a teaching technique that empowers students to assume more responsibility for their own learning. Cooperative learning promotes the development of group processing and social skills, which are important college and/or career readiness skills. Learners, in groups of three to five, work together toward a common learning goal. The groups are often intentionally selected, and the learners assign roles once they begin working together. Depending on the situation, these cooperative groups may work together for one lesson or several weeks. Learners help hold each other accountable and provide support as they work toward the learning goal.
| Technique | Description | Incorporating Technology |
|---|---|---|
| Lecture | Transmit factual information, provide explanations, supplement or enhance readings | Record short lecture videos or podcasts |
| Discussion • Whole class • Brainstorm • Buzz group • Pair-share |
Students respond to a well thought out, leading question until the major points have been developed and explained | Create an online discussion board with the class or others from around the world |
| Demonstrations | Show students how to perform a process or task | Record video demonstrations, VR demonstrations |
| Field Trips | Showcase a real-world setting related to course content | Conduct virtual field trips, VR tours |
| Role-Play | Portray a given role and analyze it to learn about a topic or concepts | Act out a sales pitch to a potential client via videoconferencing platforms |
| Resource People | Work with a “consultant” who aids in teaching or reinforcing content | Connect with experts from around the world via videoconferencing platforms |
| Cooperative Learning | Intentionally select groups of three to five learners to work together on a well-defined learning task | Utilize a digital collaboration tool to facilitate group work |
Table 8.1: Group teaching techniques.
Individualized Teaching Techniques
Every learner has their own unique needs. In an ideal situation, the teacher would establish specific goals for each course and every learner could work to achieve those goals consistent with their own unique needs and abilities. Each learner would have the needed materials, approaches, and support to assist them on their learning journey. In formal settings, this ideal situation can be difficult. However, a quality educator remains committed to supporting every learner and can do so by leveraging individualized teaching techniques. Great educators will use a variety of group teaching techniques and individualized teaching techniques. This provides variety to the learning activities. As you consider individualized teaching techniques, you must be aware of the needs of your learners. These techniques not only allow you to individualize the learning, but they can also help learners develop the ability to inquire into subject matter. Learners no longer need to wait for someone to tell them what they need to know, as they are actively seeking information. This helps them become independent problem solvers. Through the selection of appropriate individualized teaching techniques, learners begin to critically evaluate and apply information. Leveraging individualized teaching techniques can empower learners to take ownership of their learning journey.
Basic Individualized Teaching Techniques
Five commonly used individualized teaching techniques are:
- Supervised study
- Experiments
- Independent study
- Student notebooks
- Information sheets, assignment sheets, skill sheets
Each technique will be explained in further detail. Table 8.3 provides a brief description of each technique and how an educator may incorporate technology.
Supervised Study
Supervised study is a technique that allows learners to use basic reference materials to find answers for themselves. The learners do not have to depend on the teacher to provide the information and can obtain specific information that they need independently from what other learners may need. Supervised study also allows the teacher to work with individuals that may need additional support. As with any teaching technique, planning is crucial. You should determine the desired outcome of the supervised study, decide on the resources to be used, and plan how the learners will conduct the supervised study. There are six basic types of supervised study which include:
- All learners study the same problem using the same reference materials.
- All learners study the same problem using different reference materials.
- Small groups study the same problem using the same reference materials.
- Small groups study the same problem using different reference materials.
- Small groups study different problems using the same reference materials.
- Small groups study different problems using different reference materials.
The decision on which type of supervised study is based on the reference materials available and the desired outcomes of the technique. It is important that prior to implementing supervised study, you clearly define the problem, communicate what information the learners need to discover, and provide direction to meet the desired outcomes.
Experiments
Experiments create a high level of learner involvement, which often translates to increased interest. Experiments challenge students to use their minds and to be physically involved in setting up the experiment, making observations, collecting data, and developing conclusions. Experiments allow for concepts, theories, or approved practices to be graphically illustrated. This teaching technique helps promote systematic thinking. You must emphasize the importance of being systematic, clear, and thorough throughout the experiment. In drawing conclusions, learners learn that all the facts must be considered.
As you consider using this technique, you can identify an appropriate experiment or work with your learners to design an experiment to solve a problem. Once the experiment is identified, outline the procedures to follow, how to collect and record data, and a list of supplies and materials needed. If you design an experiment for learners to conduct to solve a problem, it is recommended that you also have an idea of the basic findings and conclusions the experiment is intended to reveal. At the conclusion of the experiment, the whole group should benefit from the knowledge gained, which is generally achieved through a report. You should work with your learners to standardize reporting procedures. Figure 8.2 offers a list of ideas for experiments. Though not exhaustive, it is intended to help you begin thinking of other ideas for experiments.
| Subject Area | Ideas for Experiments |
|---|---|
| Production Agriculture | • What herbicide controls weeds best? • Which ration is best for a given species of livestock? • How does planting date affect yield? |
| Horticulture | • What is the most effective way to propagate a given plant? • What effect does soil sterilization have on plant growth? • What is the best method to control a given insect or disease? |
| Agricultural Mechanics | • How does temperature affect oil viscosity? • How does the spark plug gap size affect engine starting performance? • How does amperage affect weld strength? |
| At-Home Experiments | • How does technology use before bed impact sleep quality? • How does the consumption of different types of food at breakfast affect energy levels throughout the morning? • How does exposure to natural light versus artificial light affect overall mood? |
Table 8.2: Ideas for experiments by subject area.
Independent Study
Independent study is any form of study that is conducted by an individual learner. Supervised study and experiments, if completed by individual learners, are considered independent studies. However, the independent study can be leveraged beyond those examples. The main goal of independent study is to meet the needs on individual learners. You may encounter a situation where a learner can’t physically complete a planned learning activity. Therefore, independent study can provide a meaningful alternative. Independent study can be reading, self-paced instructional units, computer-assisted instruction, or many other formats. During independent study, you take on a facilitator role. The learner assumes responsibility for their own learning. This technique can add variety to your instruction, but it also promotes learner independence. You may need to teach learners how to study independently for this technique to be successful. Additionally, you should work with your learners to apply what is learned from the independent study so that it is not a meaningless exercise. Independent study can occur during class or lab or outside of traditional instructional time. While the format for each learner’s independent study will vary, some structure is still needed to help them progress. A sample structure is below.
Sample Independent Study Structure
- What is the problem to be solved?
- What are the questions that must be answered?
- What references will I use?
- What steps will I follow in conducting my independent study?
- What will I learn from my study (a summary)?
Notebooks
Notebooks are a great way for learners to organize and accumulate their knowledge and can serve as a constant reminder of what was learned and how all the pieces fit together within a unit or course. Notebooks can also be a great reference for future problems or studying for quizzes or tests. Good note keeping promotes learning. High-quality notebooks require a commitment from the educator. You have to teach your learners how to set up their notebooks and the expectations for adding to the notebook as learning progresses. You can provide learners with a recommended note-taking format to keep everything uniform. You should continually remind learners of the importance of a high-quality notebook and evaluate the notebooks periodically. The format, electronic or hard copy, can be based on your preference or the needs of your learners.
Study Sheets
Another way to individualize learning is to use specific study sheets that are designed to guide a learning experience. Information sheets, assignment sheets, and skill sheets are the common study sheets used and are most often associated with laboratory learning. These study sheets allow learners to learn at their own pace and to progress when they are ready to do so. The study sheets are narrow in scope and should be developed to be suitable for the majority of the learners.
Information Sheets
Information sheets are short handouts that include basic information (the what, why, and how) a learner needs in order to perform a specific skill or job. While they can be used to introduce learners to information for the first time, they are also useful in providing a synopsis or summary of previously covered material.
Assignment Sheets
An assignment sheet details an assignment that learners should complete, how to complete it, and how to check the assignment for completeness.
Skill Sheets
Skill sheets are similar to assignment sheets but are more limited in scope. Skill sheets focus on a specific skill and provide guidance to the learner in developing and mastering the skill. Step-by-step instructions with illustrations help learners visualize the specific skill.
Many factors go into considering the teaching techniques to be used. For individualized teaching techniques, it is imperative that you consider the readiness of the learner. In order for a learner to pursue independent study, they must be able to organize thoughts, read, manage personal behavior, and synthesize information. You may have some learners that will never fully meet these conditions while others may thrive. This highlights the importance of knowing the needs, skills, abilities, and interests of your learners. Variety is important and with the range of group and individual teaching techniques discussed, you can maintain student interest while working toward the desired outcomes of your program.
| Technique | Description | Incorporating Technology |
|---|---|---|
| Supervised Study | Seek answers to clearly defined problems with guidance from the teachers (i.e., providing specific resources). Work with the students to arrive at a final conclusion with this method. | Use the internet to search for the information being sought; Use online user manuals to research information based on questions developed by the teacher |
| Experiments | Explore a phenomenon (most often via the scientific method). Gather facts and draw conclusions and graphically illustrate important concepts, theories, or practices. | Electronically log of all the steps in an experiment; Digitally report the results of an experiment; Use electronic sensors to help conduct experiments |
| Independent Study | Learners individually conduct a study. Use this opportunity to meet their individual needs. | Use an electronic form to gather information from learners about their interests and abilities related to the course to assist in designing independent study tasks; Allow learners to use the internet or other digital resources for independent study |
| Student Notebooks | Organize and document learning throughout a course. | Allow learners to create a digital notebook to document their learning; Use digital interactive notebooks |
| Information Sheets, Assignment Sheets, Skill Sheets | Use specific study sheets that are designed to aid in guiding learning experiences. | Use digital study sheets; Use video information or assignment sheets |
Table 8.3: Individual teaching techniques.
Incorporating Technology in Instruction
Technology has transformed many aspects of our lives. It has the potential to do the same for teaching and learning. As educators, we should embrace and leverage the transformative power of technology to create exciting and engaging learning opportunities, or risk leaving our students at a competitive disadvantage in the technologically advanced workforce. Technology integration requires careful planning and appropriate pedagogical practices to be successful.
Common forms of technology we incorporate into our learning environments include productivity software, learning management systems, content delivery platforms, and assessment tools. Generally speaking, we will likely use technology to plan, create, and deliver content; assess learning; and empower students as creators.
Examples of technology used to plan, create, and deliver content and to assess learning may include:
- Productivity software (e.g., Microsoft Word, Google Docs), computer, projector, smartboard
- Presentation software (e.g., Microsoft PowerPoint, Google Slides, Prezi)
- Graphics/Videos
- Learning management systems (e.g., Canvas, Google Classroom)
Examples of technology we may use to empower students to create high-quality products or representations of their learning may include:
- Web 2.0 tools (e.g., blogs, social media)
- Presentations, graphics, videos
Table 8.4, although not exhaustive, provides a couple of easy-to-implement examples of how to leverage technology from a teacher and learner perspective.
| Technology Example | Teacher Use | Learner Use |
|---|---|---|
| Productivity Software | Use a word processor to develop unit and lesson plans. | Use presentation software to create a project report. |
| Presentation Software | Use a video recording platform to record short lectures or instructions for learning centers. | Have students develop video presentations to represent their learning. |
Table 8.4: How to leverage technology.
Digital Divide, Access, and Accessibility
Although technology has impacted many aspects of our daily lives, its full potential remains out of reach to millions of people. The term “digital divide” refers to the gap between individuals who have access to computers and the internet and those who don’t.
It is important to analyze our specific situations to know what is and isn’t appropriate in our local communities. Access to broadband internet remains a privilege with very limited access to individuals in rural areas. According to the Federal Communications Commission, a quarter of rural Americans and Americans who live in Tribal lands lack access to reliable and affordable high-speed internet. Lower-income families are less likely to own personal computers or tablets. Many learners rely on school programs to provide devices for educational use.
As we prepare for instruction, we should consider what we already have. What technology resources are available in our learning environments, our schools, our communities? What access do our learners have and what access do they need? Develop a short survey asking about learners’ technology access and use. Develop opportunities for learners of all access levels. For example, post instructional materials online, but also have physical copies for learners without access.
There are also many governmental and nongovernmental programs to help fund technology-assisted learning. The United States Office of Educational Technology, part of the US Department of Education, offers grants and funds to support remote learning and connectivity (for more information, visit https://tech.ed.gov/funding/). We can also leverage other creative solutions, such as crowdsourcing and fundraising, to support technology in our learning environments.
Accessibility and Assistive Technology
Accessibility is a broad concept that applies to content, devices, and digital tools. Accessible technology removes barriers for students with varying cognitive and physical abilities. As educators, we have a moral and legal obligation to ensure that we provide our learners with accessible materials, including content and technological tools.
Some forms of technology have been specifically created to help learners fully integrate into a learning environment. Assistive technology is equipment or software that helps learners navigate their environments while managing challenges with learning, communication, or mobility. Assistive technology includes high-tech tools like augmentative communication devices or accessibility features on devices such as text to speech, word prediction, and optical character recognition. The term can also apply to physical parts of the learning environment, including furniture and peripheral tools like keyboards.
Examples of accessible content may include closed captions for videos, alt-text that describes an image, text-to-speech functionality, or screen magnifiers. Most technological tools have built-in accessibility checkers and can provide recommendations for changes that can make content more accessible. Additionally, we can work with resource personnel to ensure the technology we use or the content we create is accessible to all learners, regardless of abilities. For more information, visit https://www.w3.org/TR/WCAG20/.
Specific Examples of Technology Integration
Learning Management Systems
A learning management system (LMS) is a set of software that centralizes the administration, tracking, and reporting of educational activities. An LMS allows instructors to develop a course schedule, register students, and assess their learning outcomes in one platform (Ninoriya et al., 2011). LMSs are used for a variety of administrative and teaching tasks, including tracking student attendance, delivering content, and recording assessments.
The list of enterprise (paid) and free LMS options are always evolving. At the time of this printing, the top three enterprise LMSs used in the United States are Blackboard, Canvas, and Moodle (Edutechnica, 2020). Google Classroom is a free alternative that integrates email, calendars, and document sharing within the Google app suite; by 2017, it was used by half of K-12 students in the United States (Singer, 2017). Schoology incorporates elements of social media and gamification—applying elements of game playing, like competition and scoring points—to educational activities in its interface, making it well suited for all learners (Fenton, 2017).
Learning management systems have many benefits. They are portable, often accessible from a host of mobile devices, and scalable, meaning they can be implemented in both small and large groups of learners. They can be integrated into hybrid instruction, or teaching that includes elements of both in-person and distance learning (Whiteside, Dikkers, & Lewis, 2017), allowing instructors to move from a physical learning environment into the digital space.
At the same time, it’s important to recognize LMS platforms’ drawbacks: They can be expensive to license, especially if they’re not supported by a school system, though free options exist. They require technology inputs, including stable internet connections and hardware like laptops or tablets. There is also something of a training learning curve for instructors, especially as technologies and platforms are constantly changing. Care must also be taken to ensure that the LMS and its tools and operations are accessible to users with physical or cognitive challenges.
Strategies and Best Practices for Teaching, Management, and Assessment with an LMS
When teaching with an LMS, you must remember that it is not itself a teaching tool; rather, it’s a means of organizing and sharing information and activities with learners. There are a number of web tools available that can be incorporated into and deployed by an LMS, but we shouldn’t rely on the LMS alone to deliver content.
When developing content to share via LMS, remember to take advantage of multimedia features. For example, a lecture captured on video may be more engaging than a list of slides for students to review. Many LMS platforms allow learners to upload responses in audiovisual format, turning them from multimedia consumers into content creators.
From a management standpoint, it’s important to set expectations for learner and instructor activities in the LMS. Before we begin a session, we should explain how our LMS works, and how we will use it in our learning environments. Make sure learners are comfortable with the format and functions before turning them loose.
LMS platforms allow us to assess learning and gather feedback through quizzes, surveys, and polls. These assessments let instructors choose from a variety of question types, set time limits and deadlines, and ease their workload through automatic grading of multiple-choice, matching, or true/false items where applicable. Learners can also be prompted to upload portions of an assessment—for example, a schematic they’ve drawn or calculations they’ve attempted.
Teaching Techniques Reimagined
Virtual Field Trips
Firsthand experiences like field trips are important parts of an educational experience. However, visiting locations such as farms, production facilities, and factories is becoming increasingly difficult due to tightening biosecurity, health, and safety restrictions. In addition, in-person visits require funding and instructor time to coordinate schedules, acquire approvals, and arrange transportation. Virtual field trips (VFTs) offer an alternative for getting learners into off-limits or geographically distant spaces.
Like in-person field trips, VFTs help learners understand and connect with a profession by placing them in the field with experts—the key difference being that VFTs rely on technology, like prerecorded videos, 360-degree viewers, and teleconferencing software, to make the “visit” happen. VFTs may be synchronous, meaning that learners and hosts interact with each other live via web cameras and microphones, or asynchronous, meaning that the virtual tour or visit is recorded in advance and shared in an online platform like YouTube or an organization website.
VFT Best Practices
When we’re considering participating in or creating a VFT, there are several elements to consider. It’s important to introduce our students to the subject of the experience before engaging in the virtual trip. These pre-VFT materials could include readings, pretests, and in-class activities. As with any learning endeavor, we should also be prepared to assess student engagement and learning after the experience. Posttests, surveys, or debrief discussions can help reinforce key takeaways. We can incorporate a VFT into a project that uses information gained in the field trip, or even assign students to plan and host their own virtual trips with instructor support.
Preparation is key to a successful virtual field trip. Hosts in the field and instructors in the class should all test their equipment, including cameras, microphones, and internet connections, in advance of the experience. If the VFT is synchronous, ask learners to prepare questions for the speaker or host in advance. Though new questions will almost certainly arise as the VFT ensues, this will prevent any pauses or disruptions to the flow of conversation. If we’re planning or organizing a VFT, recording and archiving these experiences, so that learners can refer back to them, is also helpful.
Immersive Technology
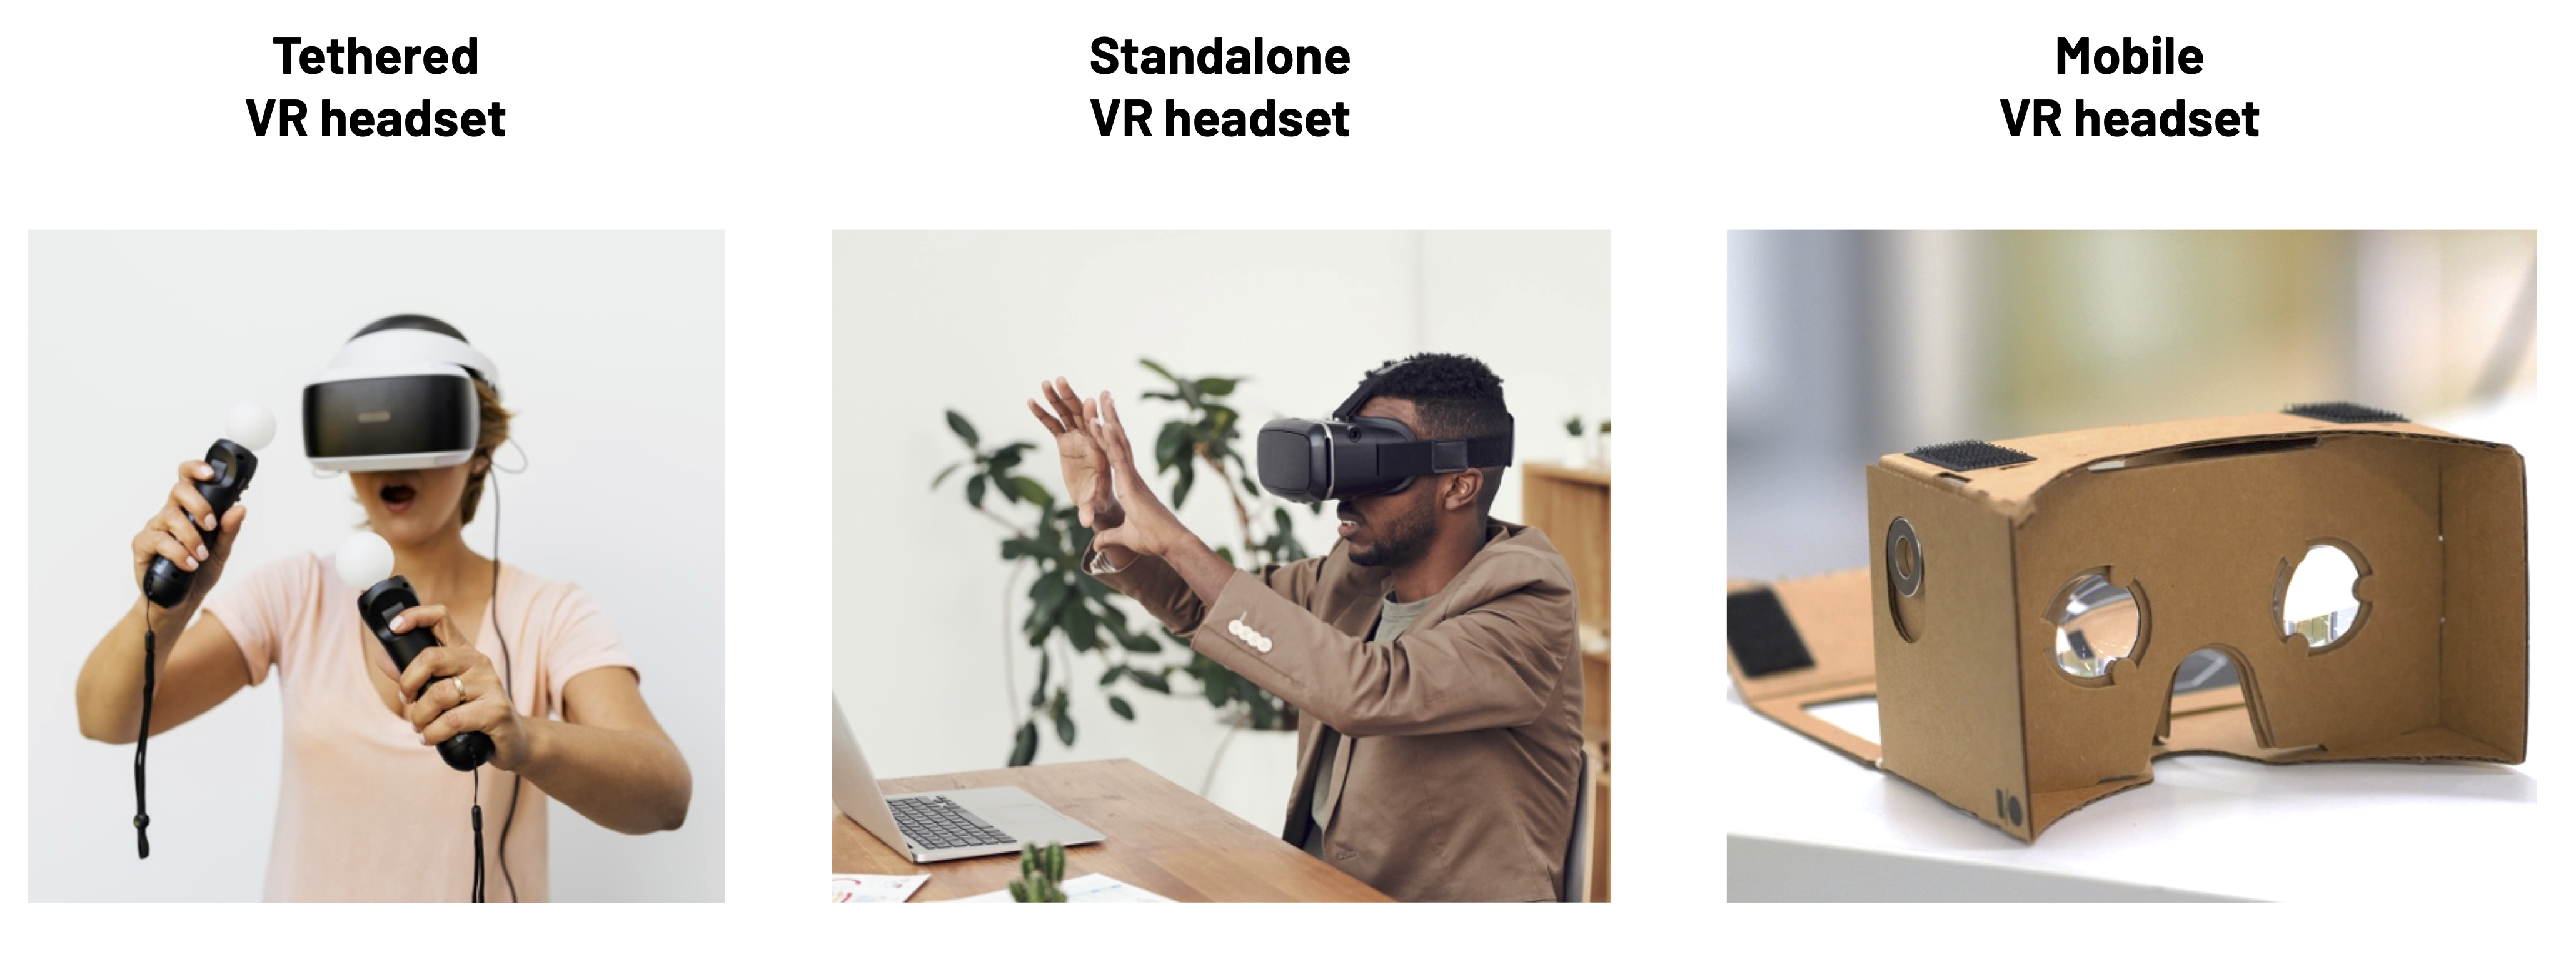
Immersive technology is a term used to describe technology that replaces or extends the physical environment. Examples include augmented and virtual reality. Augmented reality (AR) is when digital artifacts are overlaid into a real environment on a screen (e.g., smartphone). Virtual reality (VR) is typically defined as a fully immersive experience where the environment is completely replaced with a digital environment, usually via a headset (see figure 8.2).
Virtual Reality
Originally, fully immersive VR experiences required a powerful VR-ready computer and a tethered VR headset. Now, stand-alone VR headsets that don’t require a costly computer are readily available. Costly computer equipment can be a barrier for many schools. The power of VR is still within reach through mobile VR experiences. Mobile VR utilizes smartphones to deliver limited-capability VR experiences. These experiences are most often in the form of 360-degree videos that can be used with or without a mobile VR viewer.
Augmented Reality
Augmented reality brings abstract concepts to life via a smartphone or tablet. Students can now hold a strand of DNA or rapidly prototype and see their creations as a digital artifact before production. AR can also provide information on objects that can enhance and extend learning.
Immersive experiences are well supported with several pedagogical theories. Such theories that support immersive tech and VR use include situated learning, experiential learning, embodied interaction. (For more information about pedagogical theories see chapter 3, “Principles of Teaching and Learning.”)
Much like VFTs, immersive technology applications can mitigate safety and security hazards that are associated with agricultural occupations. You can use immersive experiences to train students, to gamify content, or to connect students to experts in other parts of the world. Immersive experiences can eliminate time, place, space, and financial constraints.
We have used immersive experiences to help train students on shop safety, candling eggs, proper cattle handling, veterinary skills training, and animal waste management.
Virtual Simulations
Simulations have long been a staple in educational settings. Simulations put students into situations that mimic the real world in order to create a real-feel experience. Many professions rely on simulations as they offer lifelike experiences for beginners and experienced individuals alike. Depending on the complexity and the technology readily available in your classroom or school, simulations can be used for an entire class, groups of students, or as an individual activity.
Consuming versus Creating
Many immersive applications exist that can be used in your program, but to take learning to the next level, you can shift students from consumers of those experiences to creators of those experiences. For instance, you can have students create their own virtual tours or immersive training content with 360-degree cameras (or a smartphone application) and readily available software.
Example Checklist for Creating Virtual Tours
- Identify the purpose of the virtual tour.
- How does the virtual tour help students achieve the objectives?
- What do you want the students to gain from the virtual tour?
- Create a storyboard.
- Sketch out the scenes or develop a list of scenes that contain what you want students to experience.
- Include points of interest that you want students to notice in each scene.
- Write out instructions for each scene.
- Visit the site to take 360 photos (or use existing 360 photos).
- Using a 360 camera, or existing 360 photos, collect all the needed assets.
- Create the virtual tour.
- Using your preferred virtual tour platform, construct the virtual tour based on your storyboard.
Many agricultural communications programs create publications, public relations campaigns, and other communications artifacts as projects in advanced courses that can be shared with a wide audience. They assume roles (remember role-playing?) as staff members for a magazine or communications firm, utilize their skills, and produce materials that they can distribute to clients, readers, or other stakeholders. Publications like newsletters and magazines can be easily shared with inexpensive tools such as Issuu, an online publishing platform. Educators can get free licenses for tools like Adobe Express, which allows students to create social media posts, interactive web pages, and videos using tablets or smartphones. Students at Ohio State University have created many great examples of this type of project. To see their work, visit https://u.osu.edu/agrinaturalist/.
Generative Artificial Intelligence
Generative Artificial Intelligence (AI) is a subset of artificial intelligence that leverages machine learning models to generate content. These models are trained on large language data sets, learning to create similar outputs based on the patterns and structures they’ve learned. This includes creating anything from articles and reports to poems, music, and even realistic images. Generative AI has grown in popularity and is becoming ubiquitous across many industries, including education.
Pros of Generative AI in Education
One of the most powerful uses of generative AI in education is the potential for personalized learning. By analyzing a student’s learning patterns, comprehension level, and areas of strength and weaknesses, generative AI can create customized educational content tailored specifically to that student’s needs. This enhances the learning experience and can lead to improved academic performance.
Generative AI also has immense potential in making education more accessible. For instance, it can be used to generate learning materials in multiple languages or create synthesized speech for visually impaired students.
Furthermore, generative AI can help educators by automating some of their workload. It can generate quizzes, assignments, and tests based on a given syllabus or learning material, freeing up time for educators to focus on instruction and student engagement.
Finally, generative AI can be used as a creative tool in the classroom. Students could use it to generate ideas for essays, stories, or art projects. It’s a great way to introduce students to AI technology and inspire creativity.
Cons of Generative AI in Education
While generative AI holds great potential, it’s essential to be aware of its limitations and challenges. One of the biggest concerns is the quality and accuracy of generated content. Without careful oversight, AI can produce content that is misleading or inaccurate.
Generative AI also presents ethical considerations. These systems could potentially be used to create plagiarized work or disinformation, so educators must instill ethical usage principles in their students.
Furthermore, there’s the risk of over-reliance on AI in the learning process. Generative AI should not replace the role of educators but rather serve as a tool to supplement and enrich the educational experience.
Examples of Generative AI in the Classroom
Chatbots powered by generative AI can simulate conversations with students, answering queries and providing explanations about a particular topic. Generative AI can be used in storytelling or creative writing classes, where a model like GPT-4 can generate story prompts or continue a narrative based on student input. This can be an exciting tool to stimulate creative thinking and improve writing skills.
As you promote inquiry among your learners, generative AI can be leveraged to help brainstorm and refine research questions for projects or experiments. It can even be used to provide suggestions for methodologies or sources of information.
While exploring history, generative AI can create simulations or scenarios based on historical events, providing students with a more immersive and engaging way to learn about the past.
While generative AI offers numerous exciting opportunities for teaching and learning, it’s important to understand its limitations and employ it responsibly. The efficacy of using generative AI in education is when it’s used as a tool to supplement, rather than replace, traditional teaching methods. The future of education is likely to be a blend of human and AI-driven teaching methods, offering a more personalized, engaging, and effective learning experience.
Sample Prompts for Generative AI
- “Can you describe what a career in environmental science might look like?”
- “Develop a fifty-minute lesson plan for ninth graders on the basics of floral design. Include an interest approach, two different teaching techniques, and a check for understanding.”
Other Topics to Consider
- Copyright. Copyright is a form of intellectual property protection for authors of published and unpublished works. As an educator, you have a legal and ethical obligation to respect copyrighted material. You serve as a model for your students in doing so.
- Fair Use. Fair use is a legal doctrine and framework for making a determination on whether or not using certain material is a copyright infringement. Fair use is commonly cited for nonprofit educational purposes.
- Acceptable Use. Set of rules established by the owner of a computer or network that defines the guidelines as to how it should be used.
Learning Confirmation
- Define the following key terms.
- TPACK
- Digital divide
- Accessibility
- Learning management system
- Hybrid instruction
- Synchronous instruction
- Asynchronous instruction
- Develop a technology matrix with ten different tools/platforms. In your matrix, provide a brief description of the tool and identify how you would use it for content delivery, classroom management, or student assessment.
- Your travel budget has been limited for the second year in a row. How could you offer your learners an opportunity to visit a desired destination to extend the learning for a unit/lesson in your curriculum?
Applying the Content
You are teaching in a secondary school-based agricultural education (SBAE) program in an urban area in a state known for its production of eggs and poultry. As you plan an animal sciences unit related to poultry production, you begin to outline a field trip to a farm where chickens are raised. This facility hatches chicks and raises them to a certain size before they are sent to a different location to finish growing.
You soon realize that the field trip may not be possible. Your state has strict biosecurity guidelines, or procedures required to prevent diseases from being introduced to and spread within flocks, for poultry producers, including protocols that require visitors to shower before and after they visit a farm. In addition, you realize that your program is located several hours from the farm you want to visit, so you would have to arrange for learners to miss most of a day of instruction.
As you ponder what to do, you consider creating some type of technology-enhanced lesson. You know that agricultural organizations in your state have partnered with producers to plan such experiences. Learners in your program are given tablets to use for instruction and assignments, and your space is equipped with a classroom webcam and a projector.
You find the contact information for the farm’s manager and begin to brainstorm.
The above scenario sets the scene for planning a virtual experience for the learners in your program. Using the information provided, create a lesson plan and a checklist (refer back to the Example Checklist for Creating Virtual Tours) for the experience.
As you plan, answer the following questions:
- What platform and format will you choose? How will your lesson plan shape or be shaped by the delivery method?
- What opportunities does the virtual experience offer that learners may not get from an in-person visit?
- What potential barriers (technological, logistic, or pedagogical) may you encounter as you implement a virtual experience?
Reflective Questions
- What teaching techniques might lend themselves to teaching agriscience? Which ones might be less applicable?
- What technology do you expect to have access to in your future learning environment?
- What resources would help you more effectively integrate technology into your lessons/curriculum?
- How might your use of technology adapt to different groups of learners?
Glossary of Terms
- TPACK: Technological Pedagogical Content Knowledge; a framework used in education to describe the knowledge that teachers need to effectively integrate technology into their teaching practices which combines knowledge of subject matter, pedagogy, and technology to create effective and meaningful learning experiences for students
- digital divide: The gap between individuals, communities, and countries in terms of access to and use of information and communication technologies (ICTs); can be influenced by factors such as socioeconomic d, geographic location, age, and gender
- accessibility: The design and delivery of content, products, and services in a way that ensures they can be accessed and used by people with a wide range of abilities and disabilities; includes designing websites, software, and other technologies that are compatible with assistive technologies, such as screen readers, and creating content that is easy to understand for people with cognitive or visual impairments
- assistive technology: (AT); any device or software that helps people with disabilities or impairments to perform tasks that would otherwise be difficult or impossible; can include anything from simple aids such as magnifying glasses to complex communication devices and prosthetics
- learning management system: (LMS); a software application that provides a platform for managing and delivering online learning materials and courses; typically offer features such as course creation, assessment and grading tools, and communication tools to support online learning
- hybrid instruction: A teaching model that combines both in-person and online instruction; students may attend some classes in person and others online, or a single class may have some students attending in person while others attend remotely
- synchronous instruction: Teaching and learning that occurs in real-time, with both the instructor and students participating at the same time; can include activities such as video conferencing, live streaming, or chat rooms
- asynchronous instruction: Teaching and learning that occurs at different times, with students working on their own schedules rather than in real-time; can include activities such as recorded lectures, discussion, or online assignments
- virtual field trip: A digital experience that allows students to explore a location or environment remotely, using technology such as 360-degree videos or virtual reality (VR) simulations can provide students with immersive and engaging learning experiences that may not be possible to achieve in person
- immersive technology: Any technology that creates a simulated or augmented environment that surrounds the user, creating a sense of presence and immersion; can include technologies such as virtual reality, augmented reality, and mixed reality
- virtual reality: (VR); A technology that creates a completely immersive and interactive digital environment, often using a headset or other equipment to create a sense of presence and immersion; can be used for a wide range of applications, including entertainment, education, and training
- augmented reality: (AR); a technology that overlays digital information or graphics onto the real world, often using a mobile device or other display technology; can be used for a wide range of applications, including education, marketing, and entertainment
Figure Descriptions
Figure 8.1: Three circle Venn diagram. Circle 1 represents technological knowledge (TK). Circle 2 represents content knowledge (CK). Circle 3 represents pedagogical knowledge (PK). Between TK and PK is technological pedagogical knowledge (TPK). Between TK and CK is technological content knowledge (TCK). Between PK and CK is pedagogical content knowledge (PCK). All three circles meet in the center to create Technological pedagogical content knowledge (TPACK). Jump to figure 8.1.
Figure 8.2: Three images. Tethered VR headset has a cord connecting an electronic headpiece that covers the person’s eyes to other hardware. Standalone VR headset looks identical to the tethered VR headset, except it is cordless. Mobile VR headset is a headpiece that is made out of cardboard, covers the eyes, and has a place in front of the eyes to put a mobile phone. Jump to figure 8.2.
Figure References
Figure 8.1: Technological pedagogical content knowledge (TPACK). Kindred Grey. 2023. Adapted and reproduced by permission of the publisher, © 2012 by tpack.org.
Figure 8.2: Tethered, standalone, and mobile VR headsets. Kindred Grey. 2023. CC BY 4.0. Includes Image by Karolina Grabowska from Pexels (https://www.pexels.com/photo/a-woman-wearing-a-virtual-reality-headset-while-holding-controllers-5207607/; Pexels license; 2020), image by fauxels from Pexels (https://www.pexels.com/photo/man-using-vr-goggles-3183187/; Pexels license; 2019), and image by othree from Flickr (https://flic.kr/p/o83BwL; CC BY 2.0; 2014).
References
Edutechnica (2020, February 2). LMS Data – Spring 2020 updates. Edutechnica. https://edutechnica.com/2020/02/02/lms-data-spring-2020-updates/
Fenton, M. (2017, October). Gamification and digital technologies for effective mathematics teaching. Paper presented at uLearn17 Conference, Hamilton, New Zealand.
Koehler, M. (2012, September 24). TPACK explained. TPACK.org. https://matt-koehler.com/tpack2/tpack-explained/
Koehler, M., & Mishra, P. (2009). What is technological pedagogical content knowledge (TPACK)?. Contemporary Issues in Technology and Teacher Education, 9(1), 60–70. https://citejournal.org/volume-9/issue-1-09/general/what-is-technological-pedagogicalcontent-knowledge
Ninoriya, S., Chawan, P., & Meshram, B. (2011). CMS, LMS and LCMS For eLearning. International Journal of Computer Science, 8(2), 1694-814.
Singer, N. (2017, March 2). Apple’s devices lose luster in American classrooms. New York Times.
Whiteside, A. L., Garrett Dikkers, A., & Lewis, S. (2017). Overcoming isolation online: Strategies to enhance social presence in practice. In A. L. Whiteside, A. Garrett Dikkers, & K. Swan (Eds.) Social presence in online learning: Multiple perspectives on research and practice (pp. 180–187). Stylus, LLC.
